User Management
1.Overview
DM Hub supports multiple users to use same tenant together. The administrator can set different roles for different people, and each role can set different function permissions and data permissions. The system, by defaults, will set the first user to enter the system as tenant administrator. This administrator can invite new users and create new roles. DM Hub also supports SSO single sign-on and other functions.
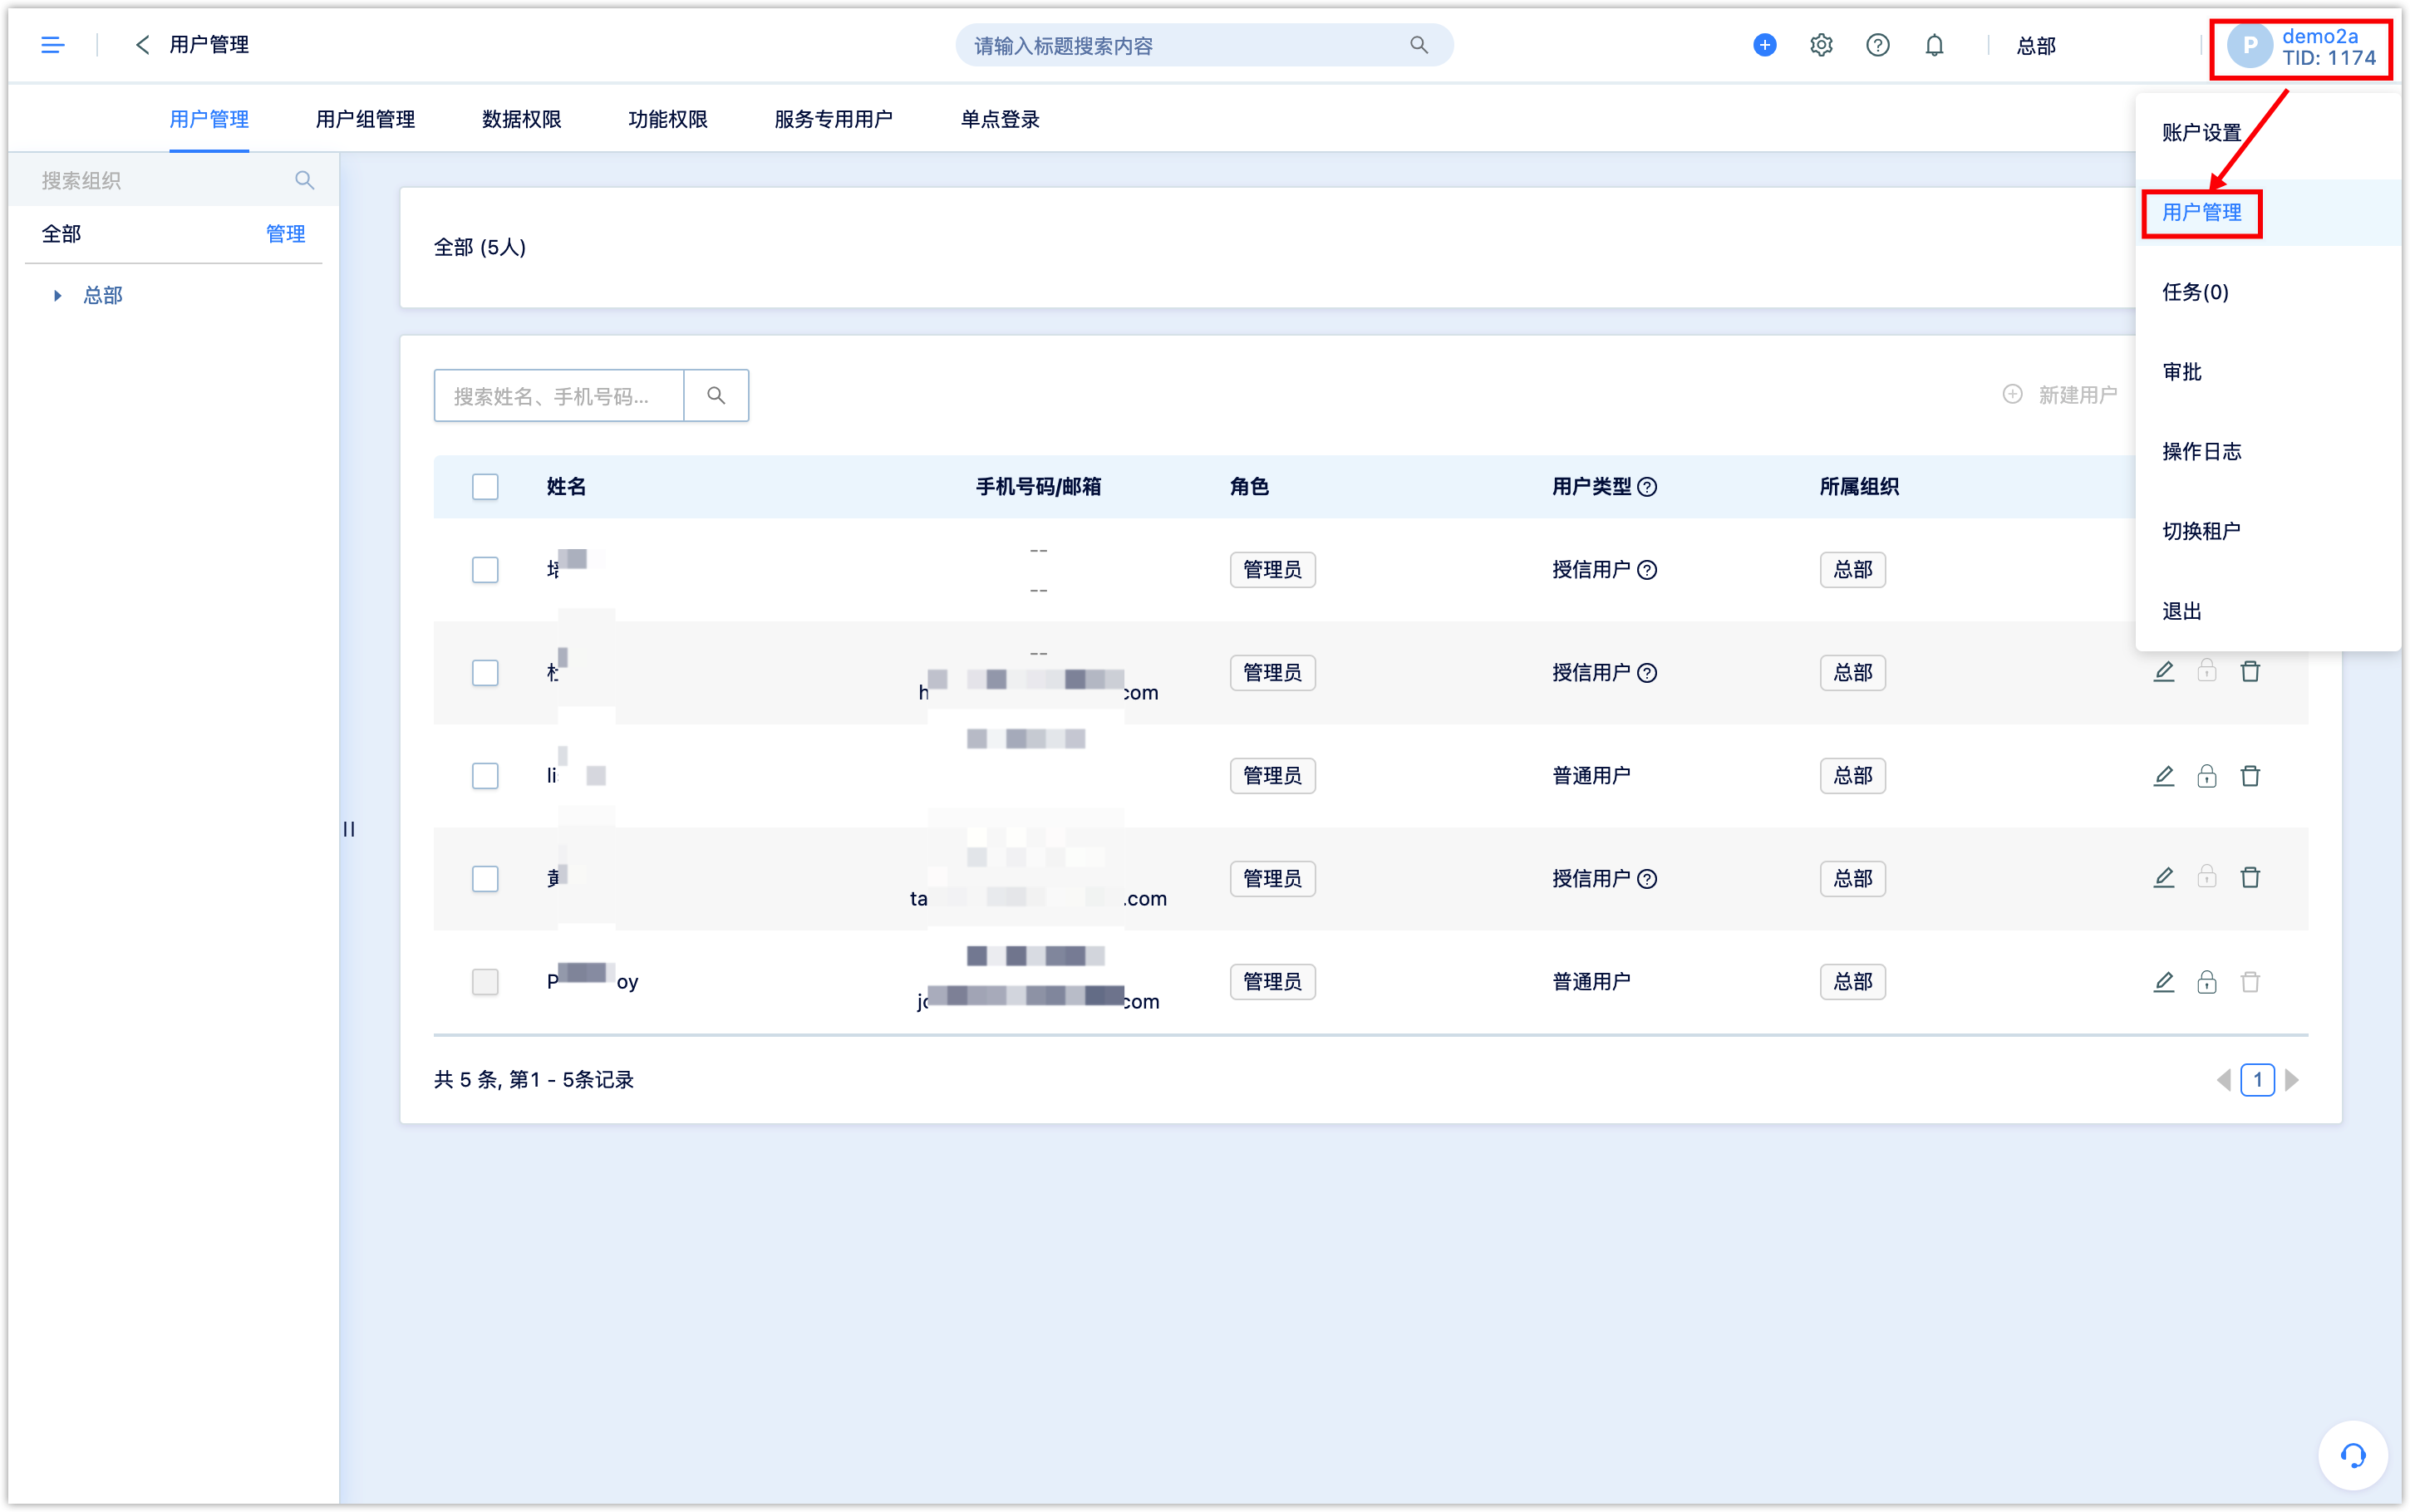
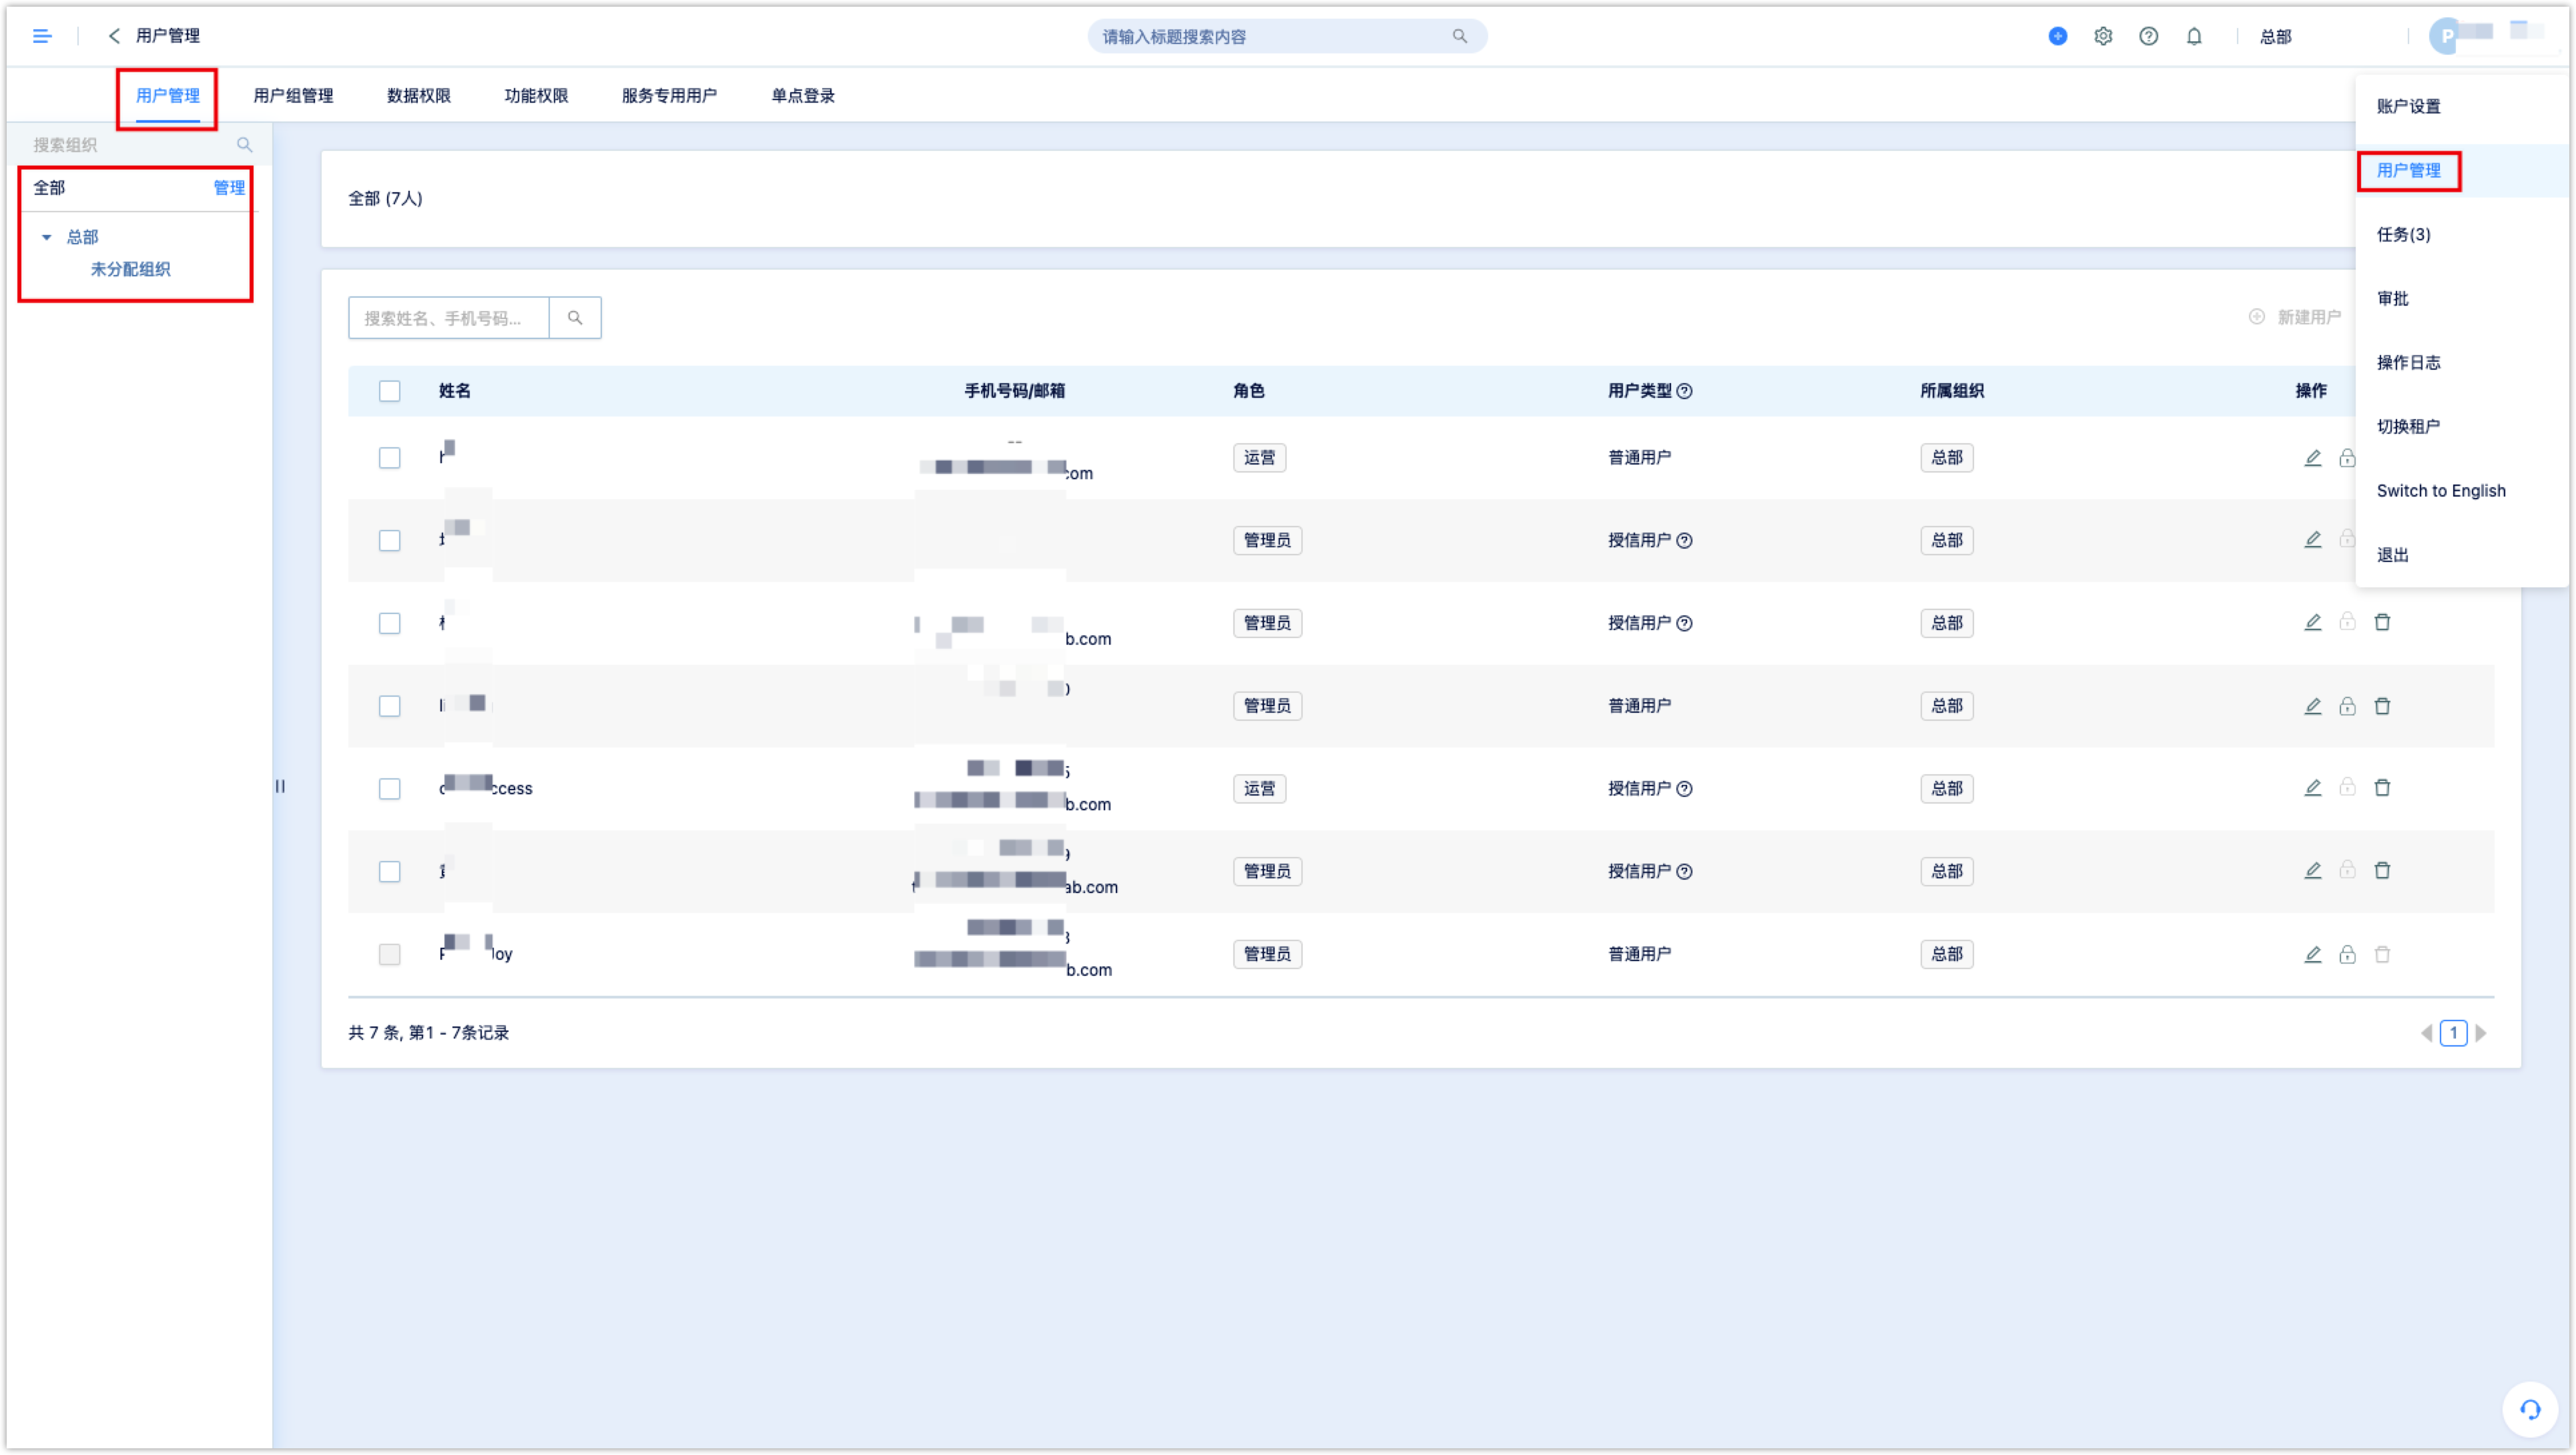
Click [User Management] in the upper right corner of the system to enter the interface.
2.User Management
In user management, the administrator can perform operations such as inviting users, deleting users, and modifying user permissions.
Please note: When a new tenant is opened, the administrator needs to set the function permissions and data permissions before inviting new users.
2.1User Type
There are 3 types of users:
Ordinary user: the user who logs in with the account password. Users created by this tenant, this kind of user does not have any DM Hub account before being created by this tenant
SSO: Single sign-on user
Credited user: The user is created in another tenant first, and then is allowed to log in to the current tenant after being invited and credited
2.2Creating New User
New users can be invited through email and mobile phone number. If the user already has a DM Hub account before, the user will become a trusted user of this tenant after being invited and can log in to this tenant.
2.2.1Email Invitation
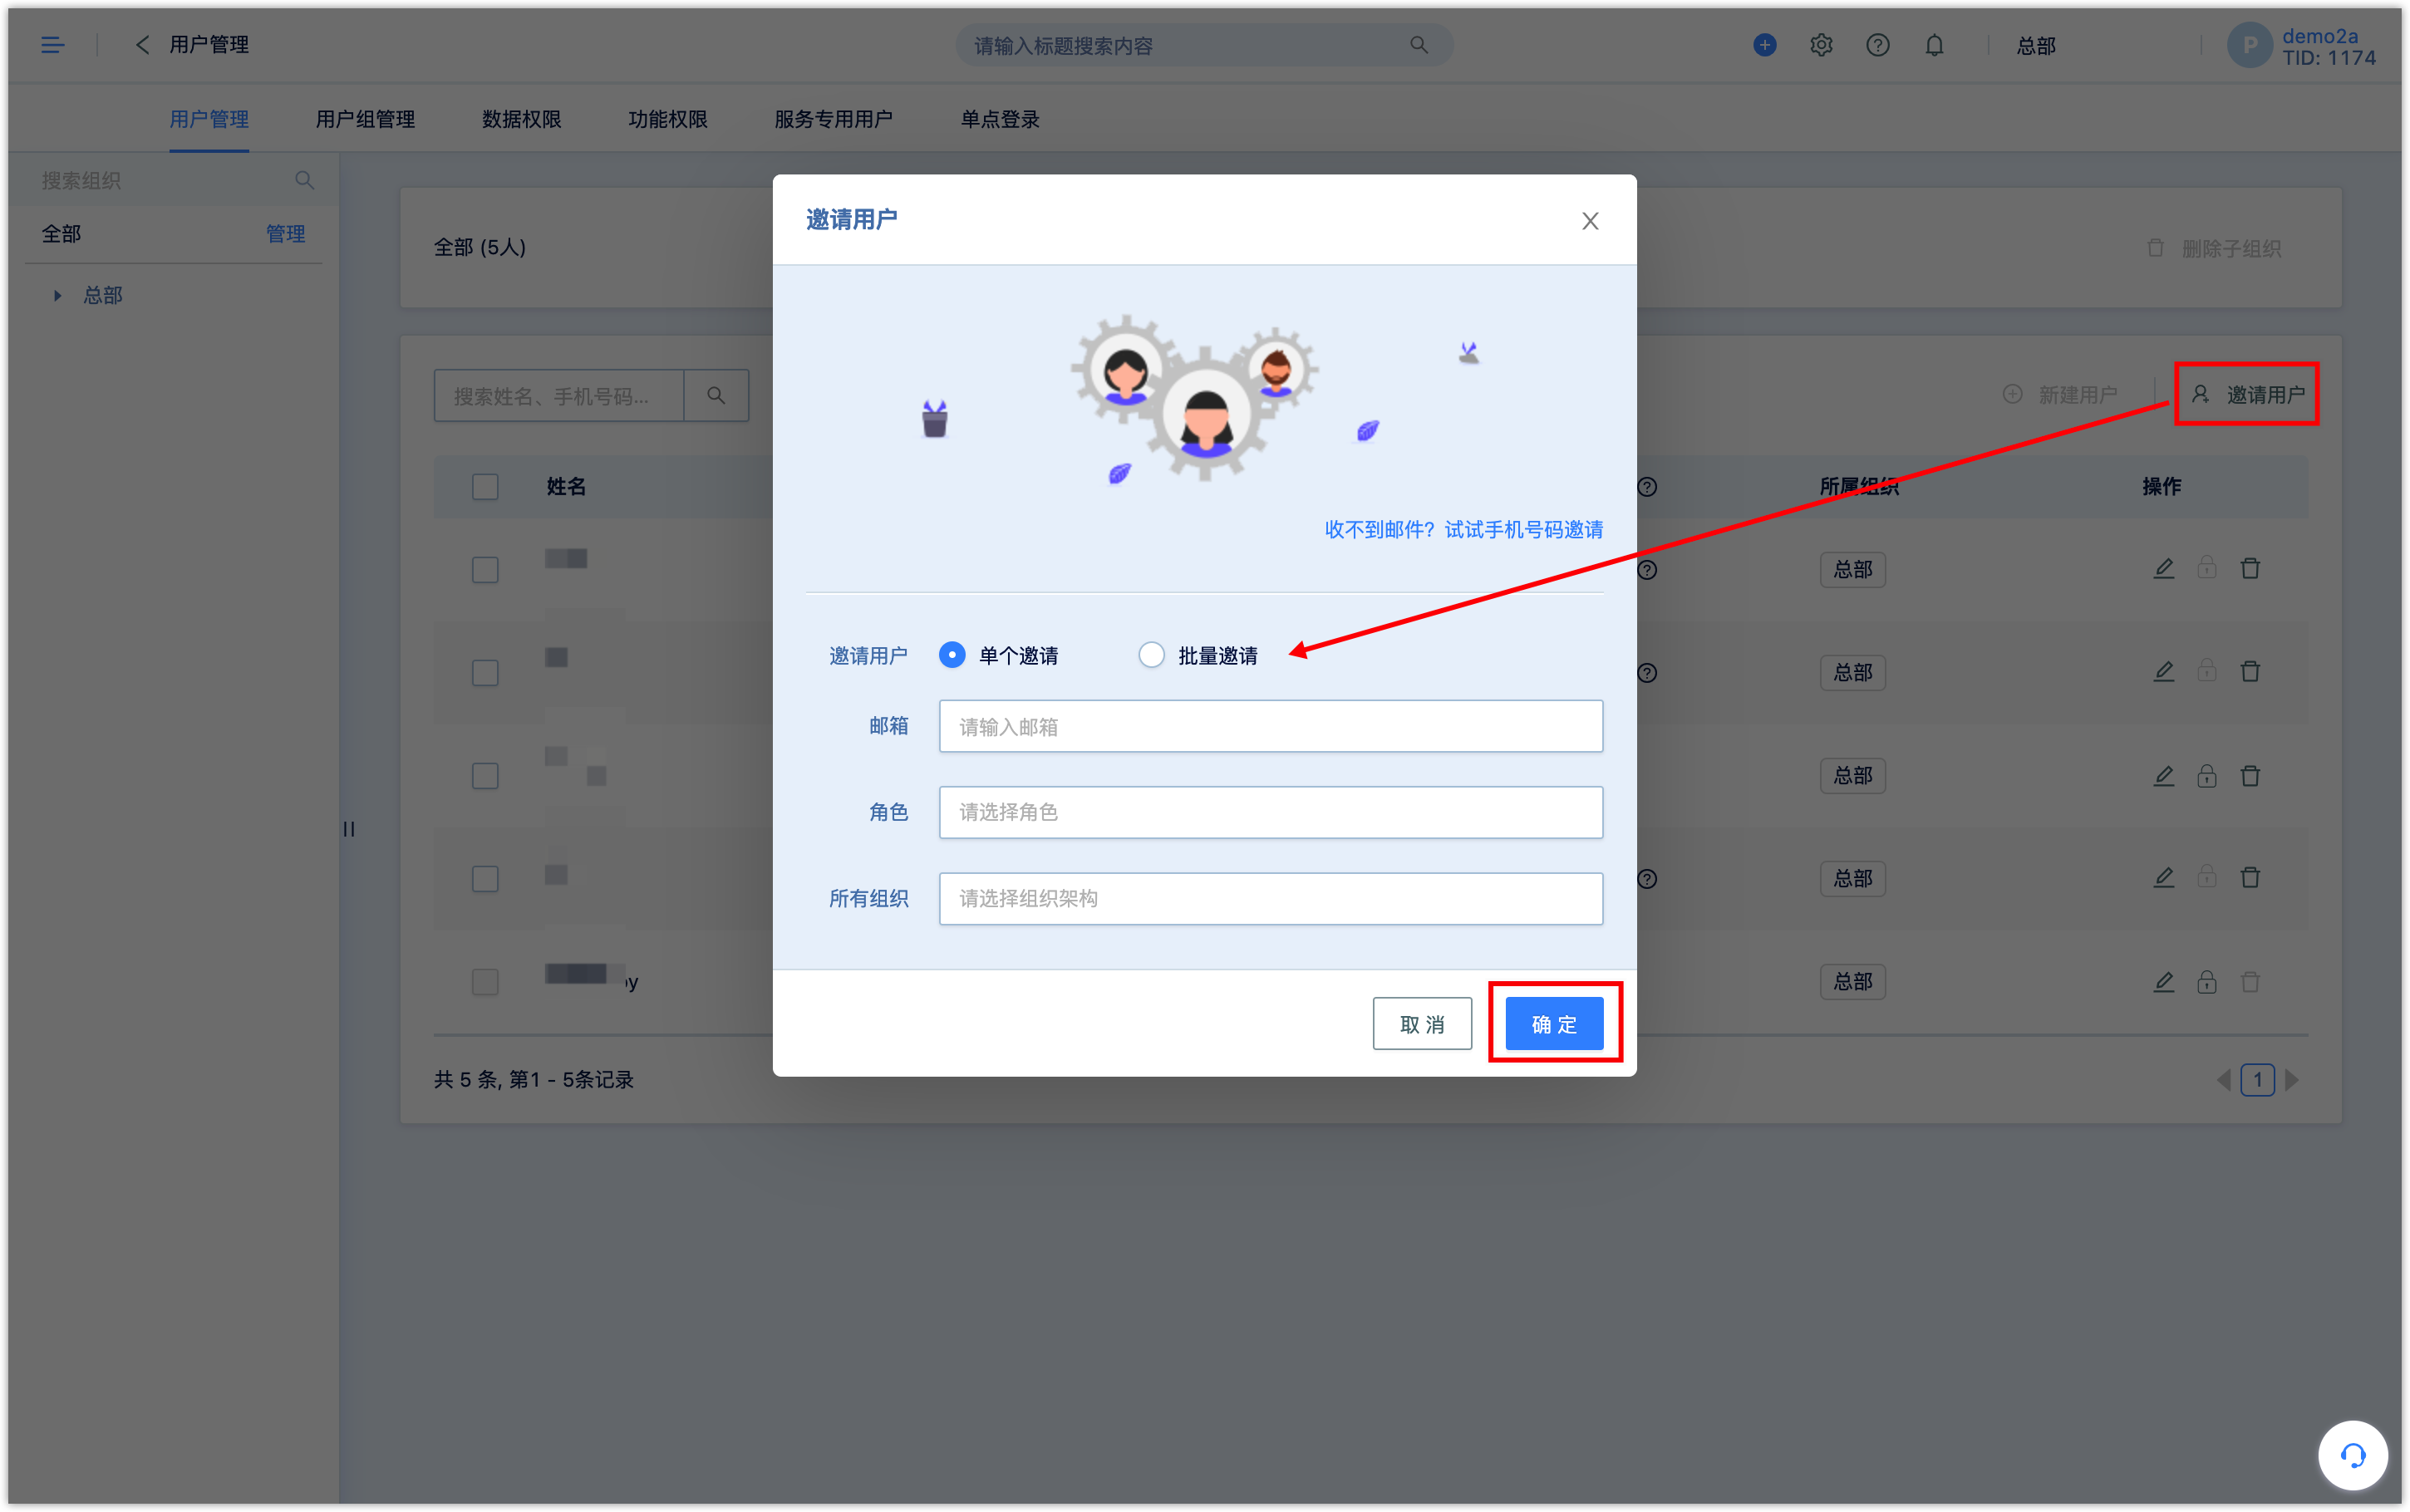
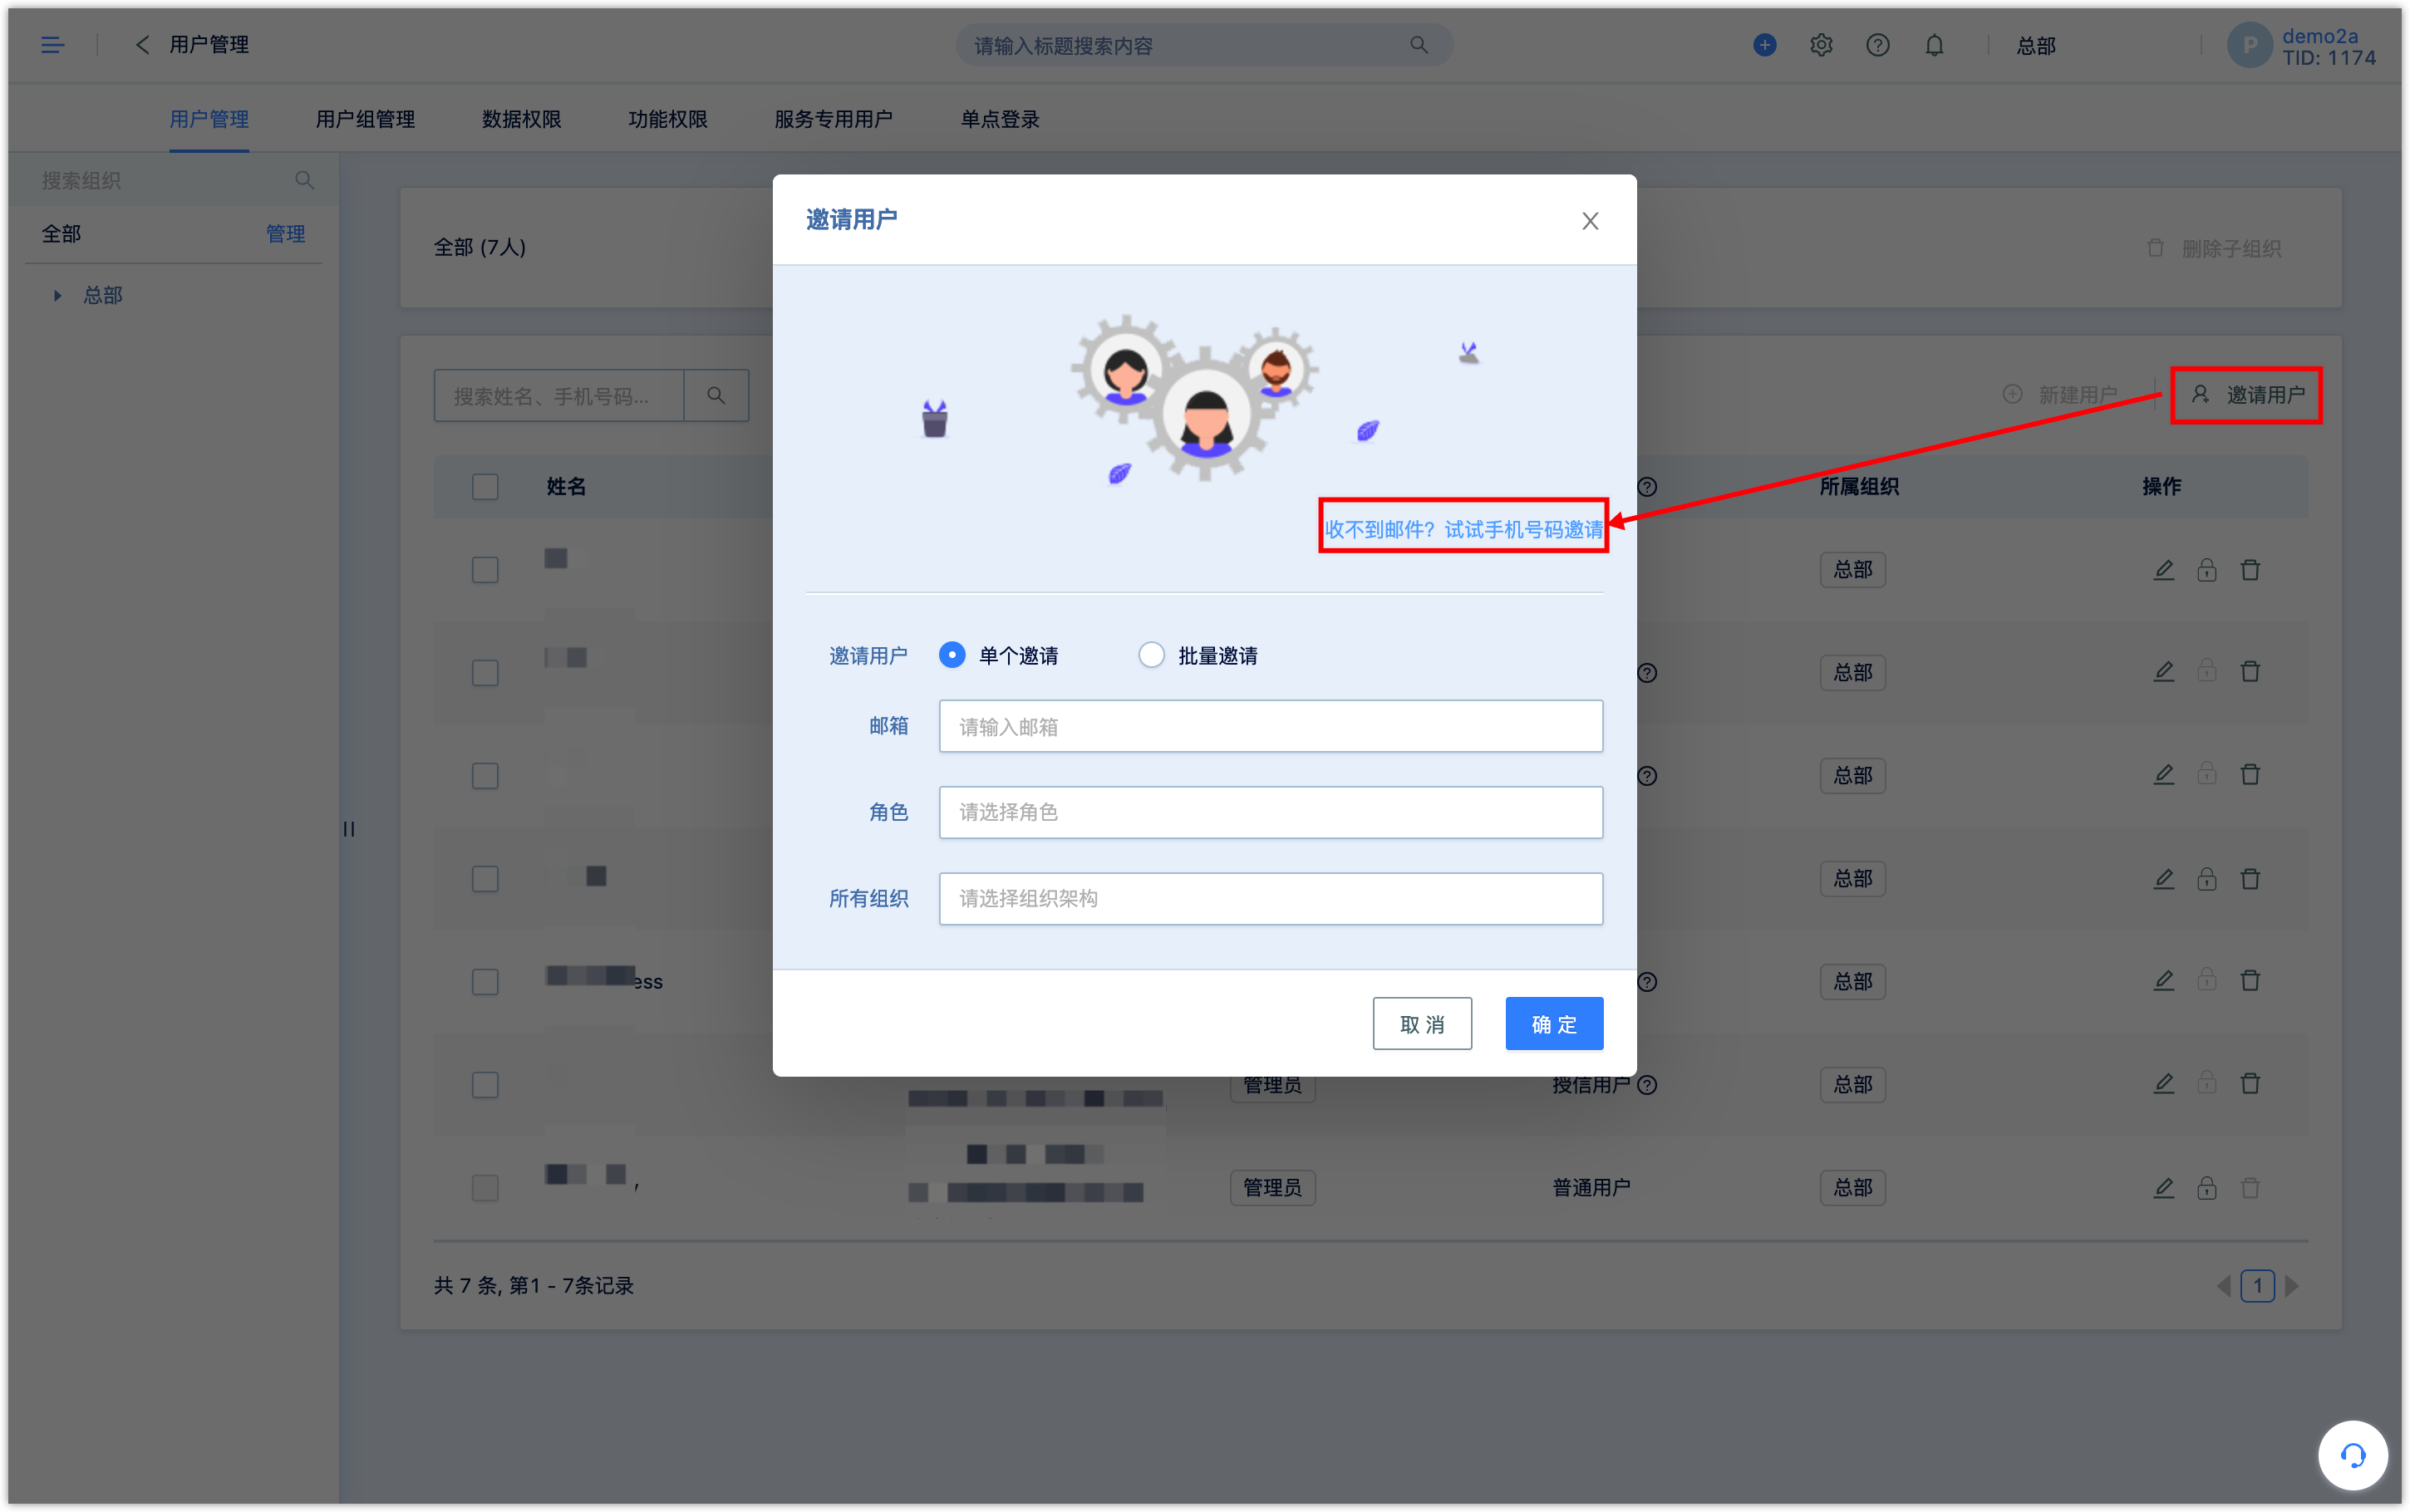
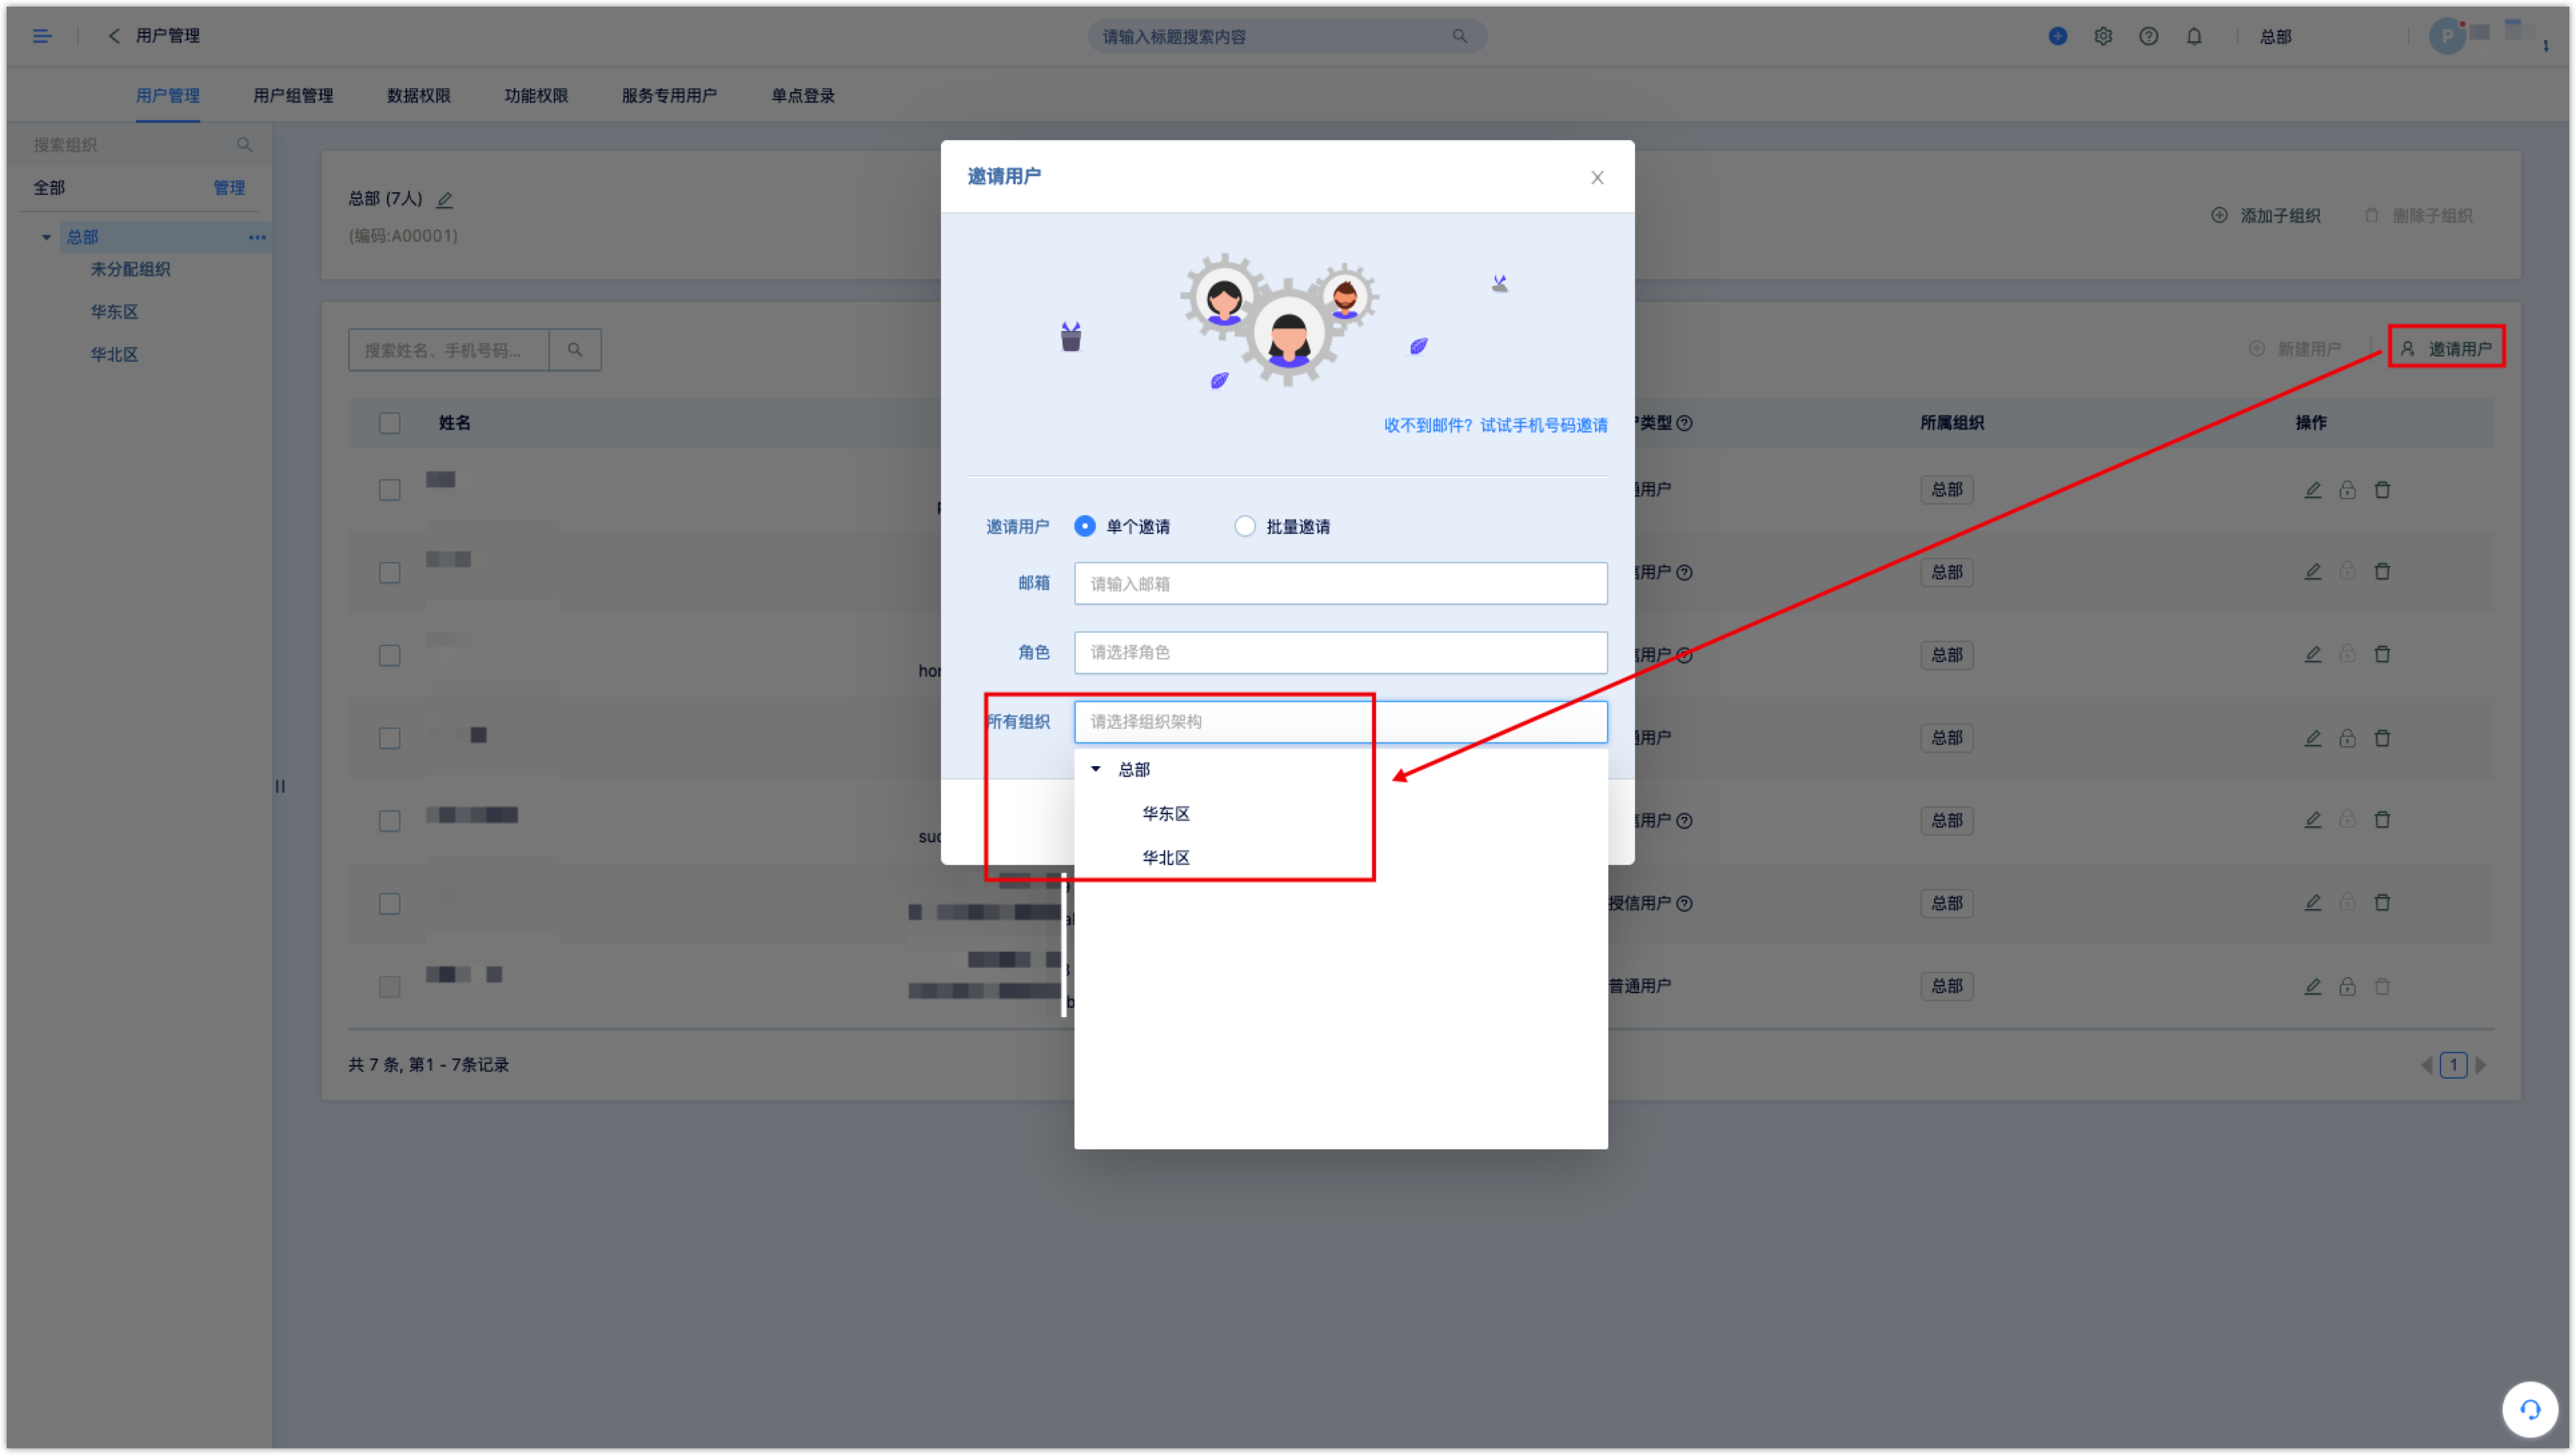
Click [Invite User], select [Single Invitation] or [Batch Invitation]. For batch invitation, the invited users are all in the same role and organization. Fill in the email address of the invitee, assign roles and organizations, and click [OK].
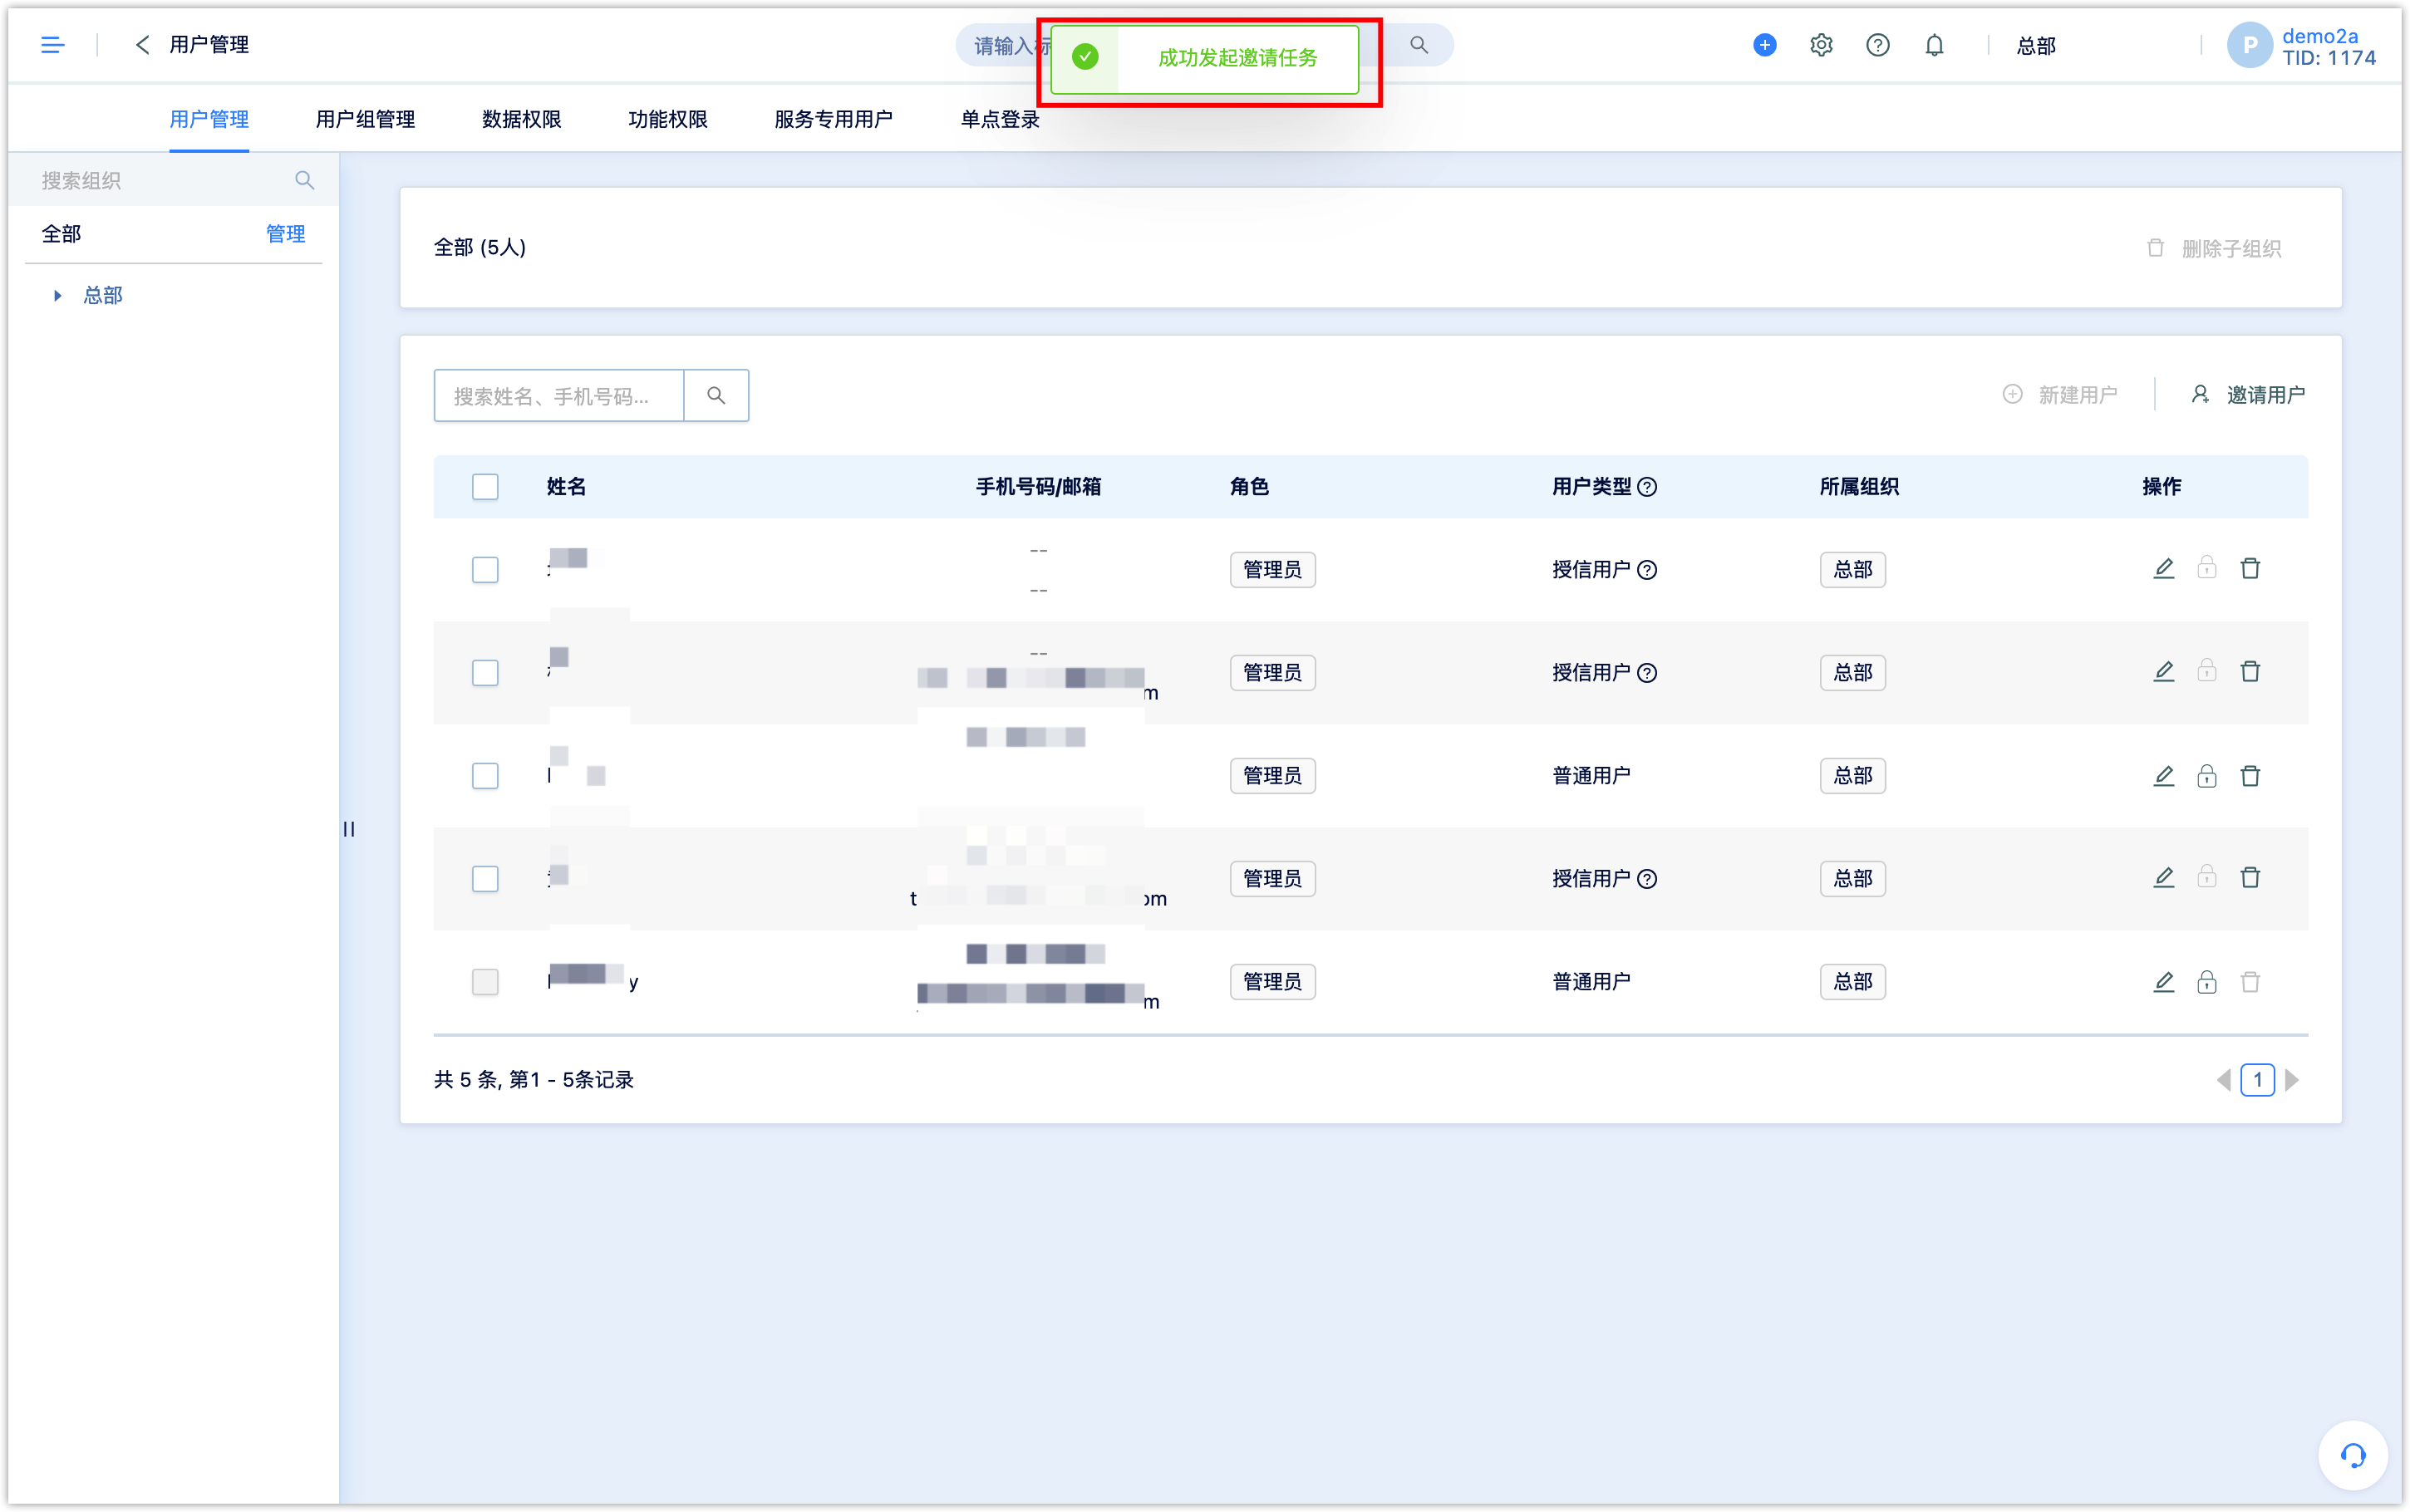
The system displays [Successfully initiated the invitation task] to indicate that the invitation is successful, and the system will send an invitation email to the invitee.
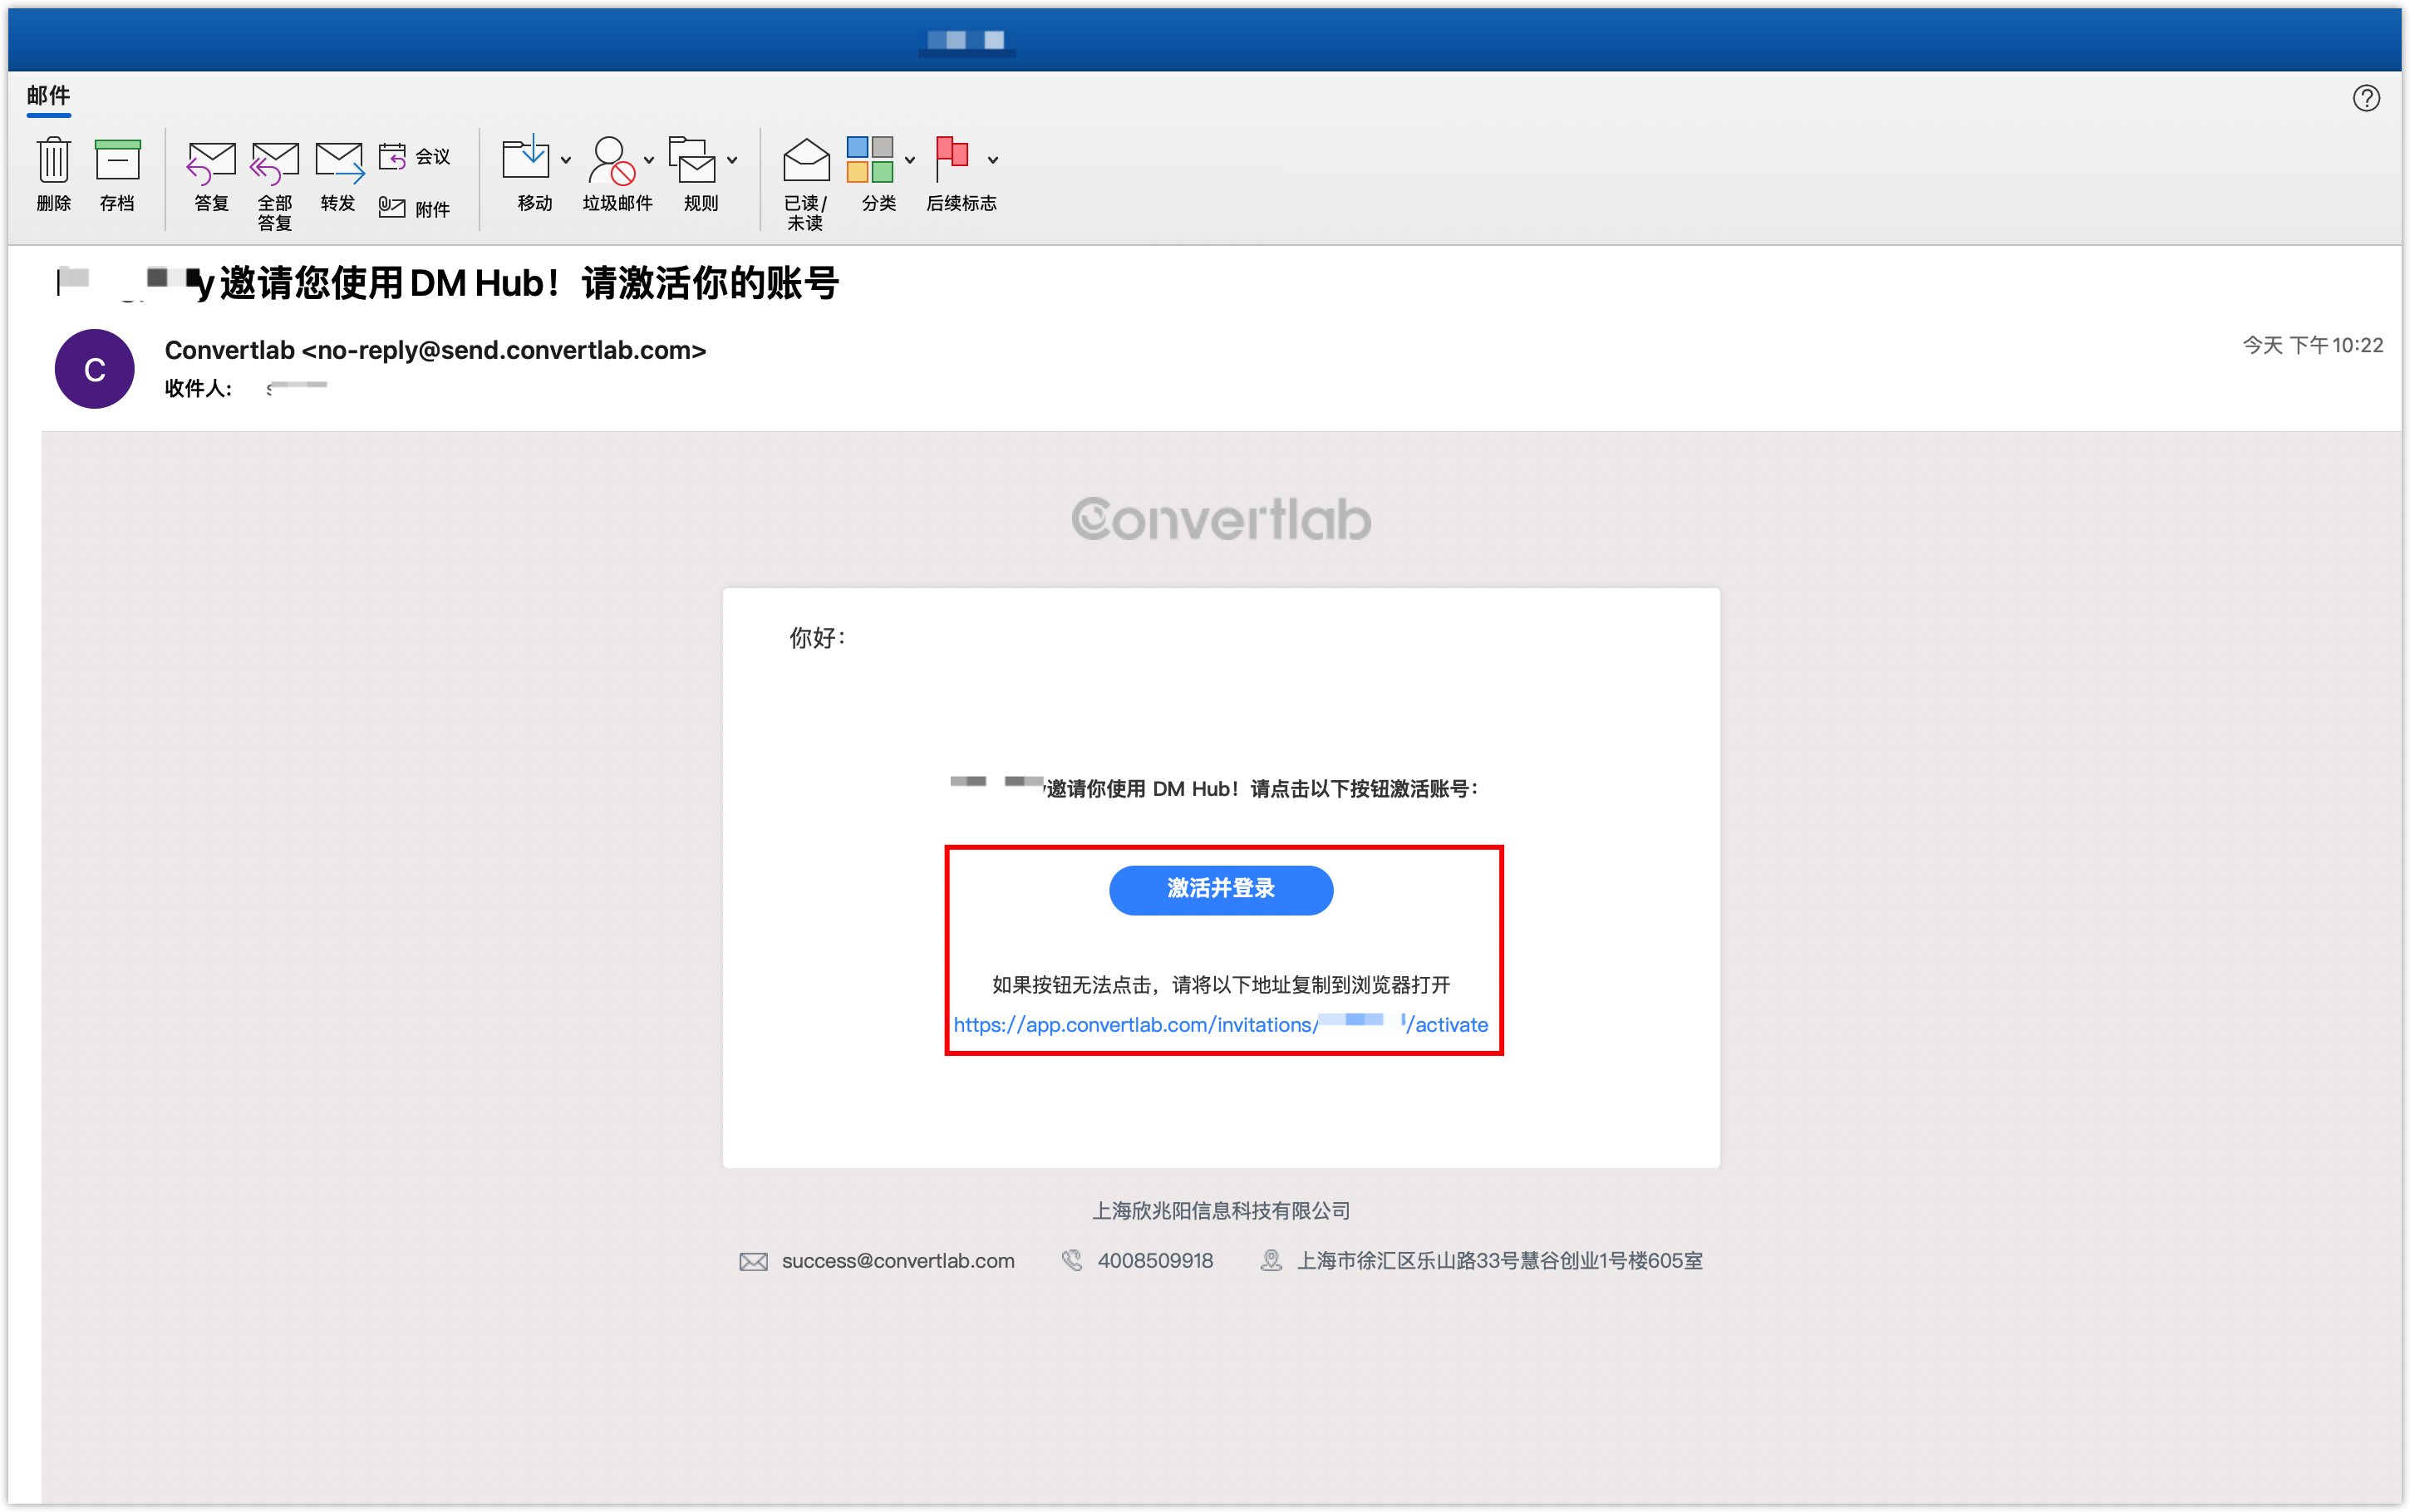
The invitee will receive the invitation email, as shown in the figure below.
Please note that the activation link is valid for 1 day, and the invitee needs to activate the account as soon as possible. If the activation link expired, the user needs to be invited again.
If the invitee does not receive the email, try following:
1) Check if there is an invitation email in the junk mail
2) If there is no mail in the junk mail, the invitee can add send.convertlab.com to the mailbox whitelist (the failure to receive the mail may be caused by the mailbox blocking policy), and then the administrator should invite again
3) Use mobile phone number to invite
Click [Activate and Login] to activate the account, meanwhile, the activation link will become invalid.
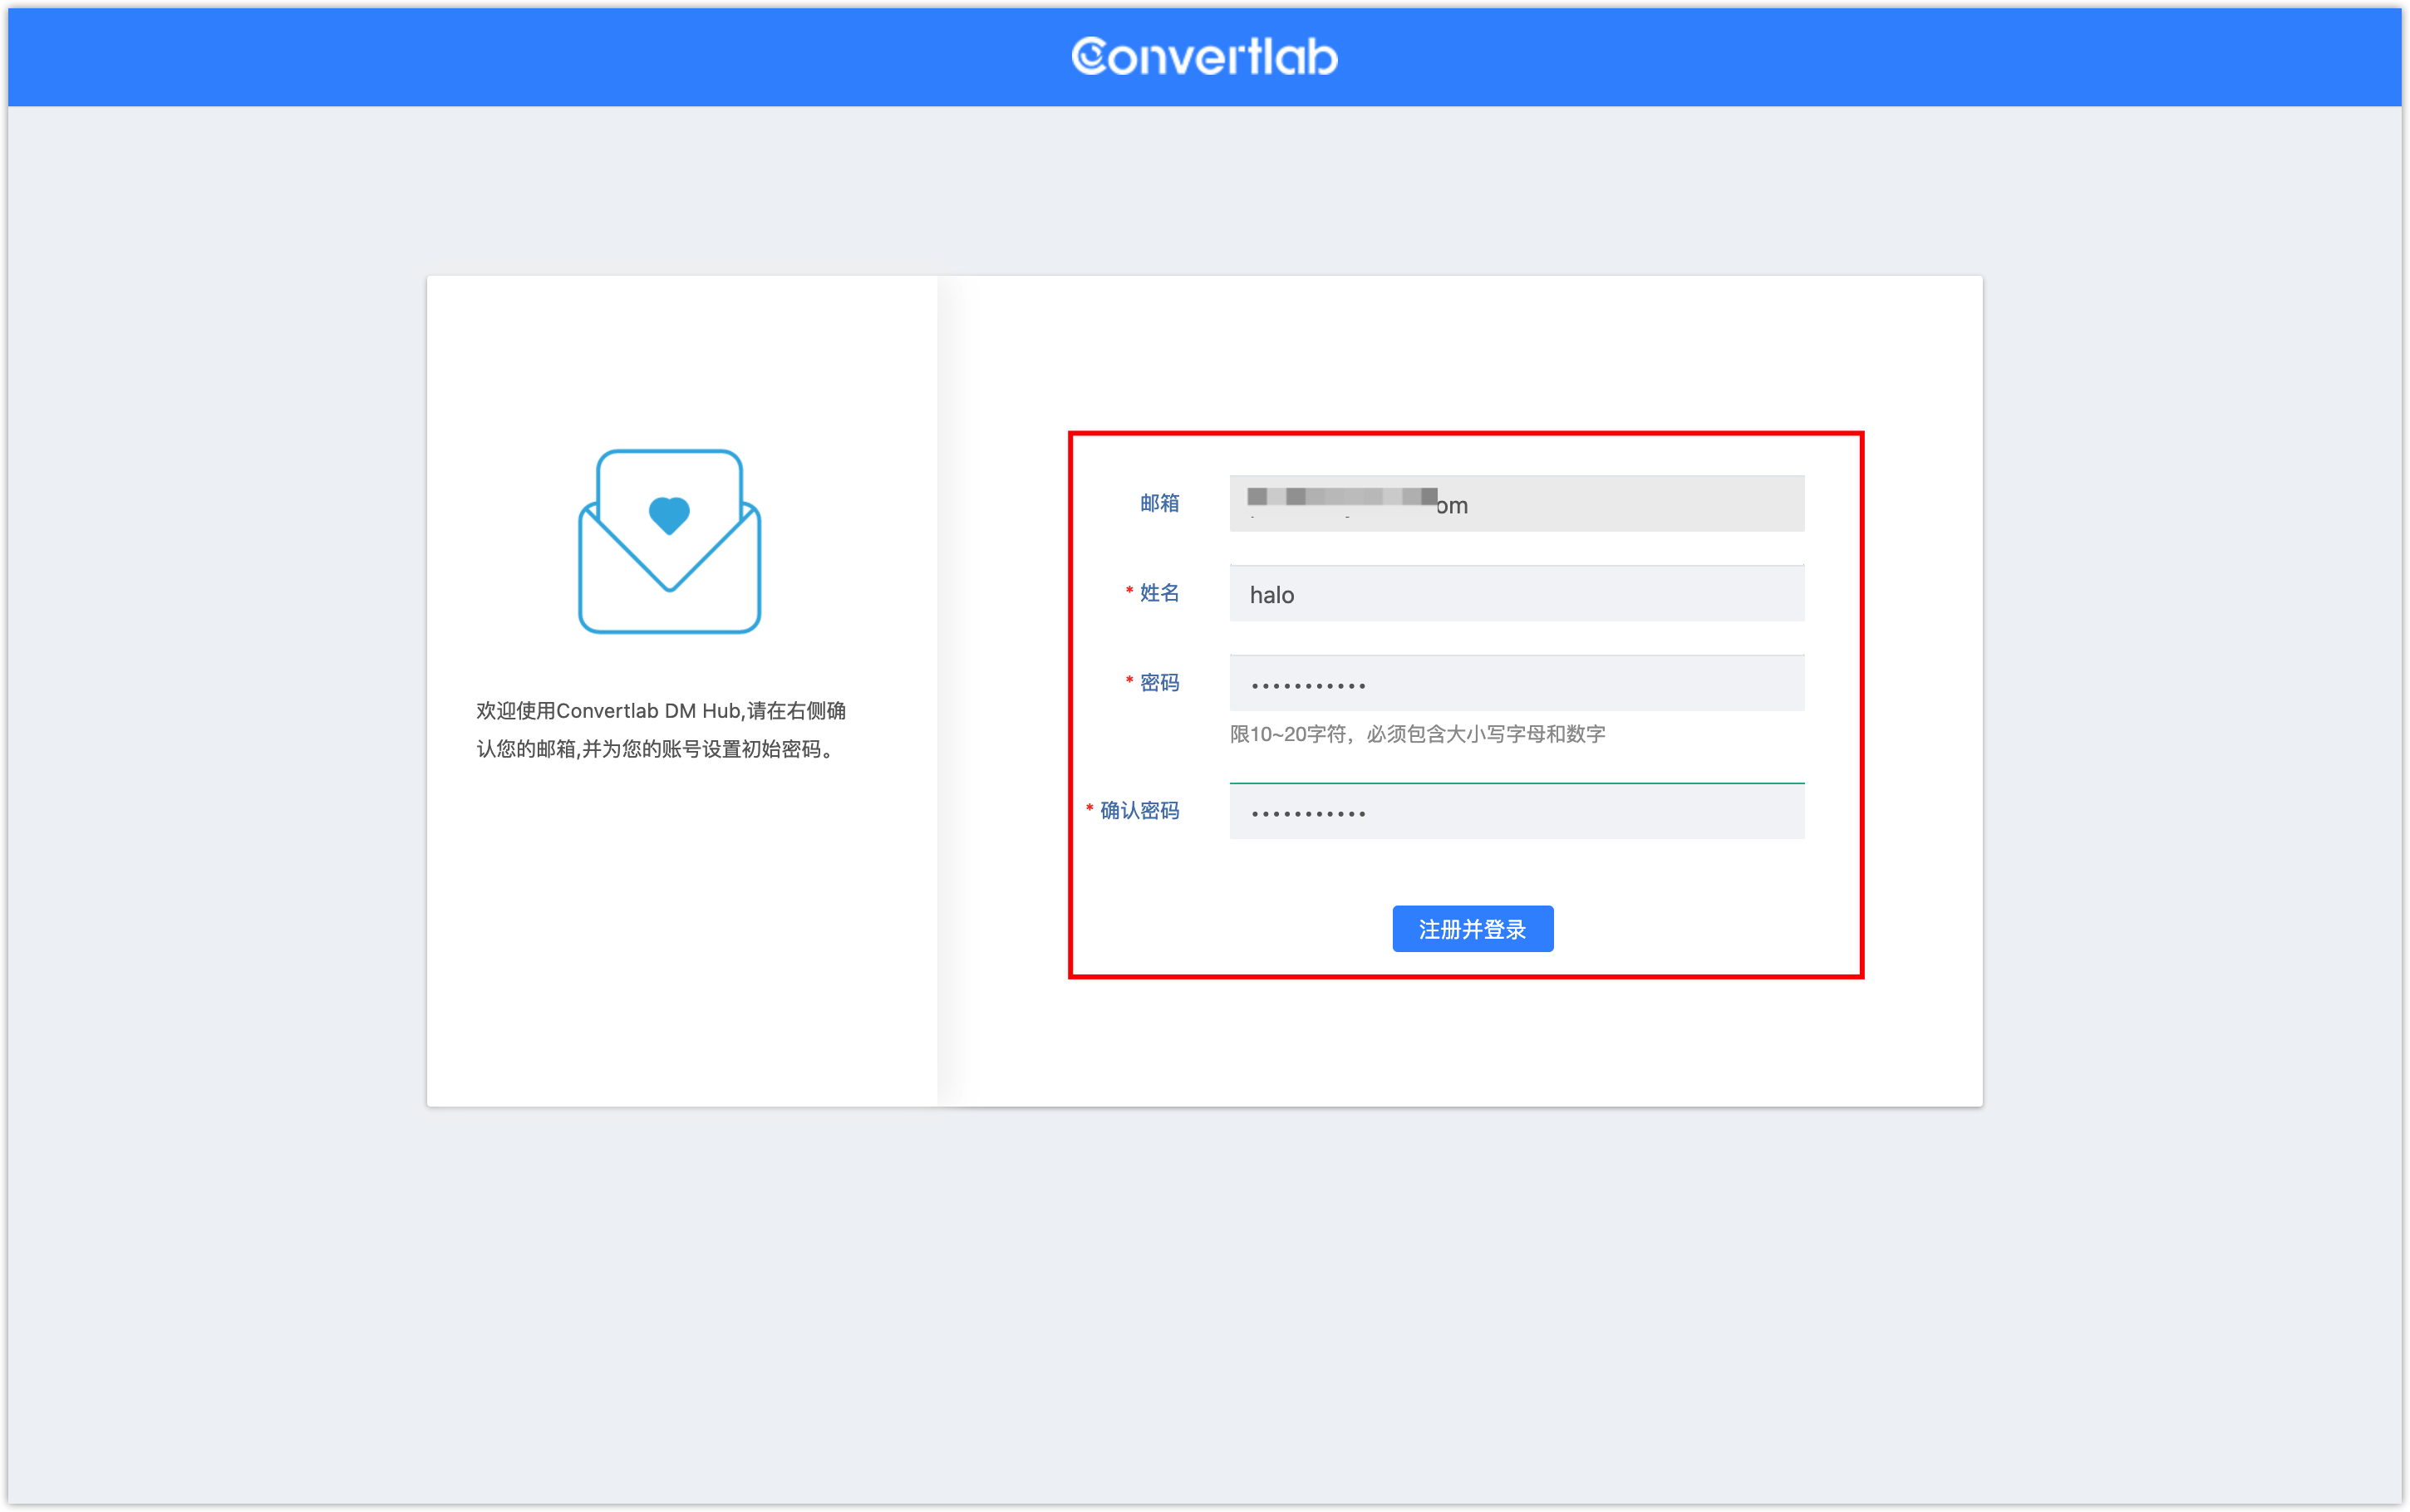
If the invitee is created in the DM Hub for the first time, the invitee will enter the registration page, set the name and password on the registration page, click [Register and Login] to complete the settings, and the invitee will be redirected to the system.
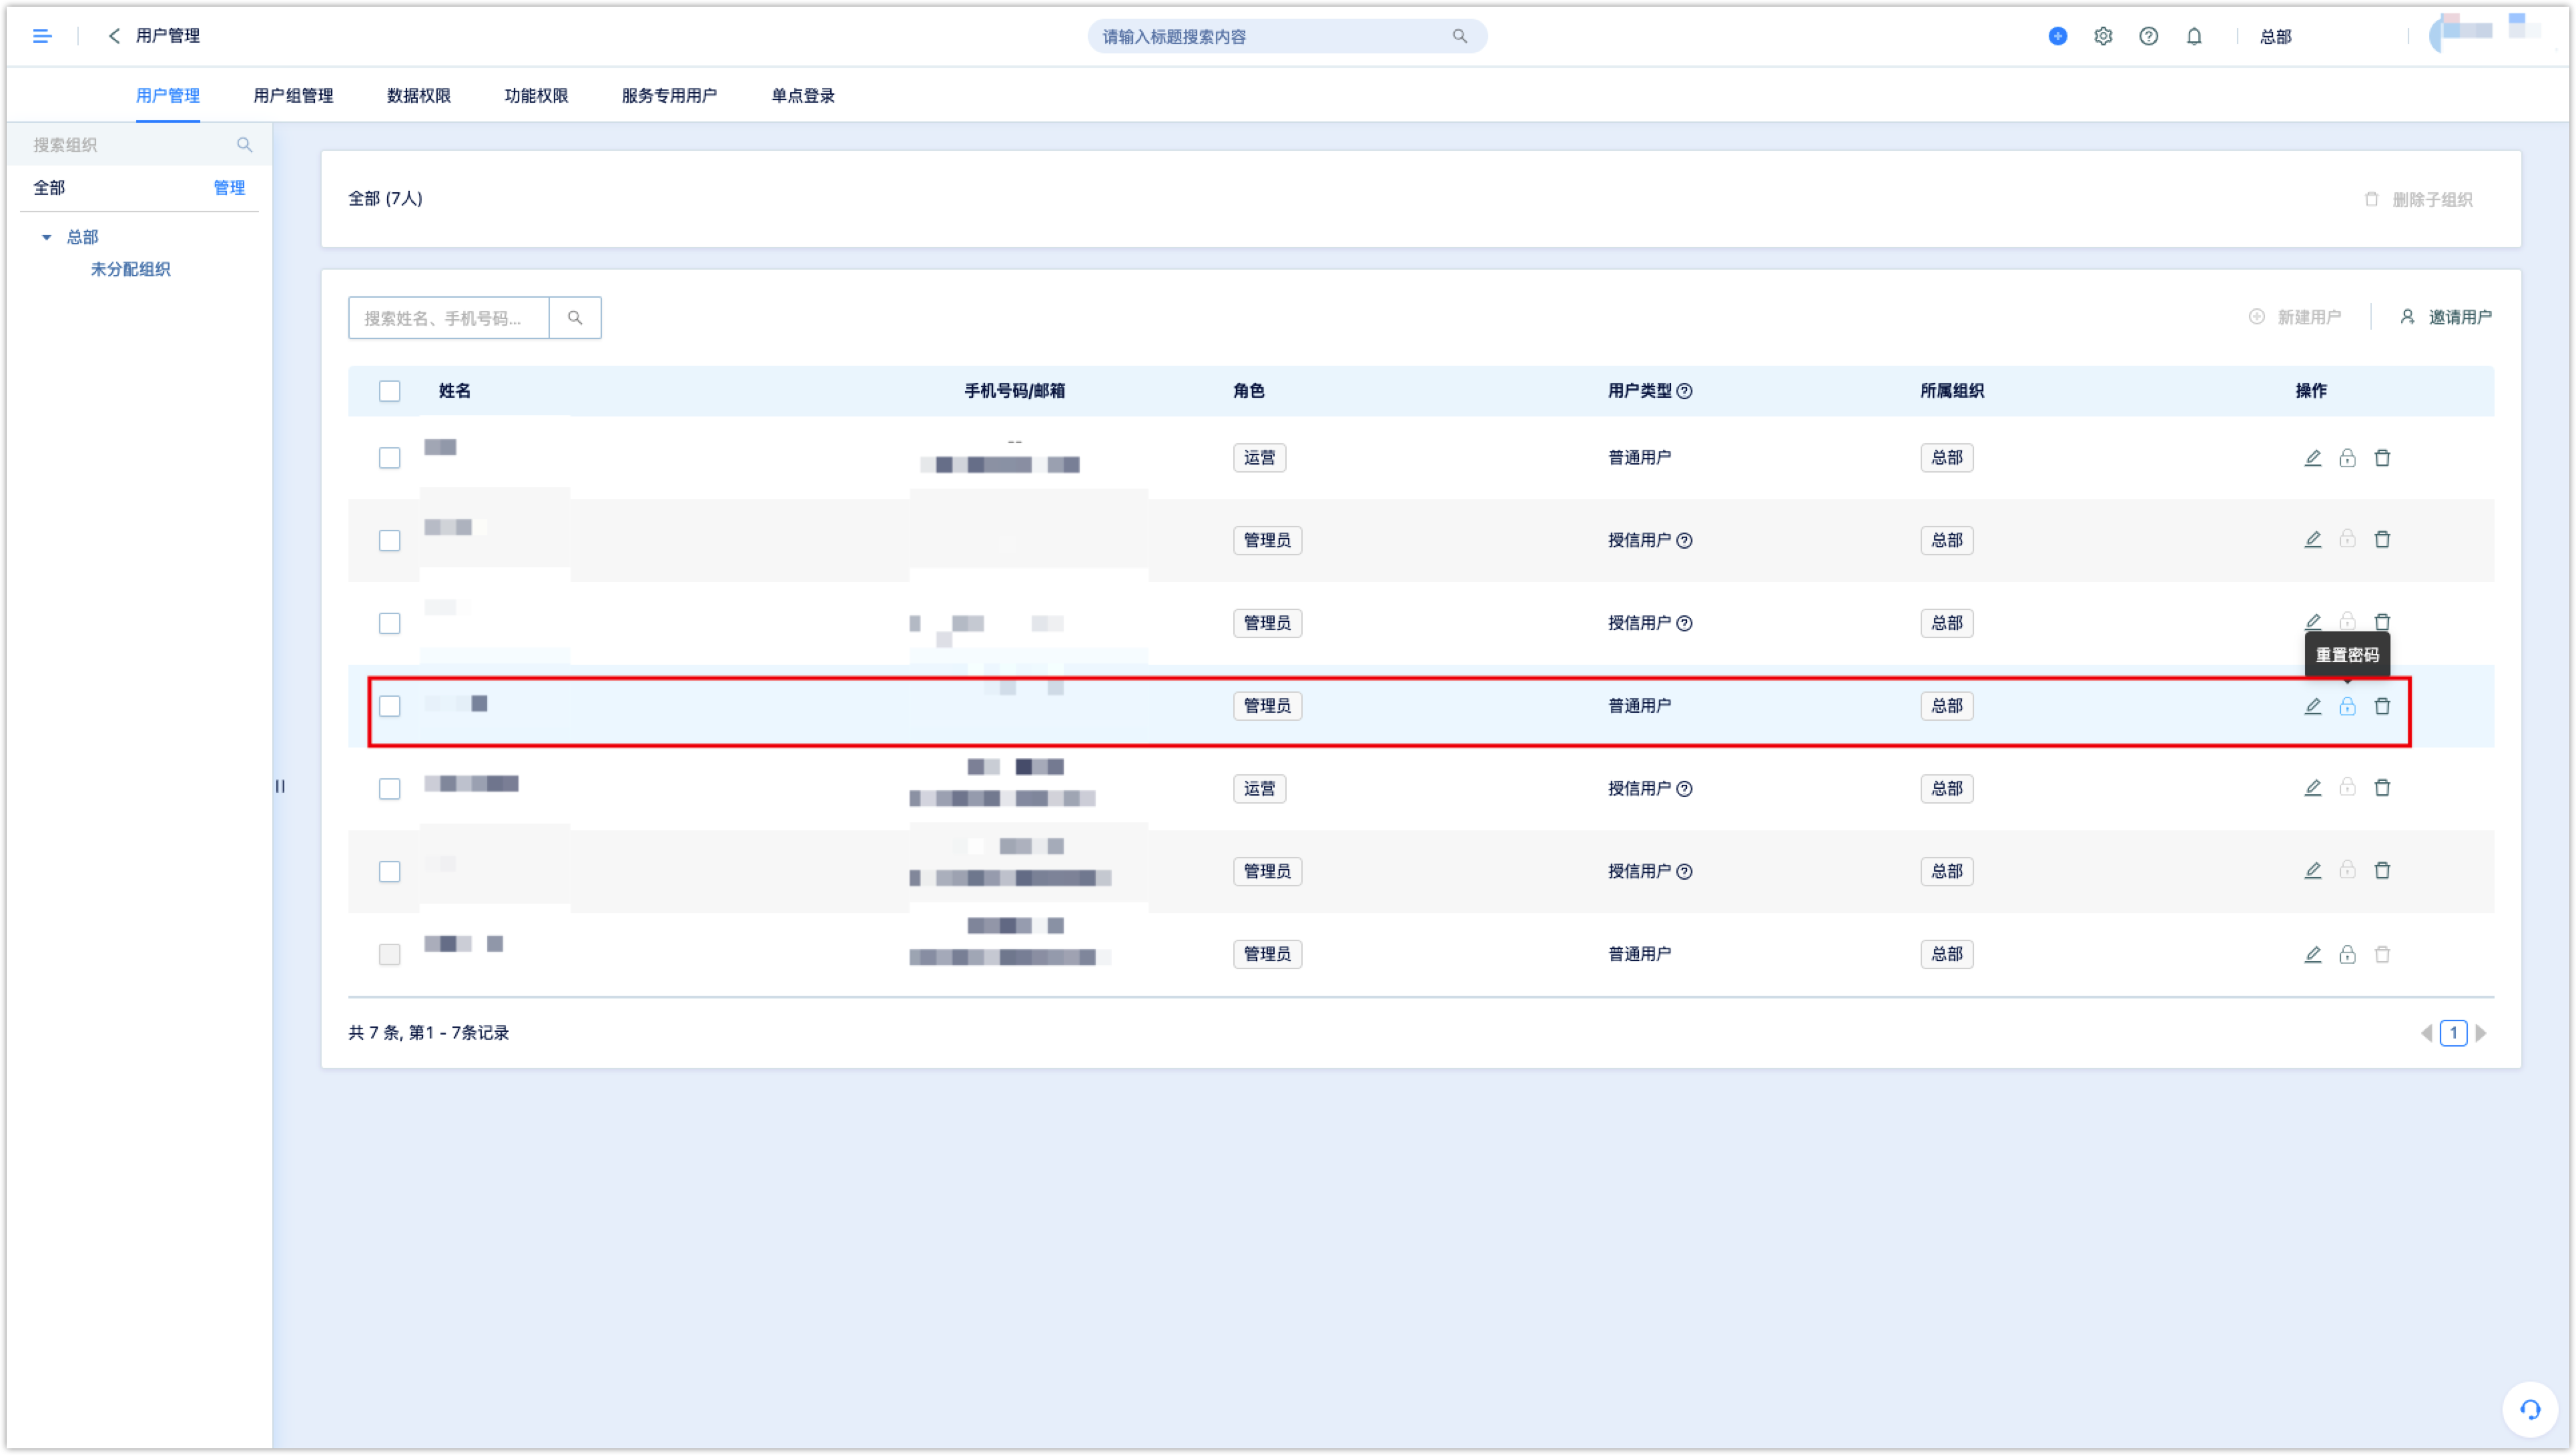
If invitee clicked the activation link, but have not completed the registration, the invitee will not be able to log in to the system, the administrator can go to the user management interface to find the user and reset the password for the user.
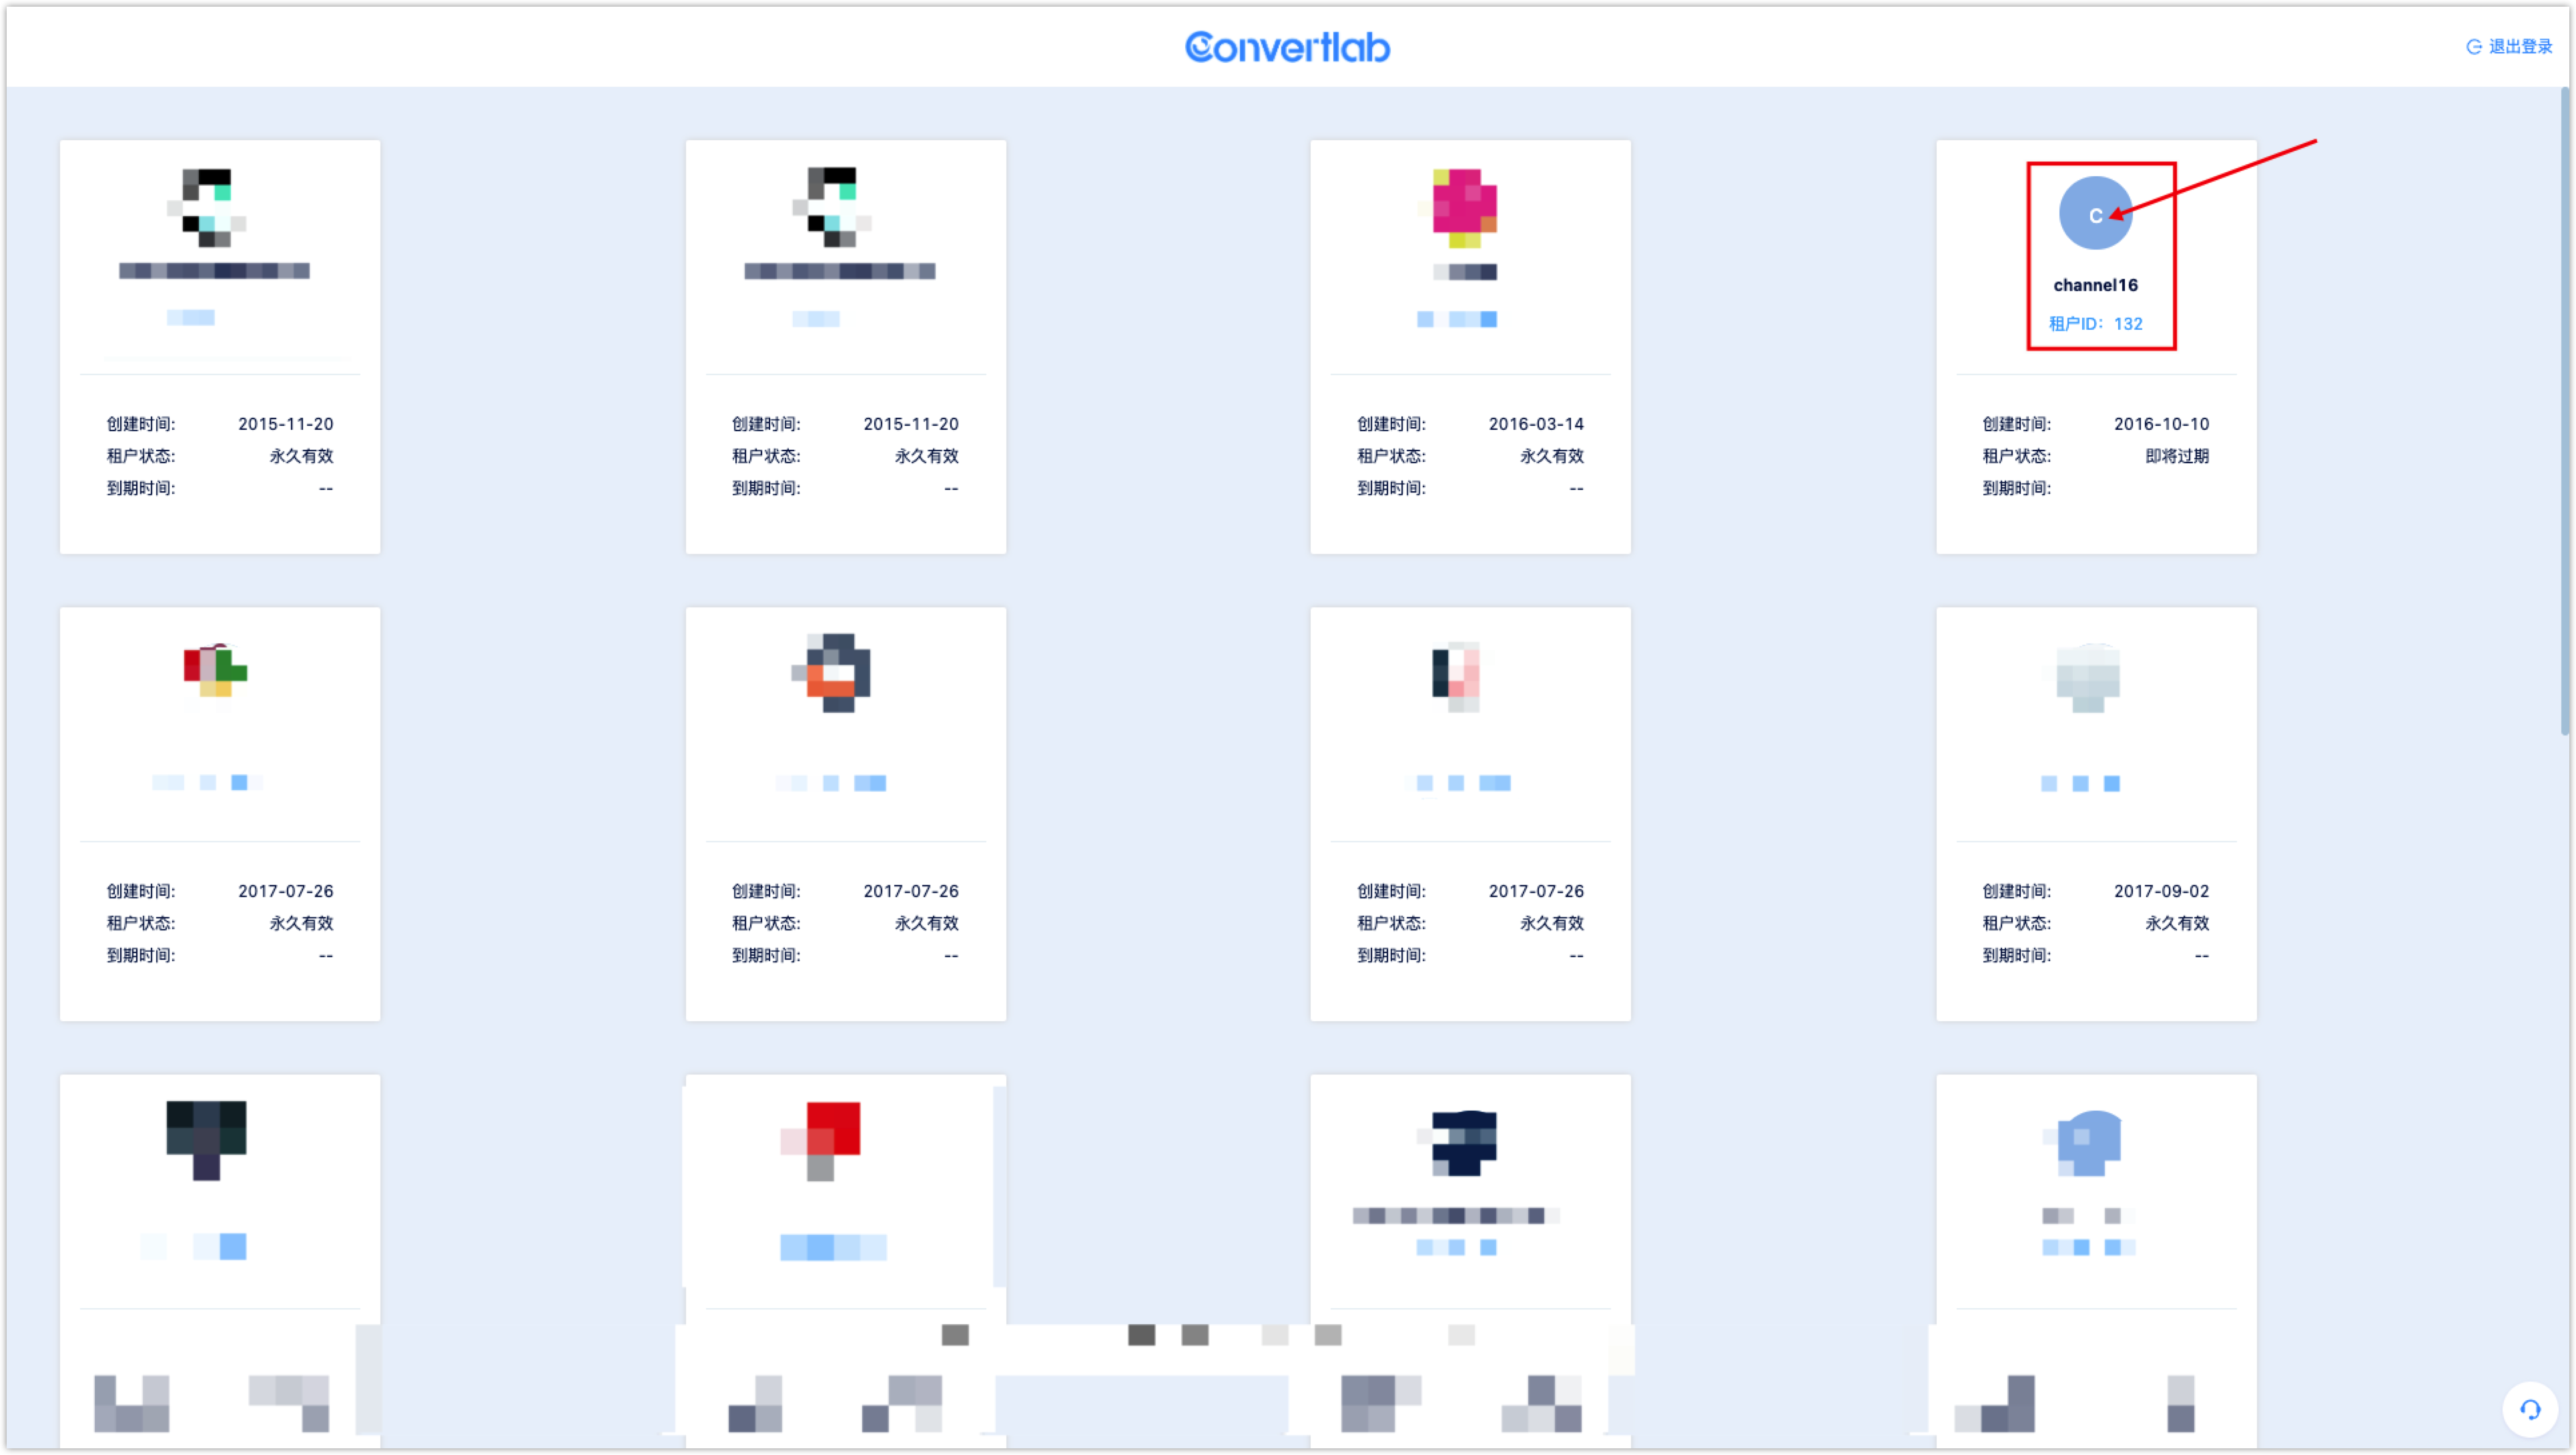
 If the user already has other tenants, click [Activate and Login] to complete the tenant credit granting. When logging in to the system, user can directly select the tenant to log in to.
2.2.2Invite through Mobile Phone Number
Click [Invite User-Can't Receive Email? Try mobile number invitation], enter the mobile number invitation interface.
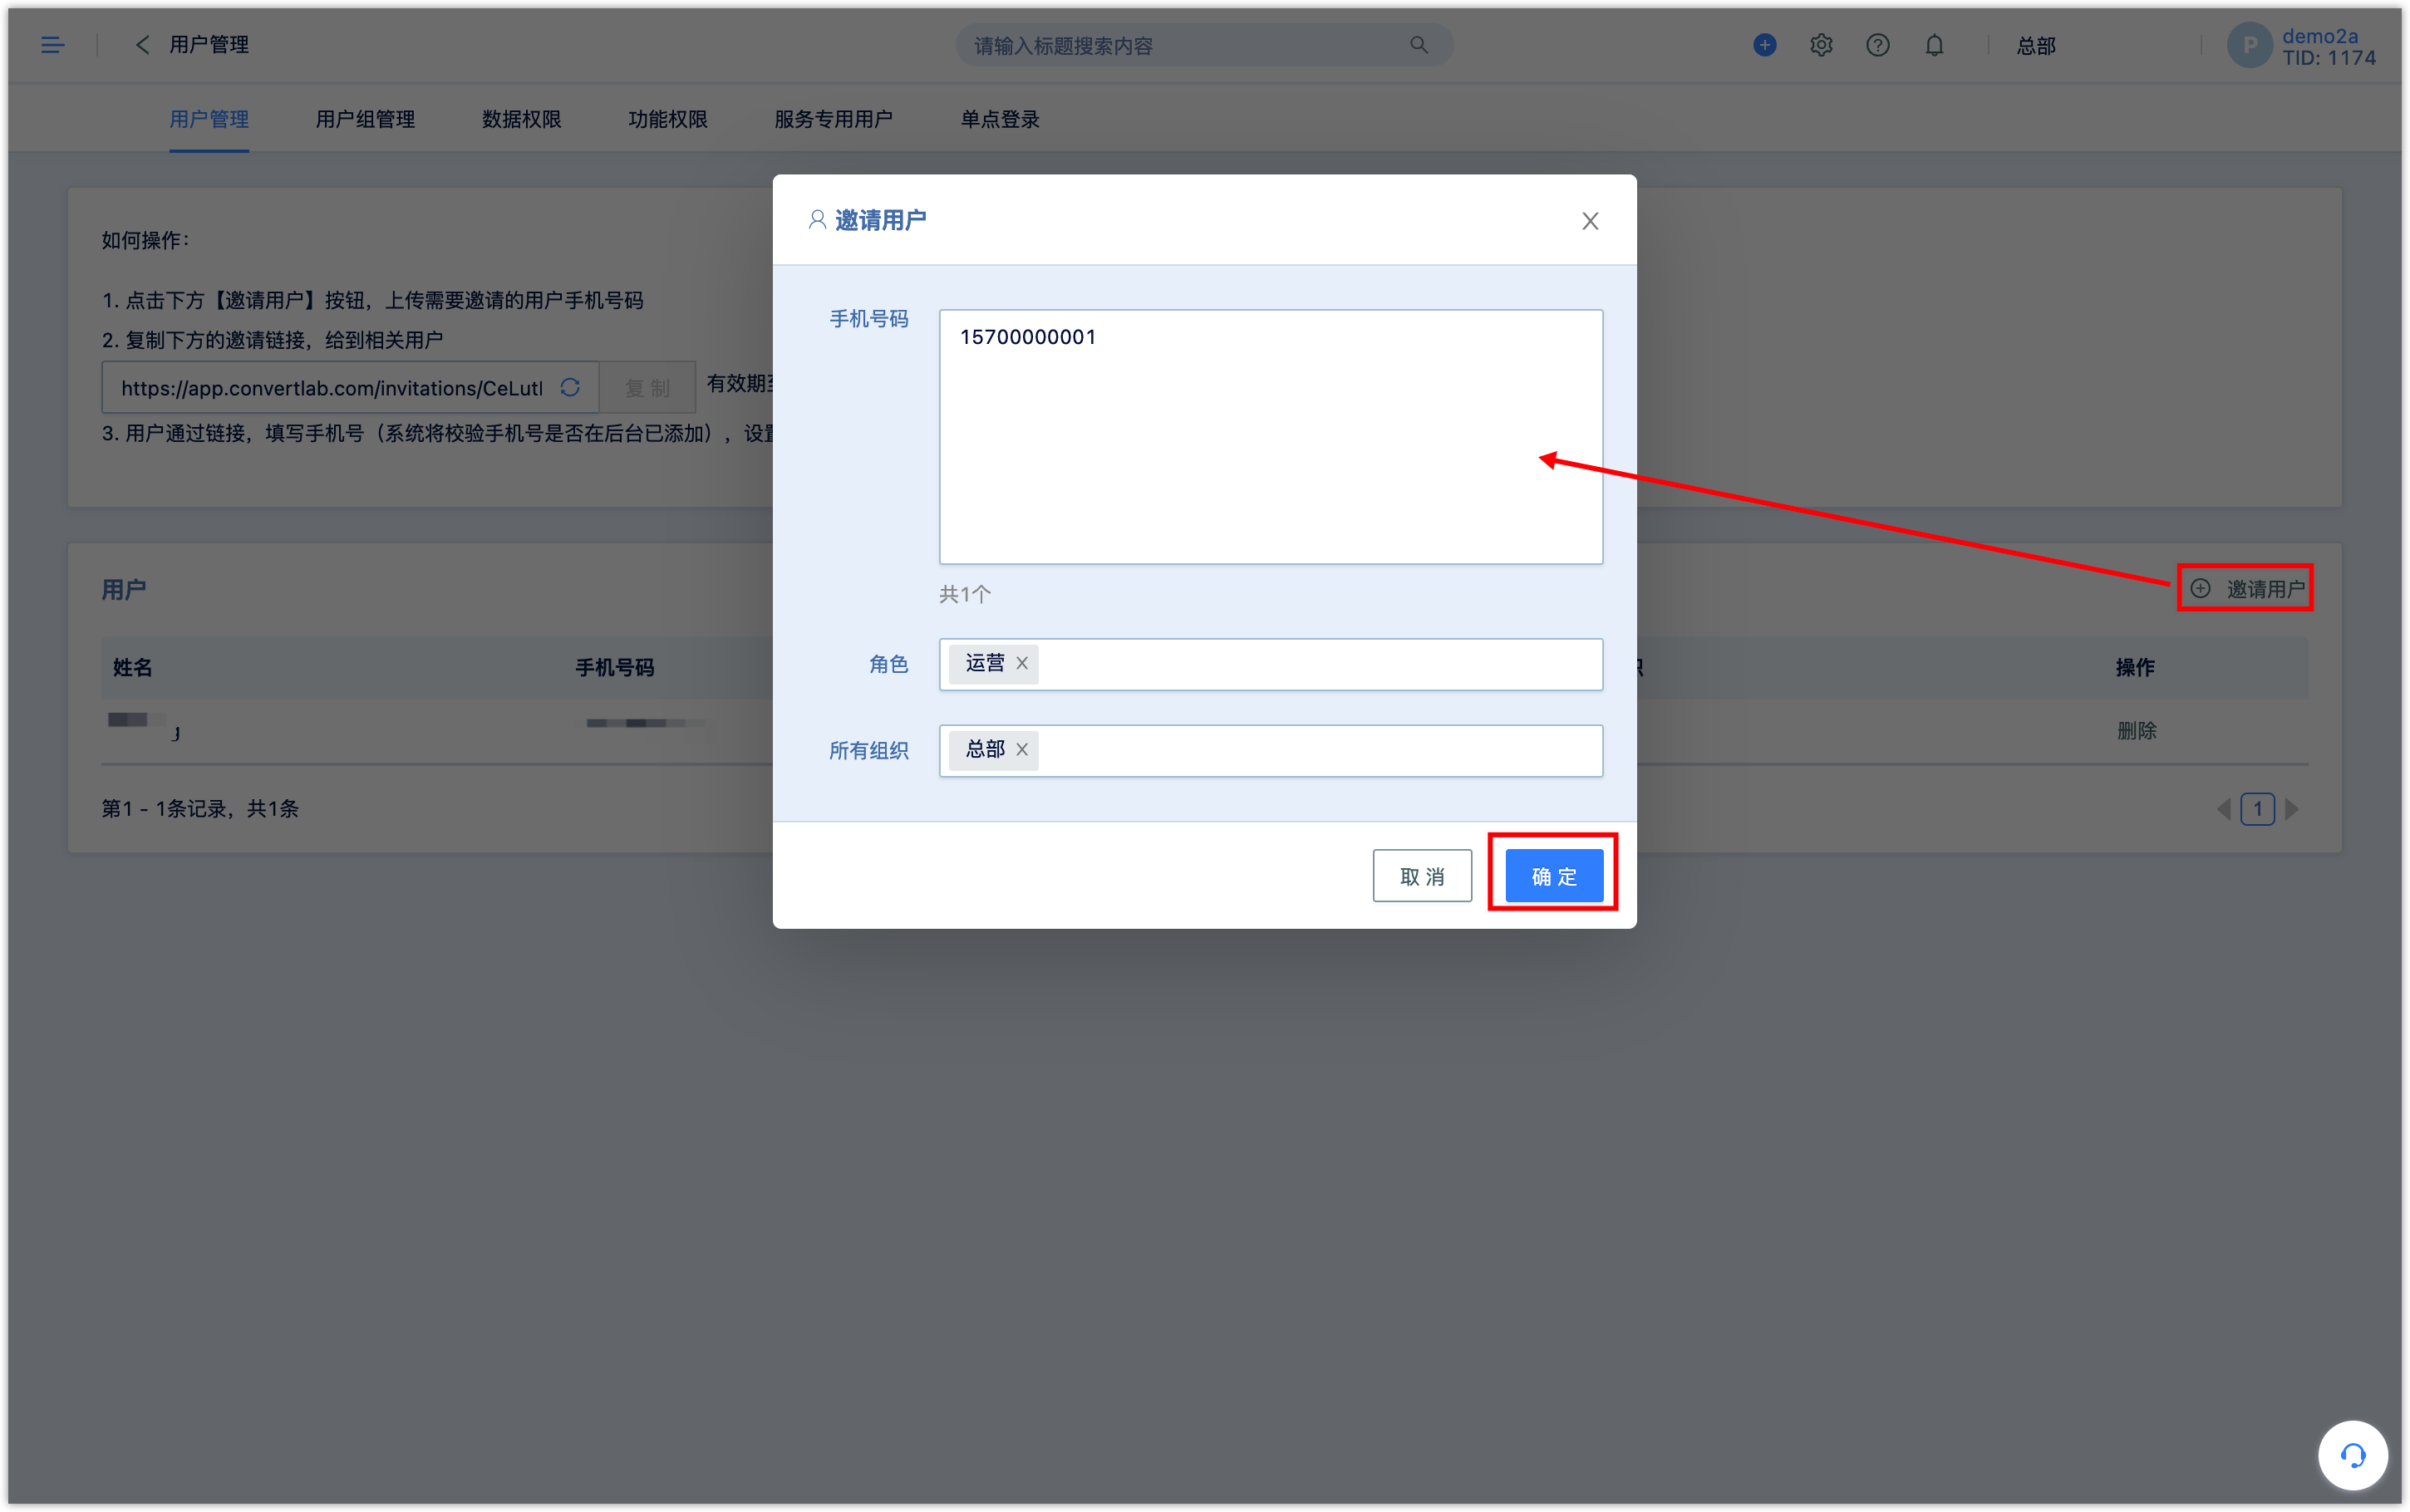
Click [Invite User] and fill in the mobile phone number of the invitee. If batch invitation is needed, fill in multiple entries in a new line, set the role and organization, and click [OK] to complete the invitation task.
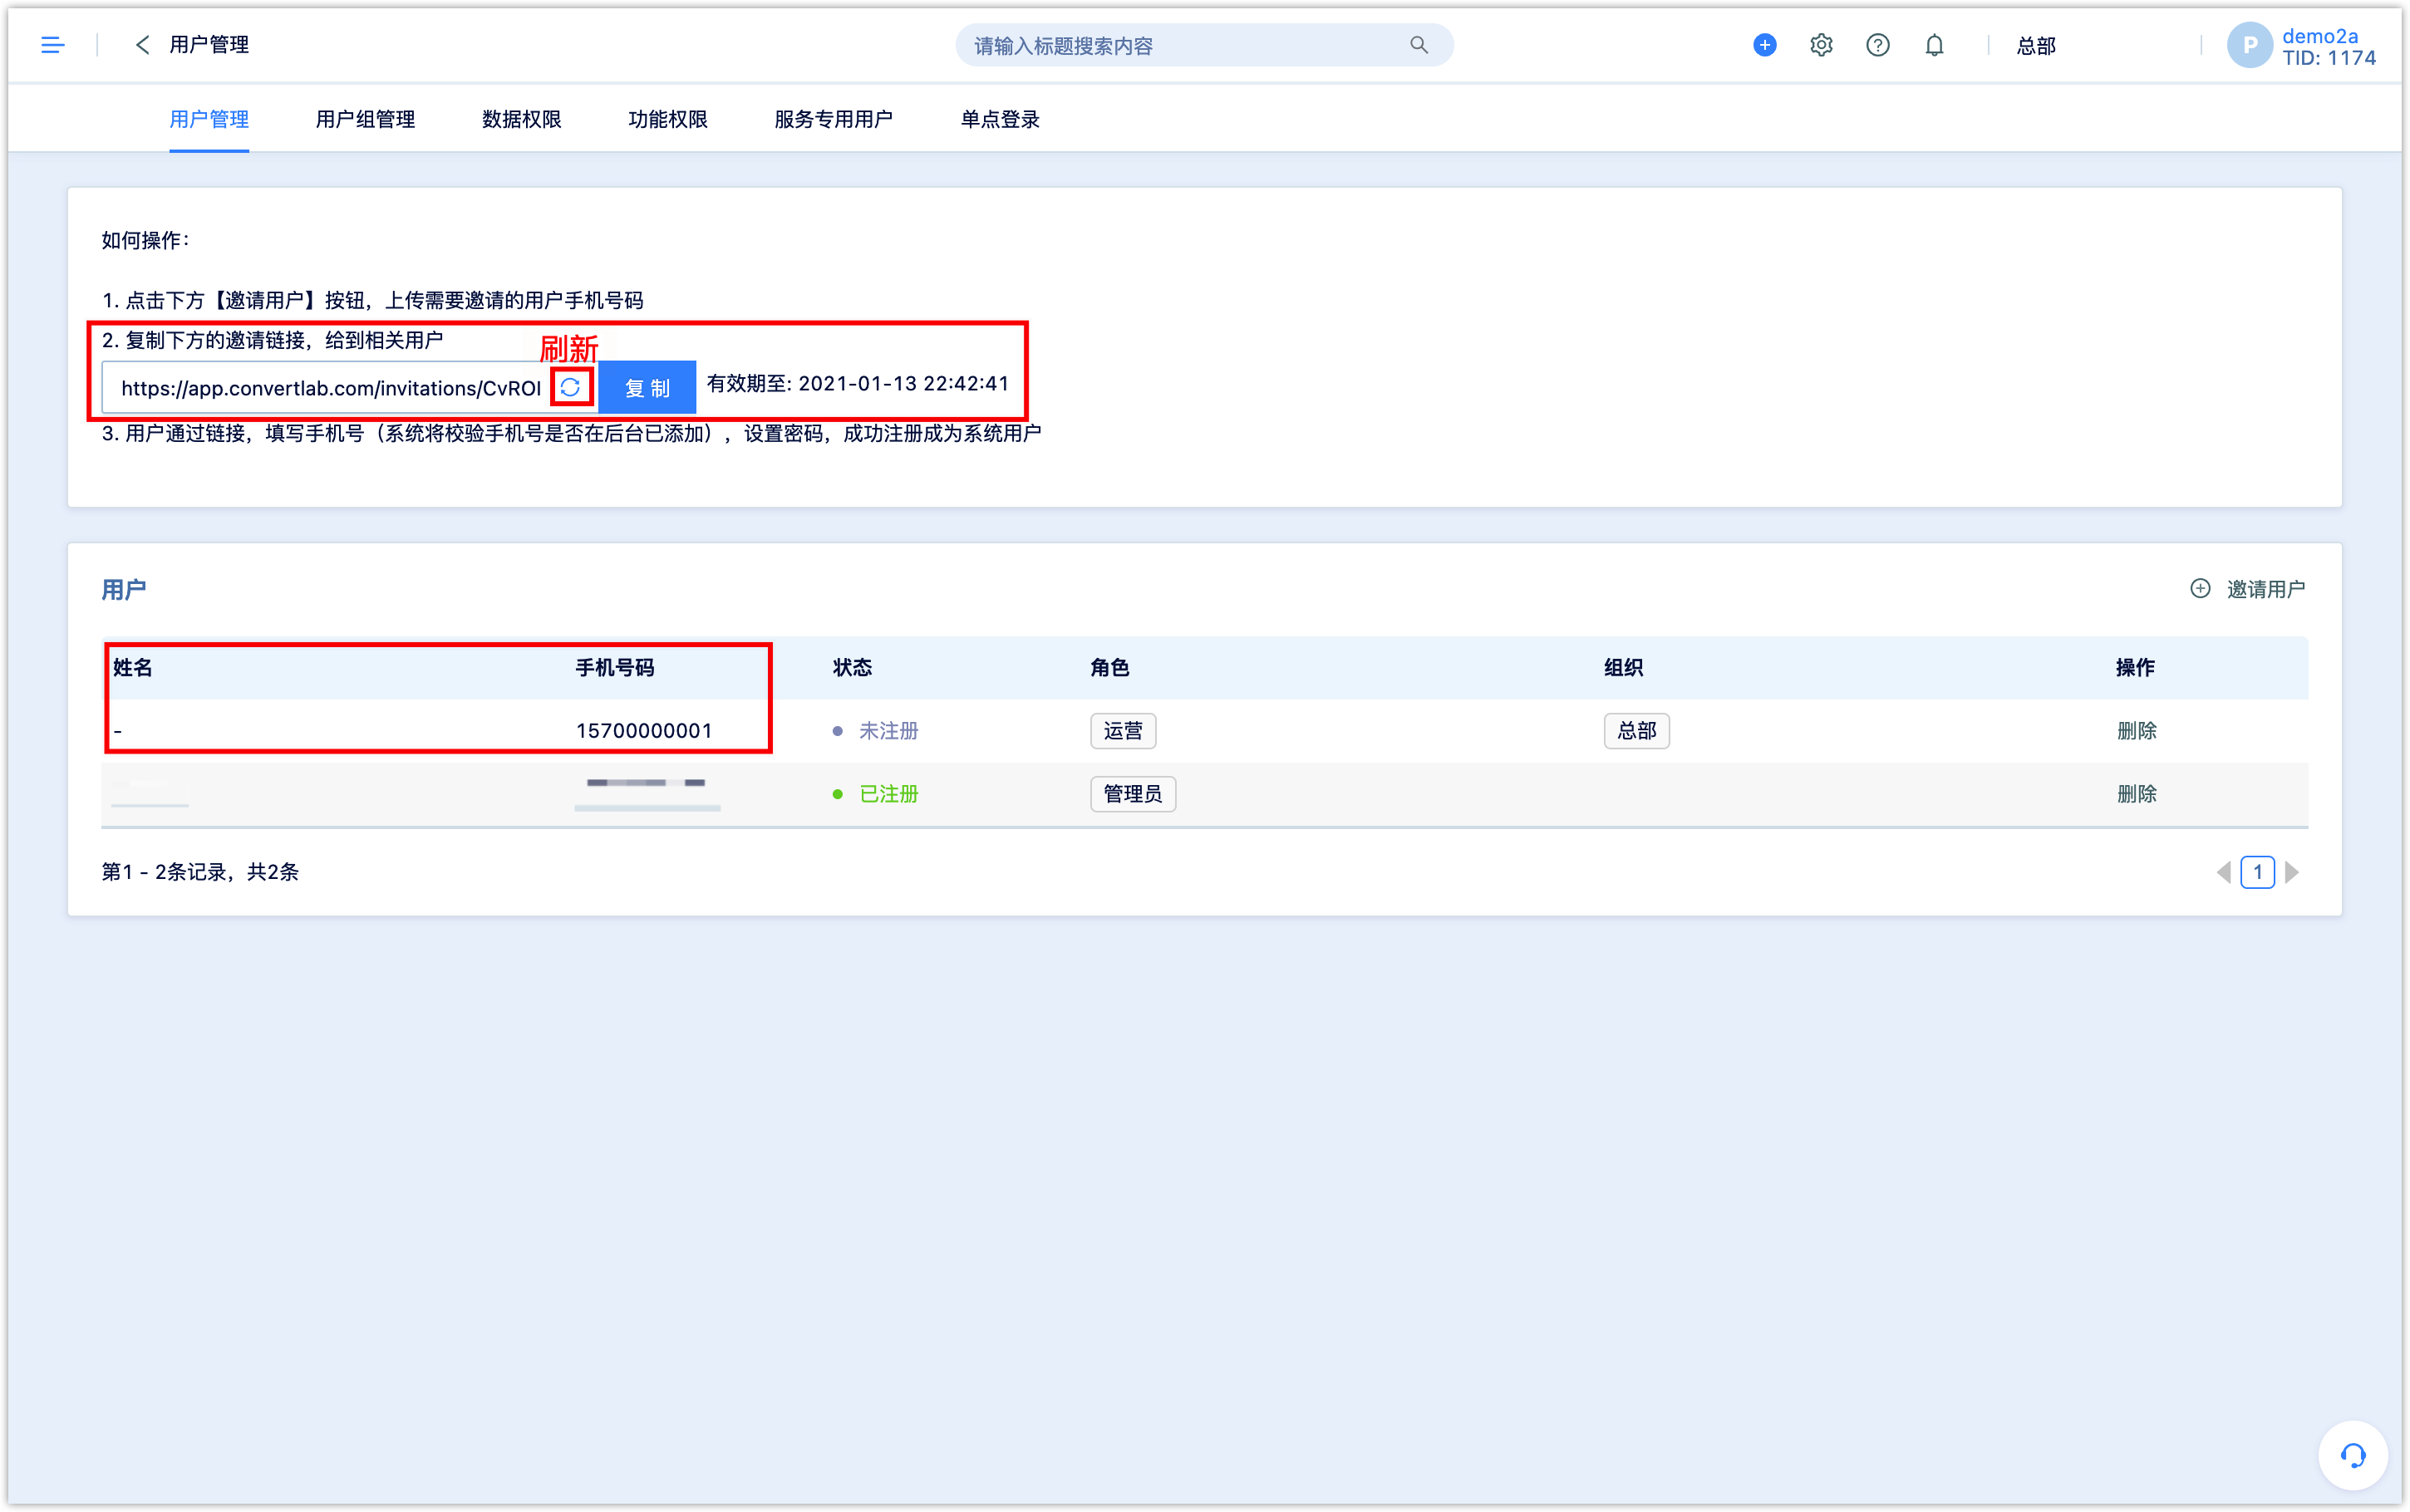
Copy the invitation link to the invitee. If the link has expired, refresh the link to copy.
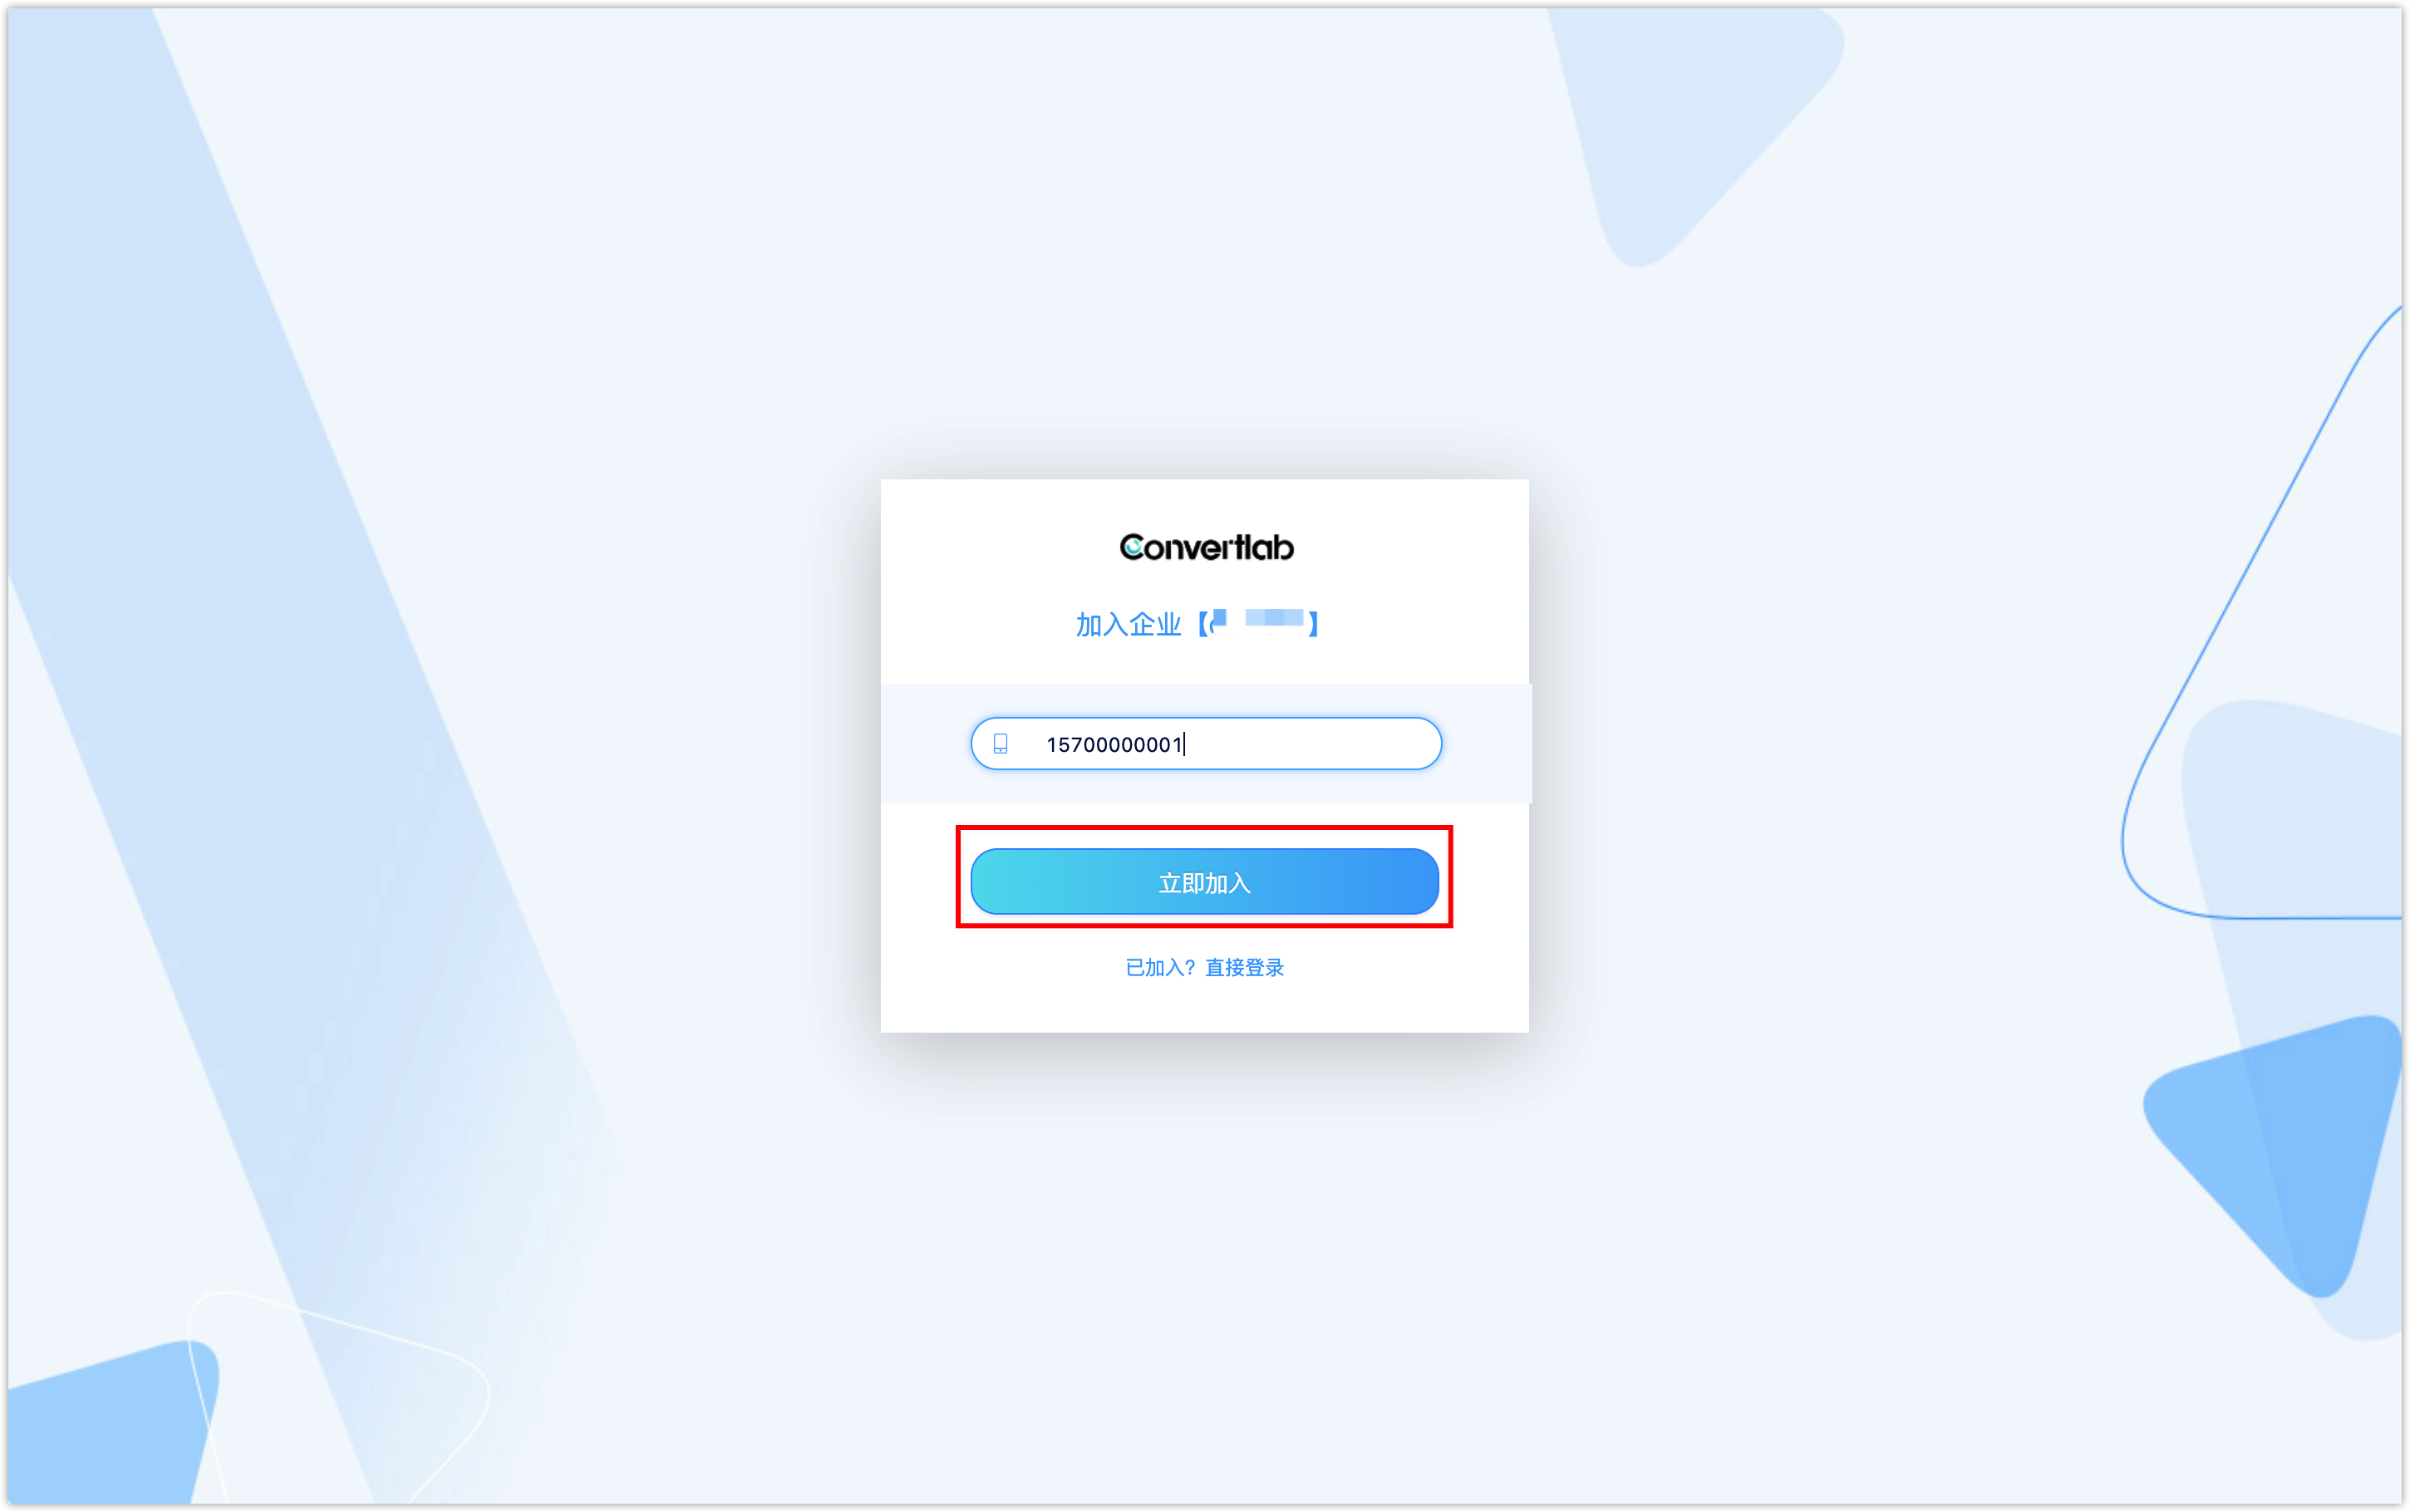
The invitee visits the link, fills in the phone number, and clicks [Join Now].
Verify the mobile phone number, set the name and password, and click [Join Now], then the registration is successful.

2.2.3Create b Tenant Admin
This function is not a default function, please contact account manager to activate it.
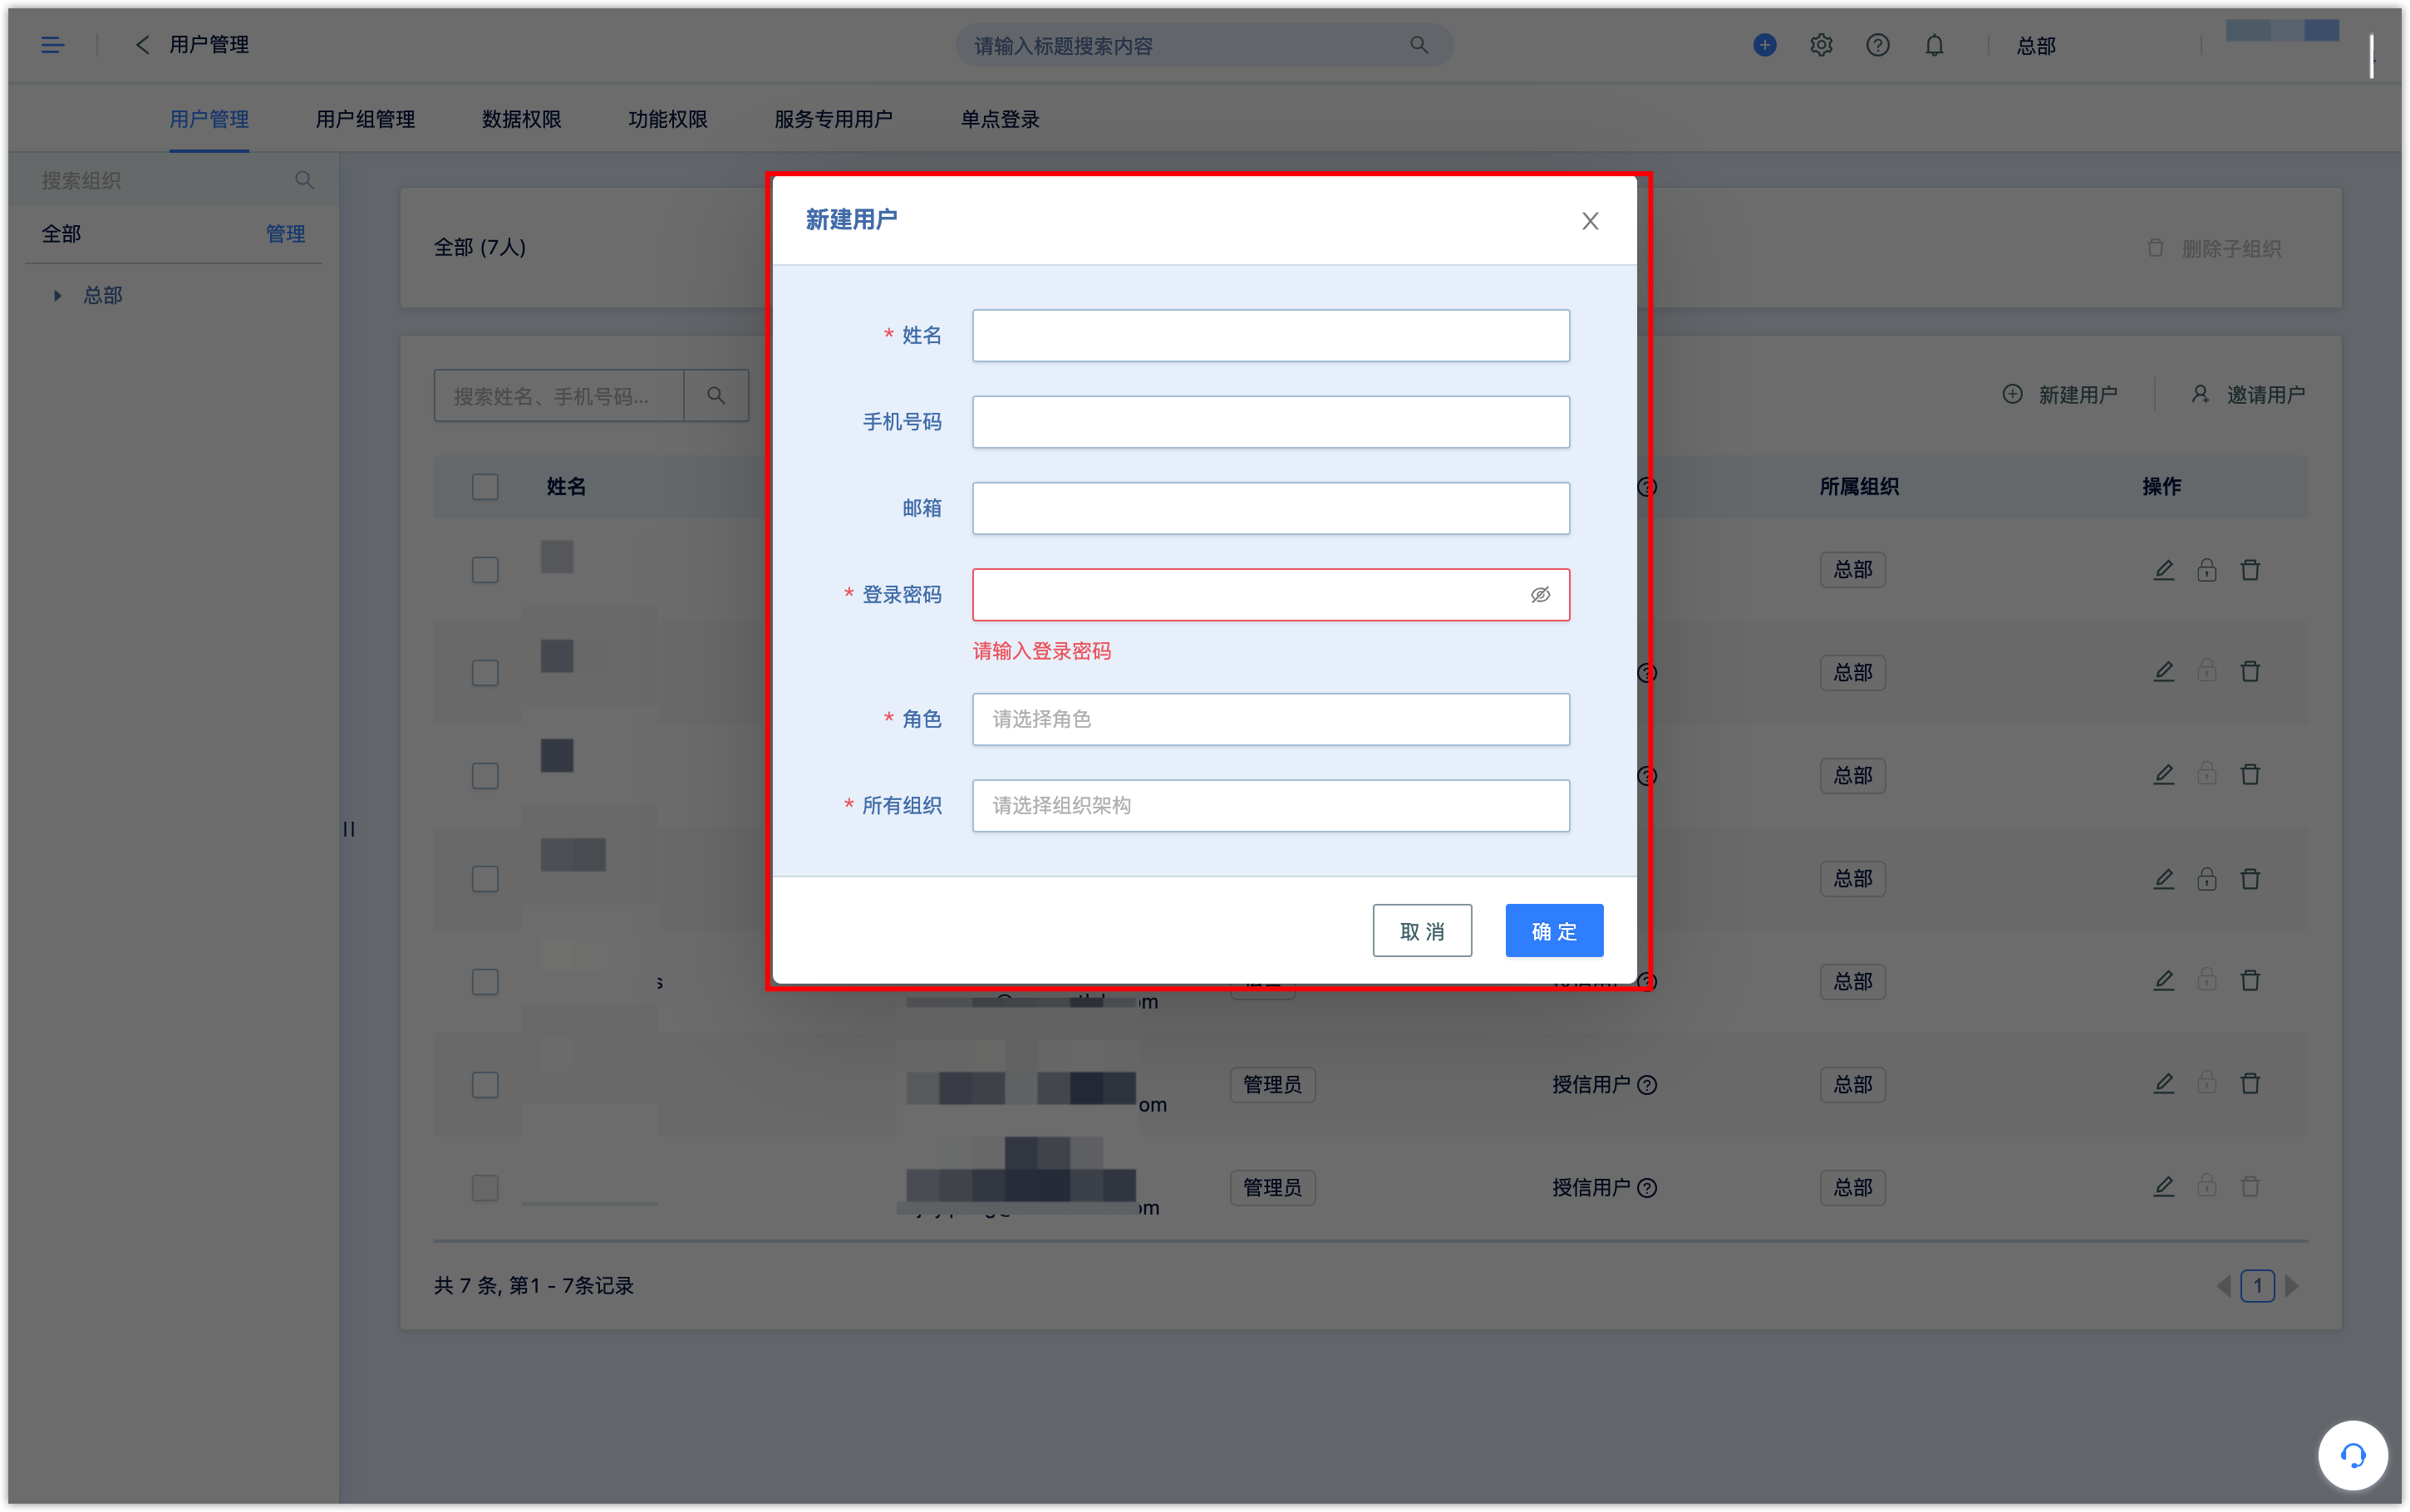
Enter user management, click [New User] at the top right.。
 Enter user information, set a password for the user, click [OK], then the user is created successfully. Give the user password, and the user can log in using the mobile phone number or email address.
3.Function Permissions
DM Hub supports setting user roles, and assigning different functional operation permissions to each role. For example, the sales role can only operate customer functions, but cannot operate the WeChat Page and SMS functions. You can set the sales role through function permissions and only assign customer-related functions.
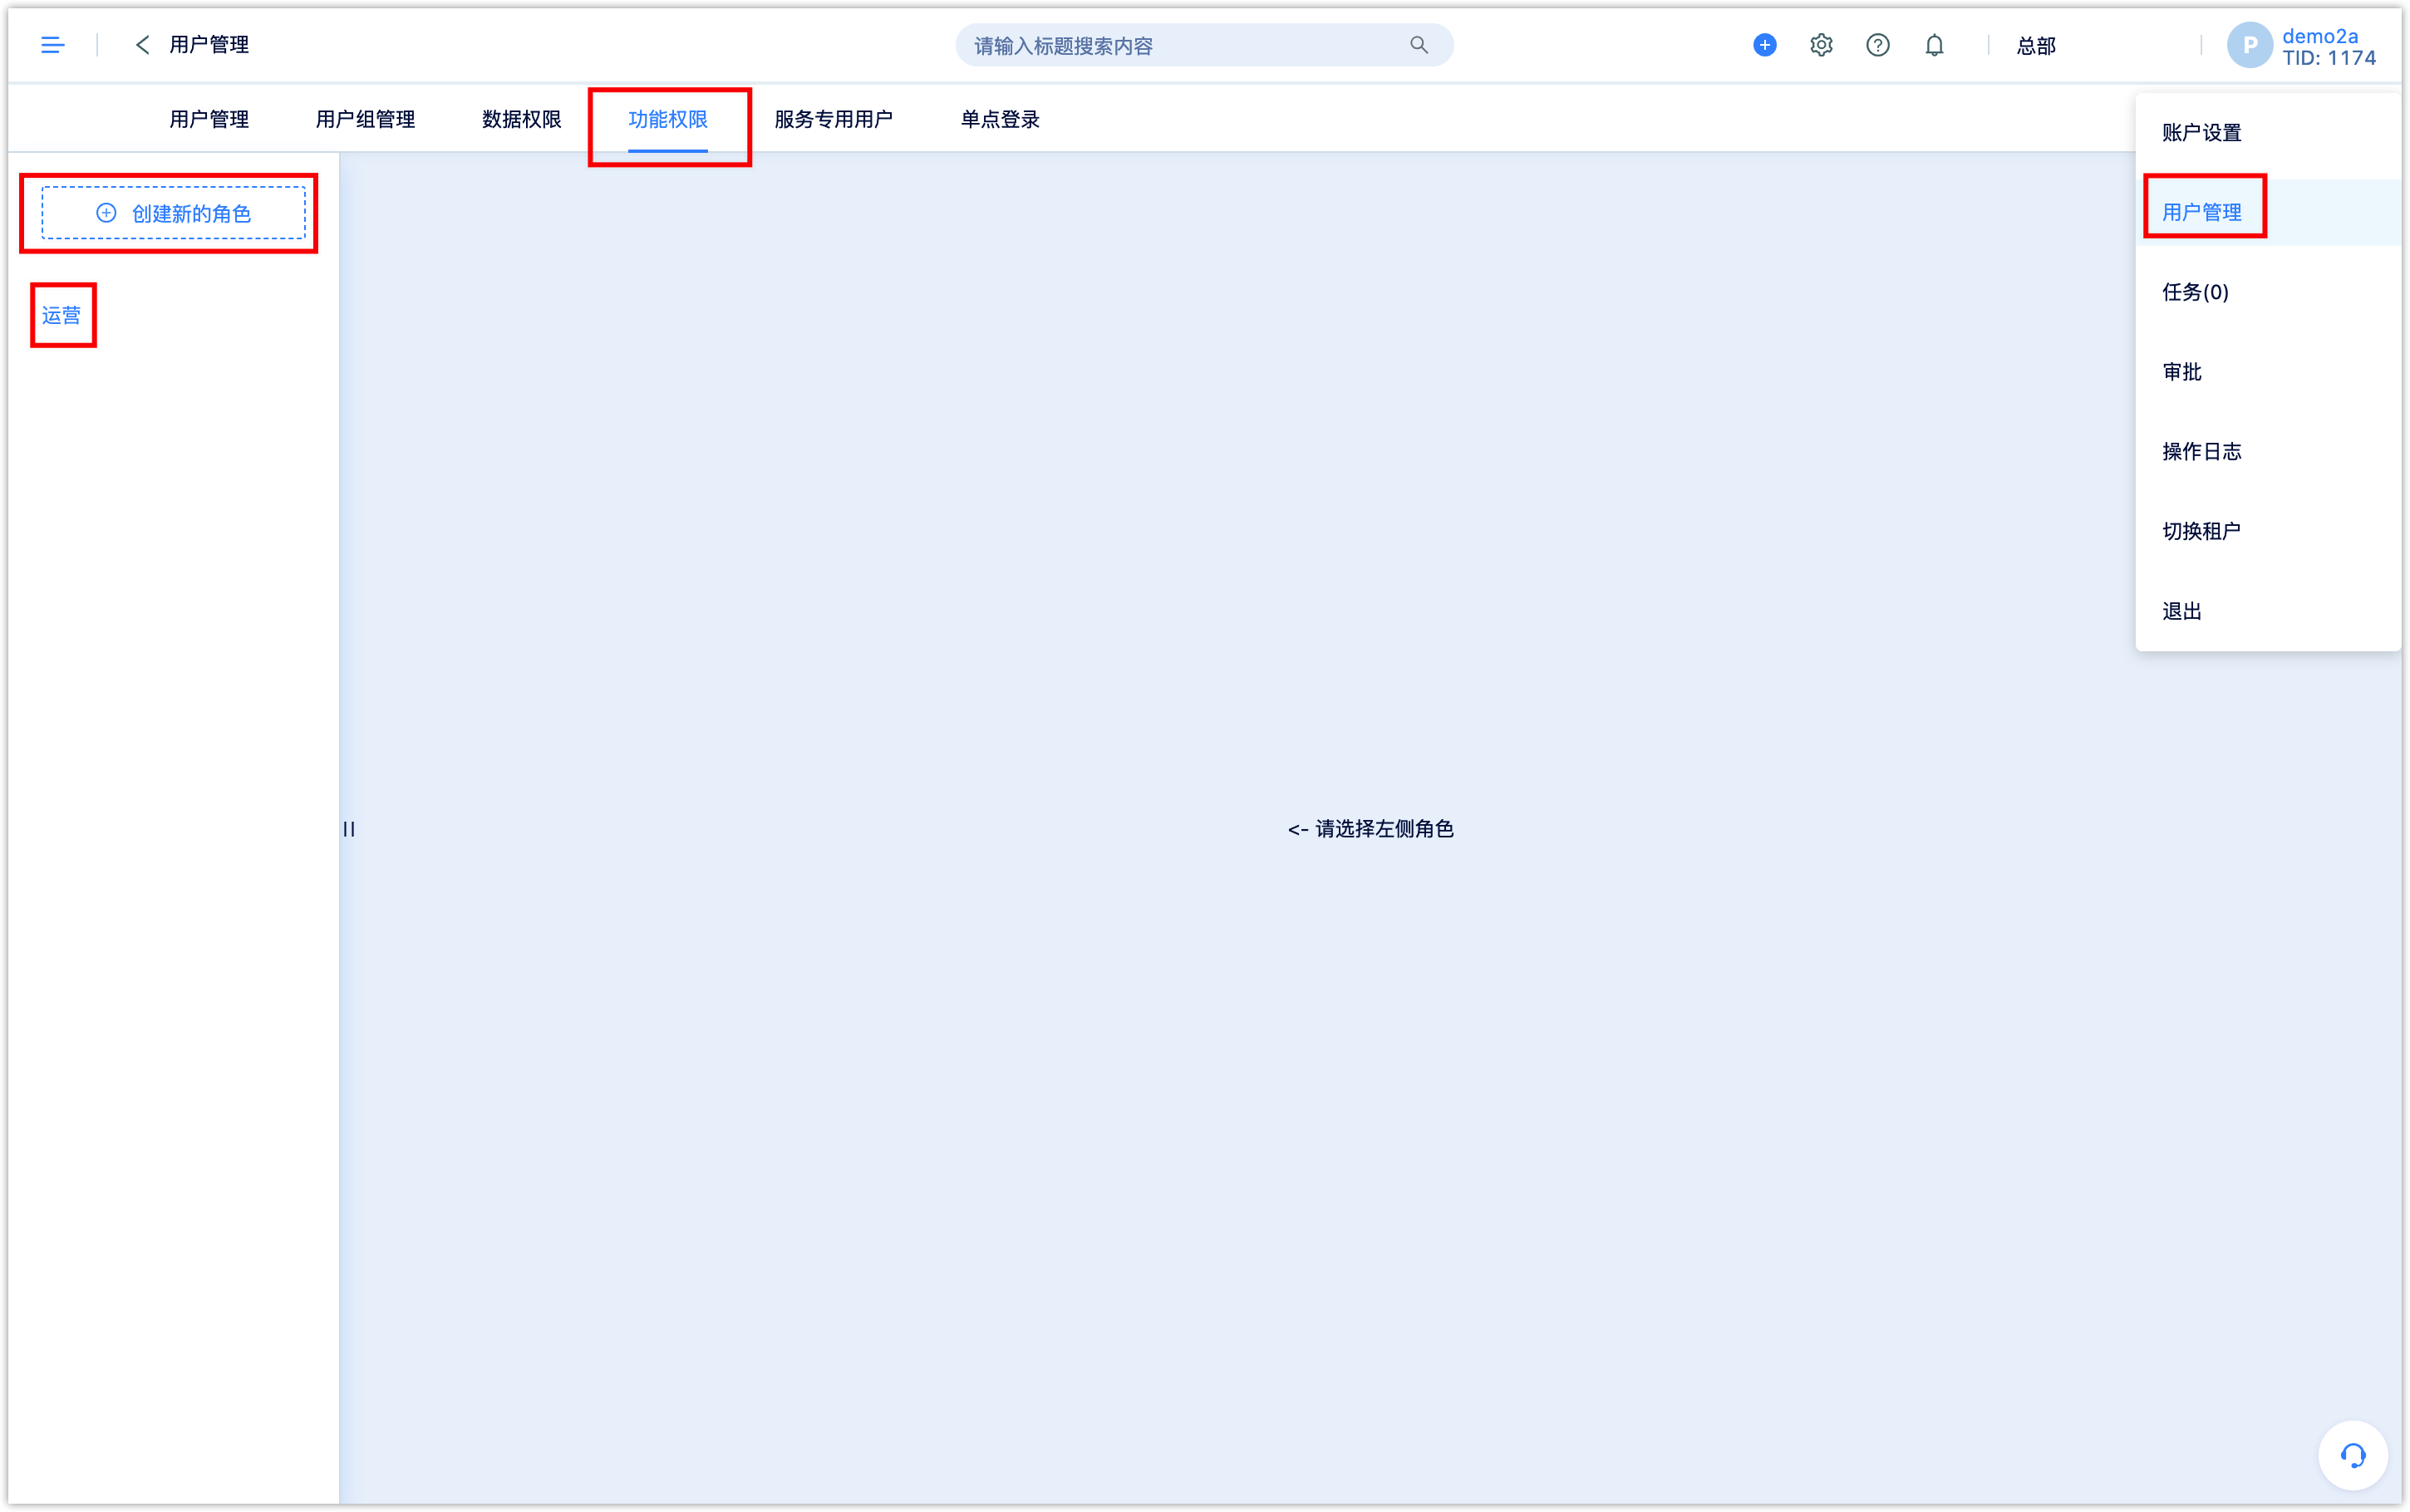
Enter the user management interface and click [Function Permission]. You can view all roles and corresponding functional permissions.
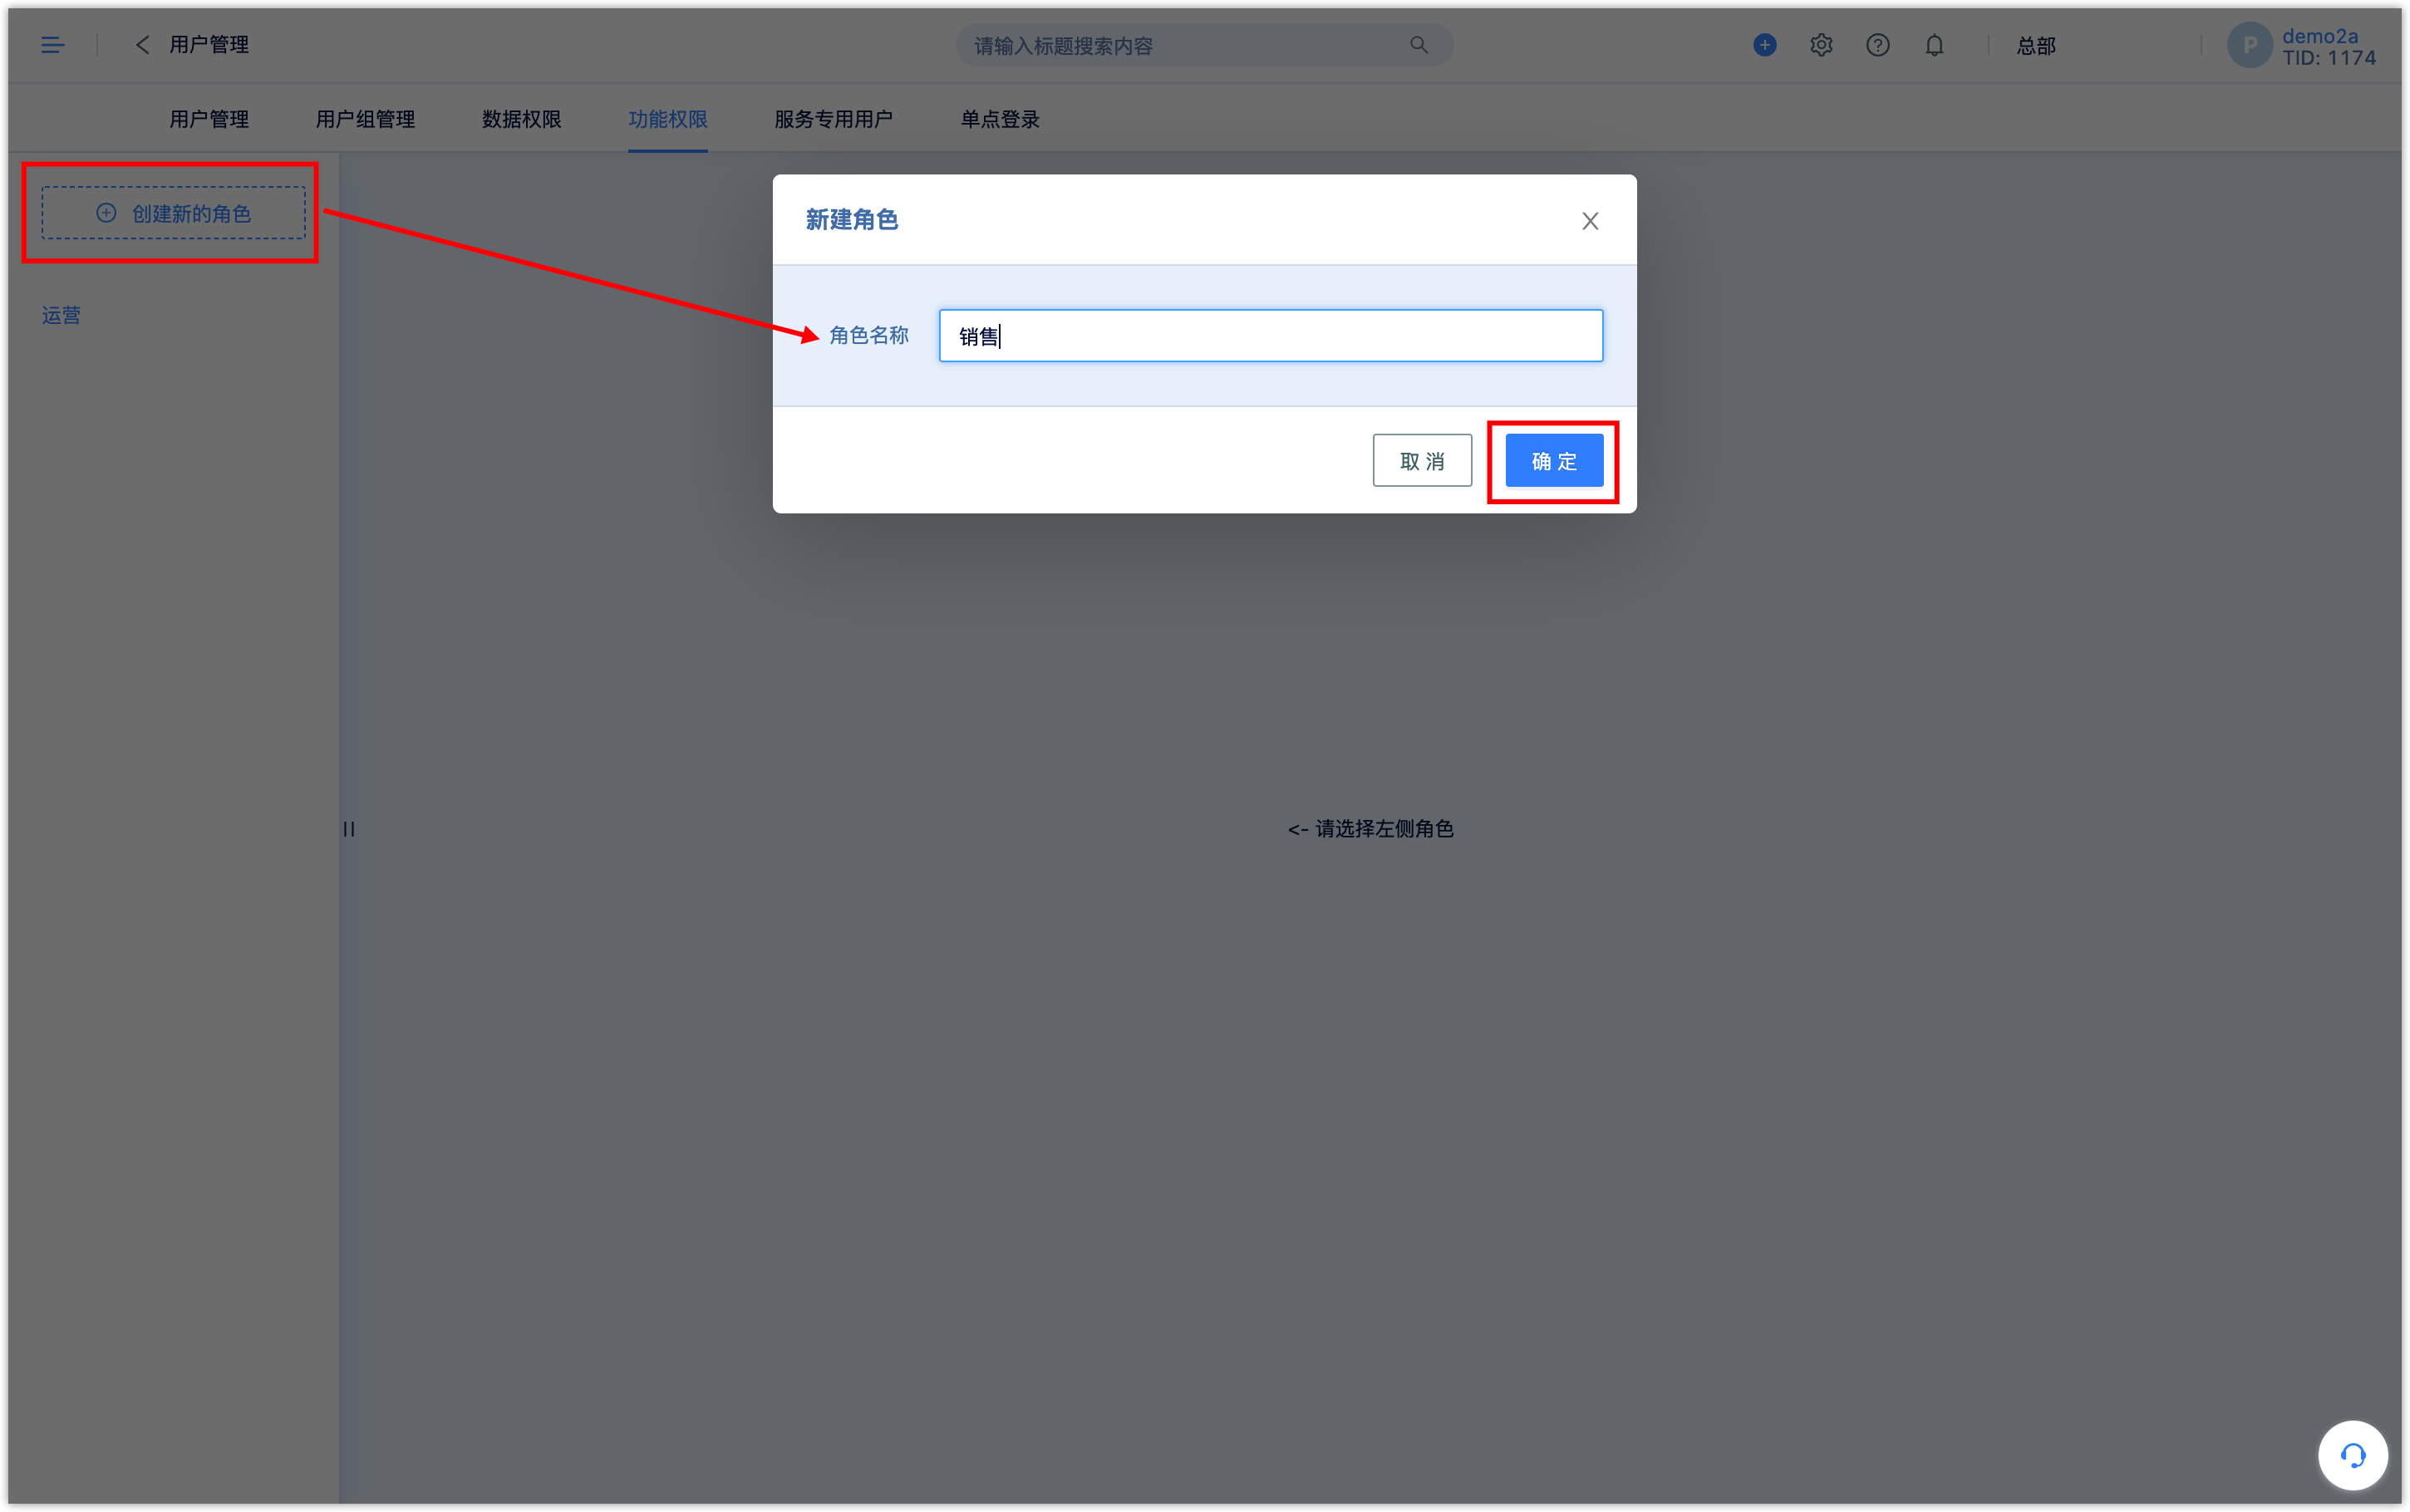
Click [Create a new role], enter the role name, click [OK], and a new role is created.
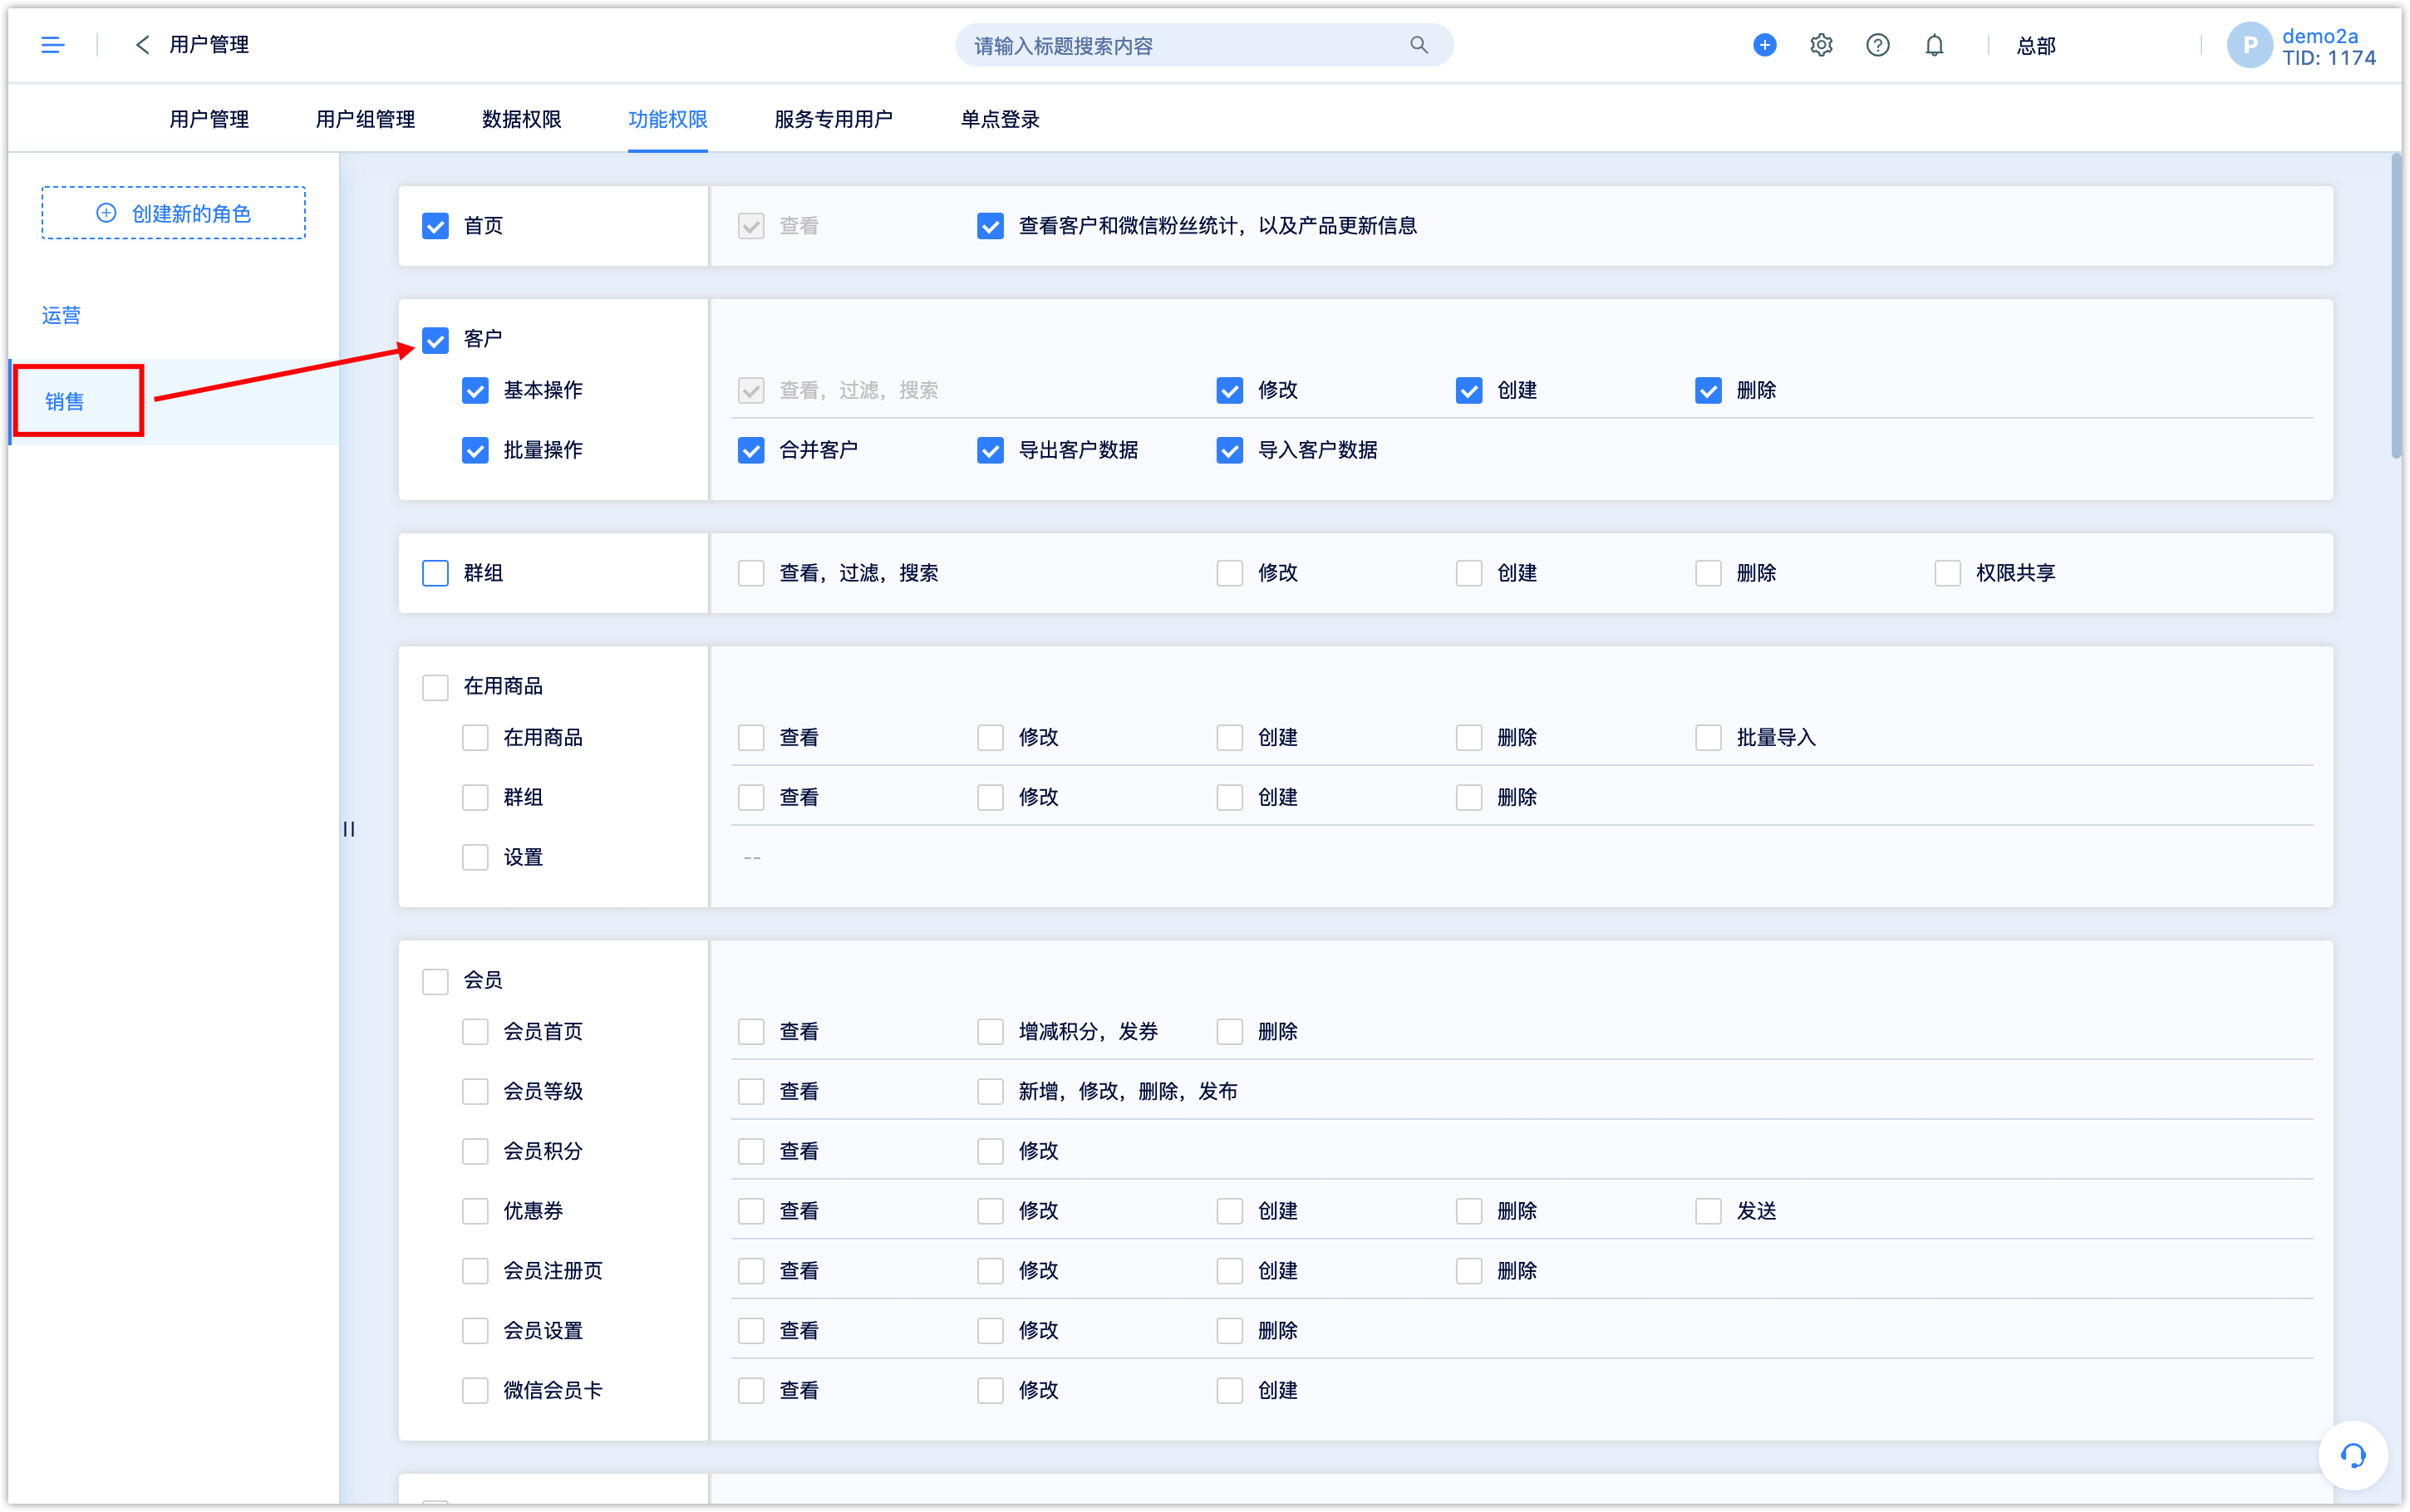
Click on the role to check the function permissions that the role can have.
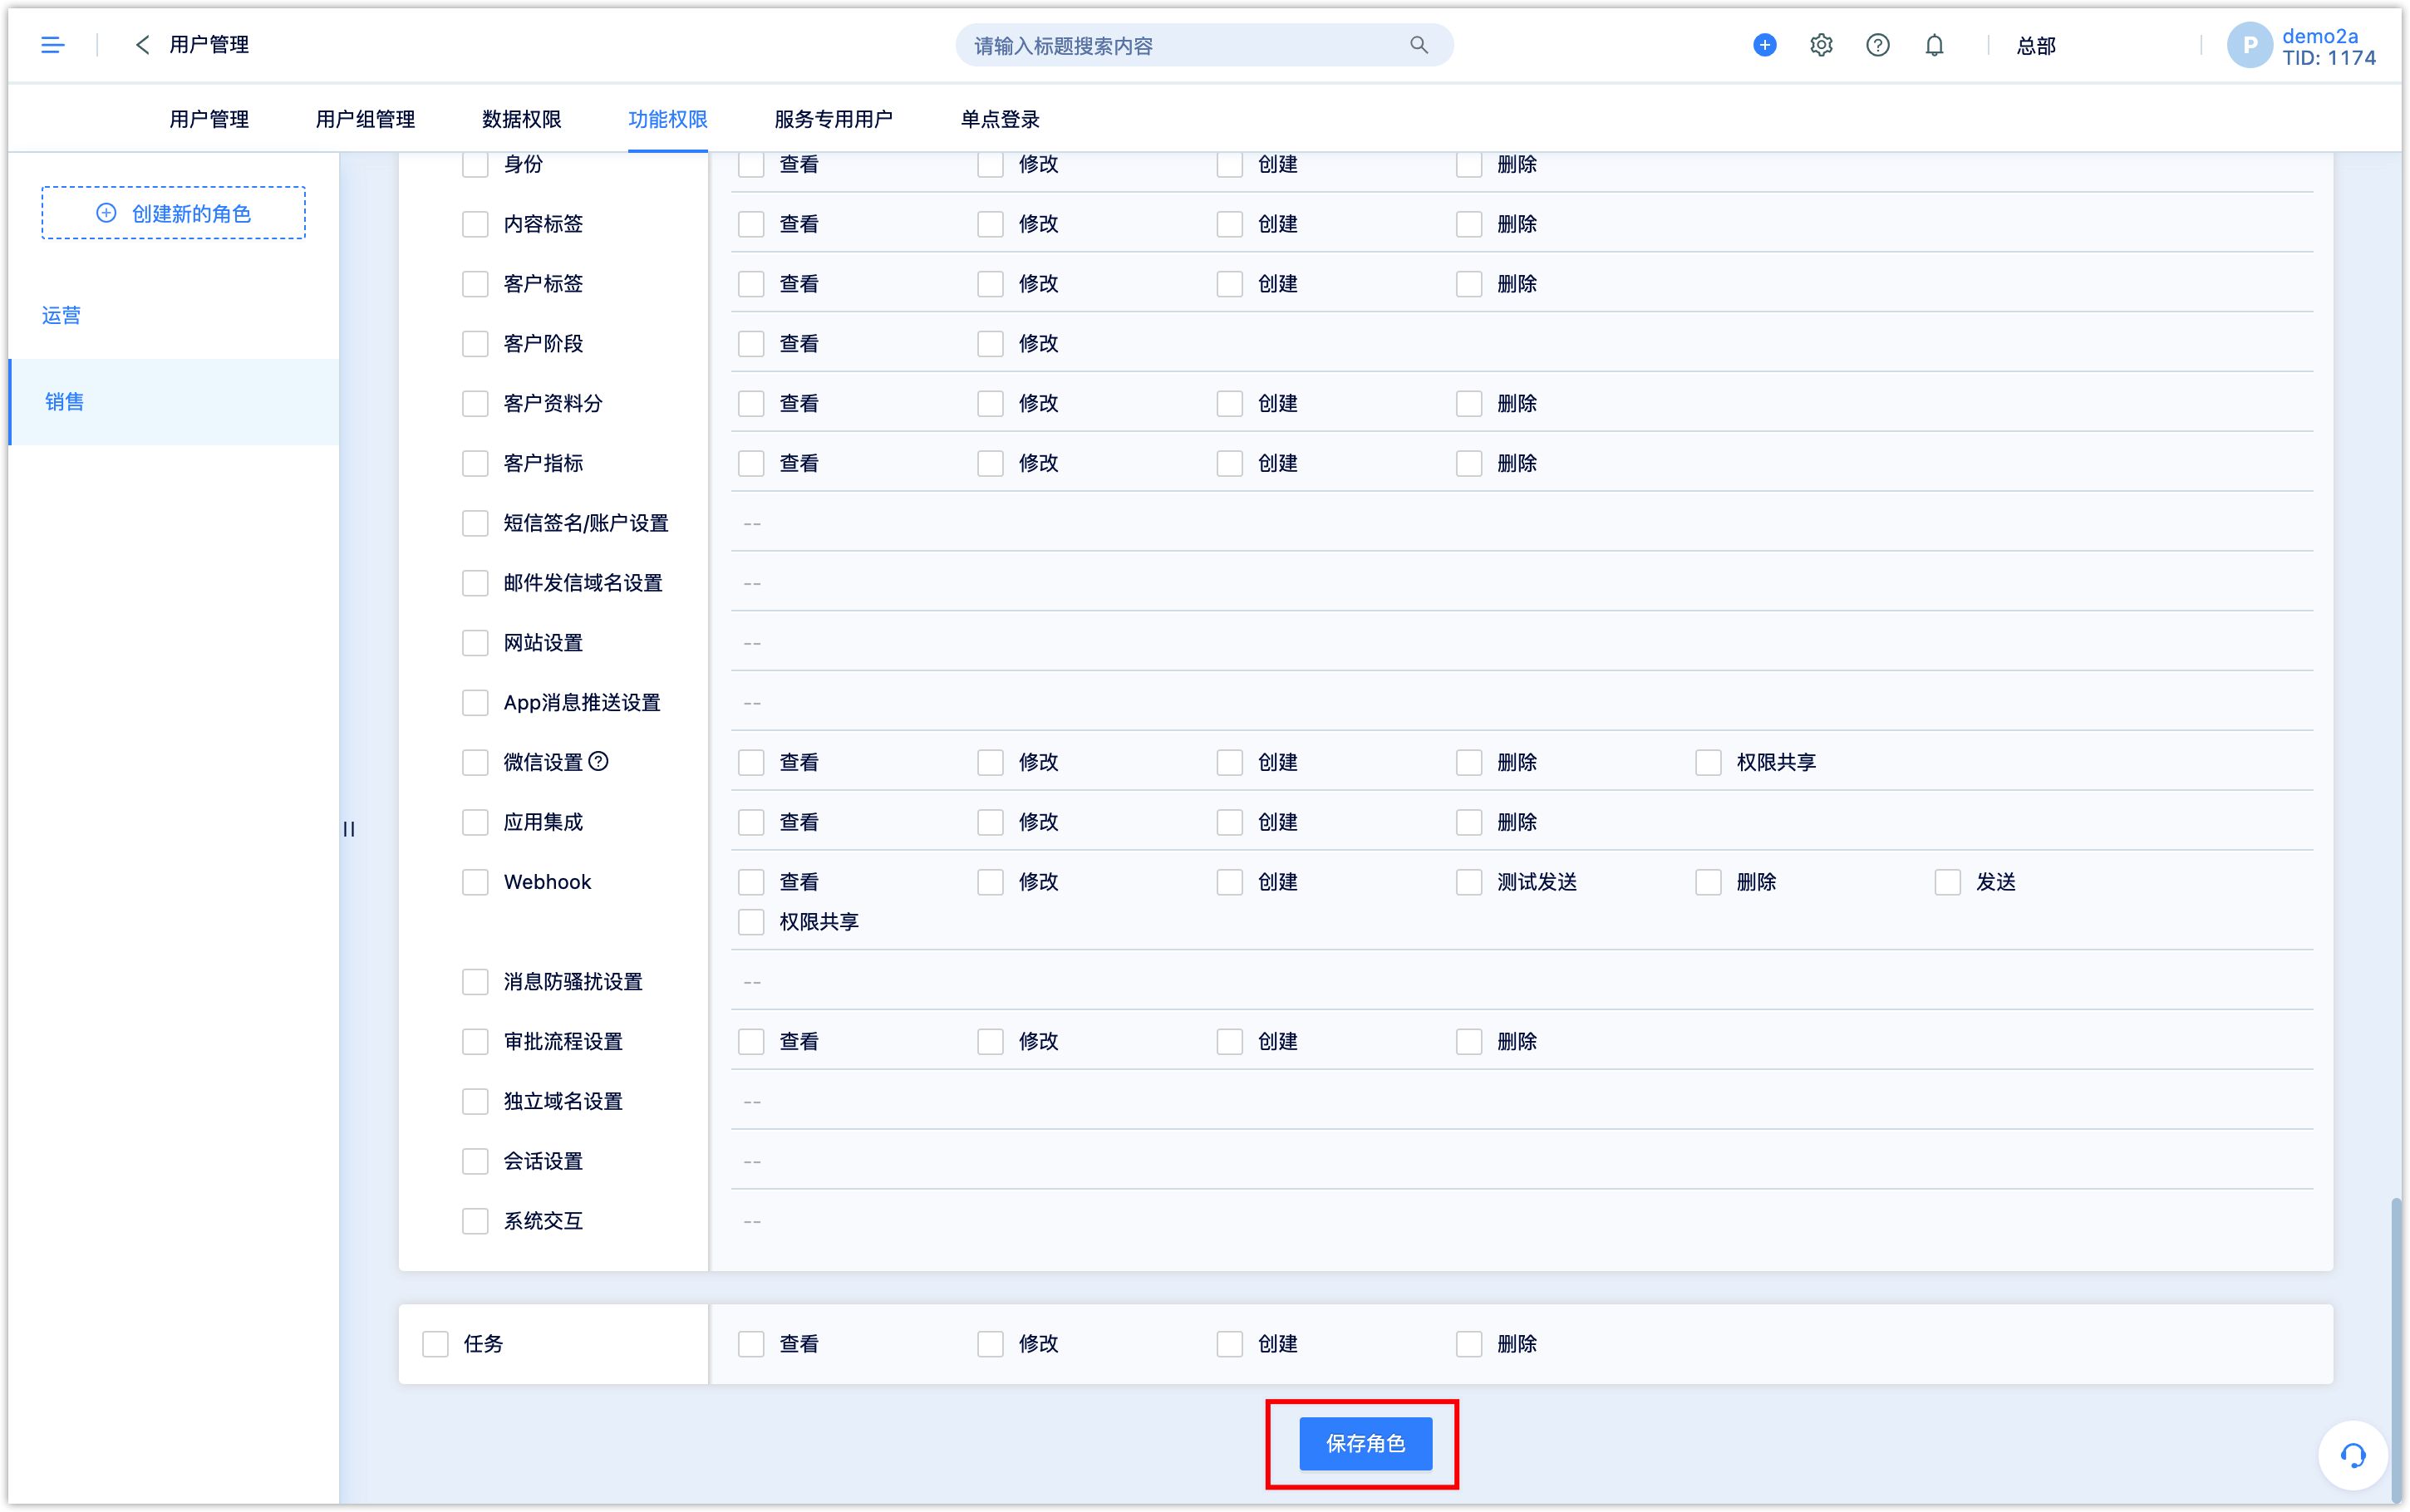
After the selection is completed, you need to pull the page to the end and click [Save Role] in order to save the role permissions successfully.
4.Data Permission
When multiple users of an enterprise use DM Hub together, there may be organizational divisions among multiple users. For data security considerations, the enterprise needs to make data between different organizations and departments independent of each other without interfering with each other, so DM Hub needs to support Data segmentation at the data logging level, that is, data permissions.
Through the data permission function, companies can limit the data resources that users can access. Data permission mainly realizes data segmentation and sharing through the user's organization, sharing rules, and manual sharing.
Note: The data permission function is not a default function of the system, please contact account manager for activation before using it. It is recommended to turn on this function before data is generated in the system, otherwise there may be a problem of inaccurate attribution of previously created data.4.1Basic Concept Description
Data attribution:The system relies on establishing the attribution relationship between various data and users or organizations to realizes data separation. Even if the data permission function is not activated, the system will record all types of data to which users or organizations that the data belong. Therefore, as long as the data permission function is activated, when a certain piece of data belongs to a certain user or a certain organization, the data can only be viewed and modified by a certain user or certain organization. The system also supports users to share their own data with other users, user groups, and organizations
User:Everyone who operates the system is a user of DM Hub. In principle, everyone should have their own account and password. A set of account and passwords is a user to the system. The user can belong to a certain organization or multiple organizations. Users has their own role and permissions.
Organization:The organization structure or department structure of the enterprise, which can be imported into the system. Users are under the organization, users belong to the organization
User group:users from different organizations can be placed in the same group to form a user group. The user group is mainly to meet the cross-organizational collaboration scenario, when data needs to be shared to a group of users.
High seas data:High seas data is data that has no attribution. Generally, it refers to data that is not created by the user (or data that does not record the affiliation before the data permission is enabled), such as customers created through official account fans, customers created through API interfaces, etc.
4.2Operation Instructions
4.2.1Organization
After enabling the data permission function, enter [User Management] to set and manage organizations and users.
Note:[Headquarters] is the highest organization level in the system, and all other organizations are sub-organizations of [Headquarters]. [Headquarters] and [Unassigned Organizations] cannot be deleted. [Headquarters] can modify the name; after the tenant enables the data permission function, all users under the tenant created before will directly be assigned to [Headquarters]; a user can belong to multiple organizations.
Creating Organization Tree:
Hierarchical limit of the organization tree: up to 5 levels can be built;
Limit on the number of nodes per layer of the organization tree: 100;
Limit on the number of people per organization: 50
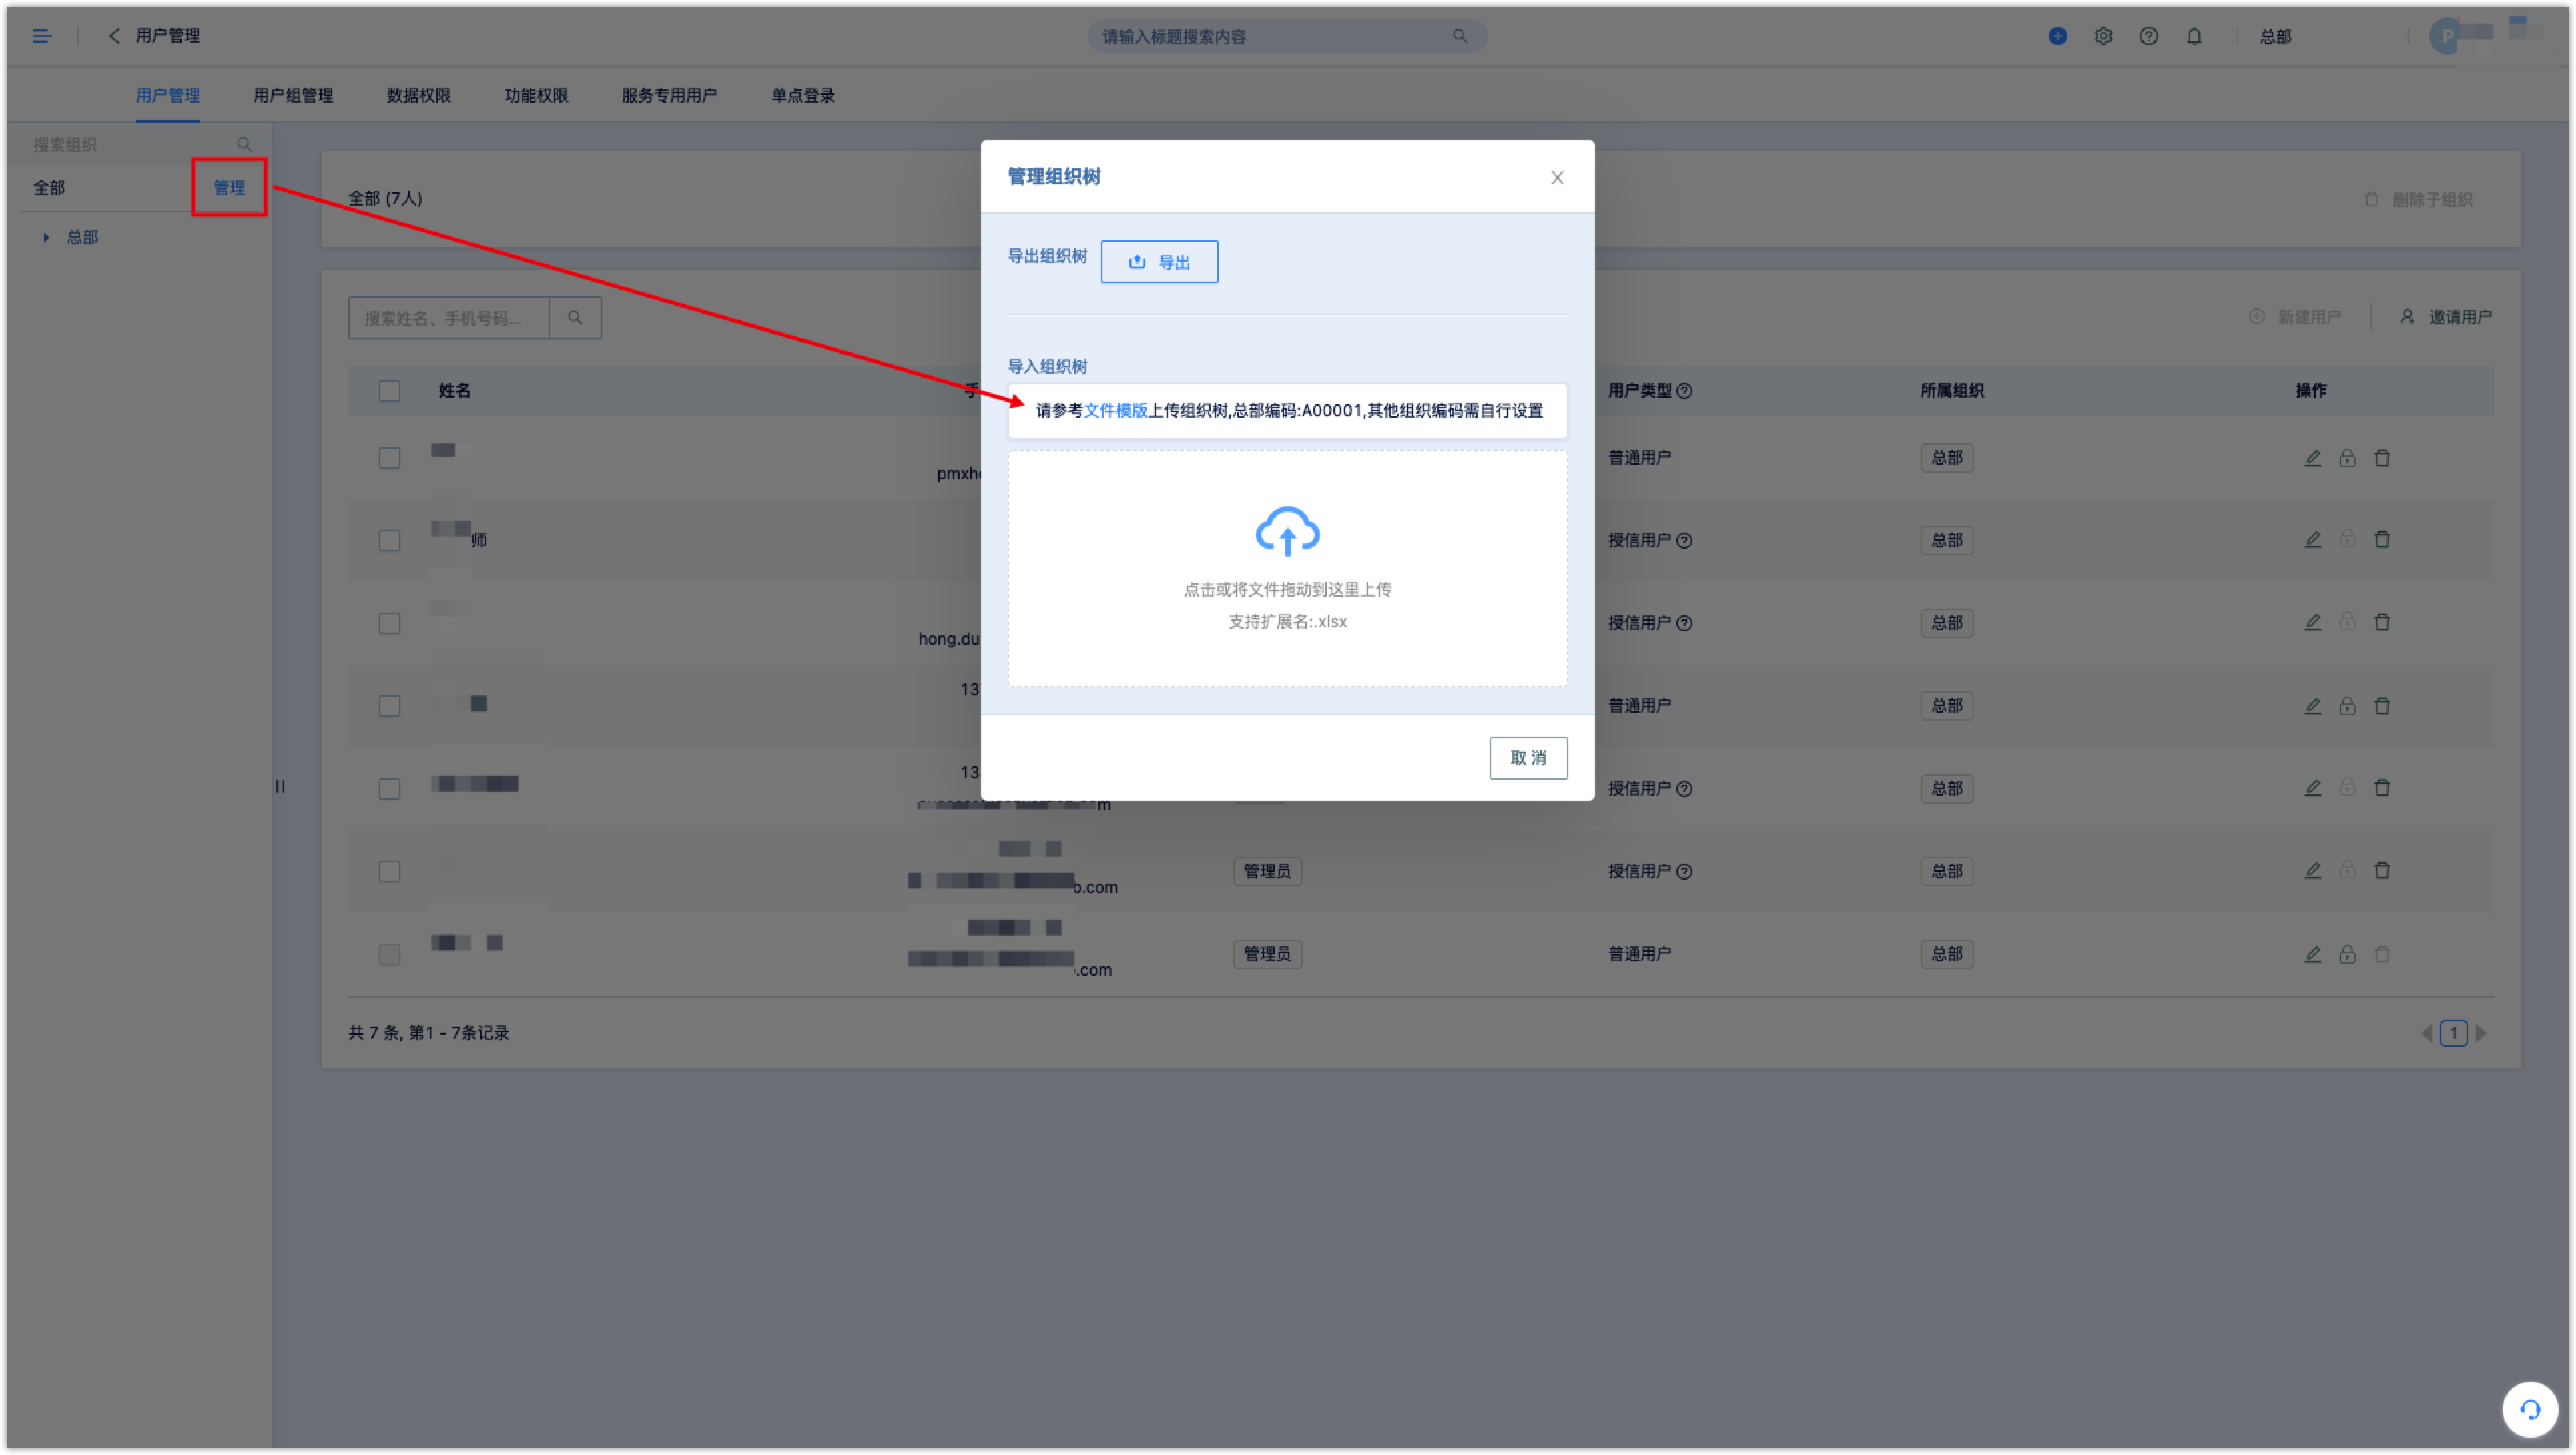
1)Import File to Organization Tree
Click the [Manage] button on the left to download the file template, refer to the file template to complete the organization tree file, and then upload it.
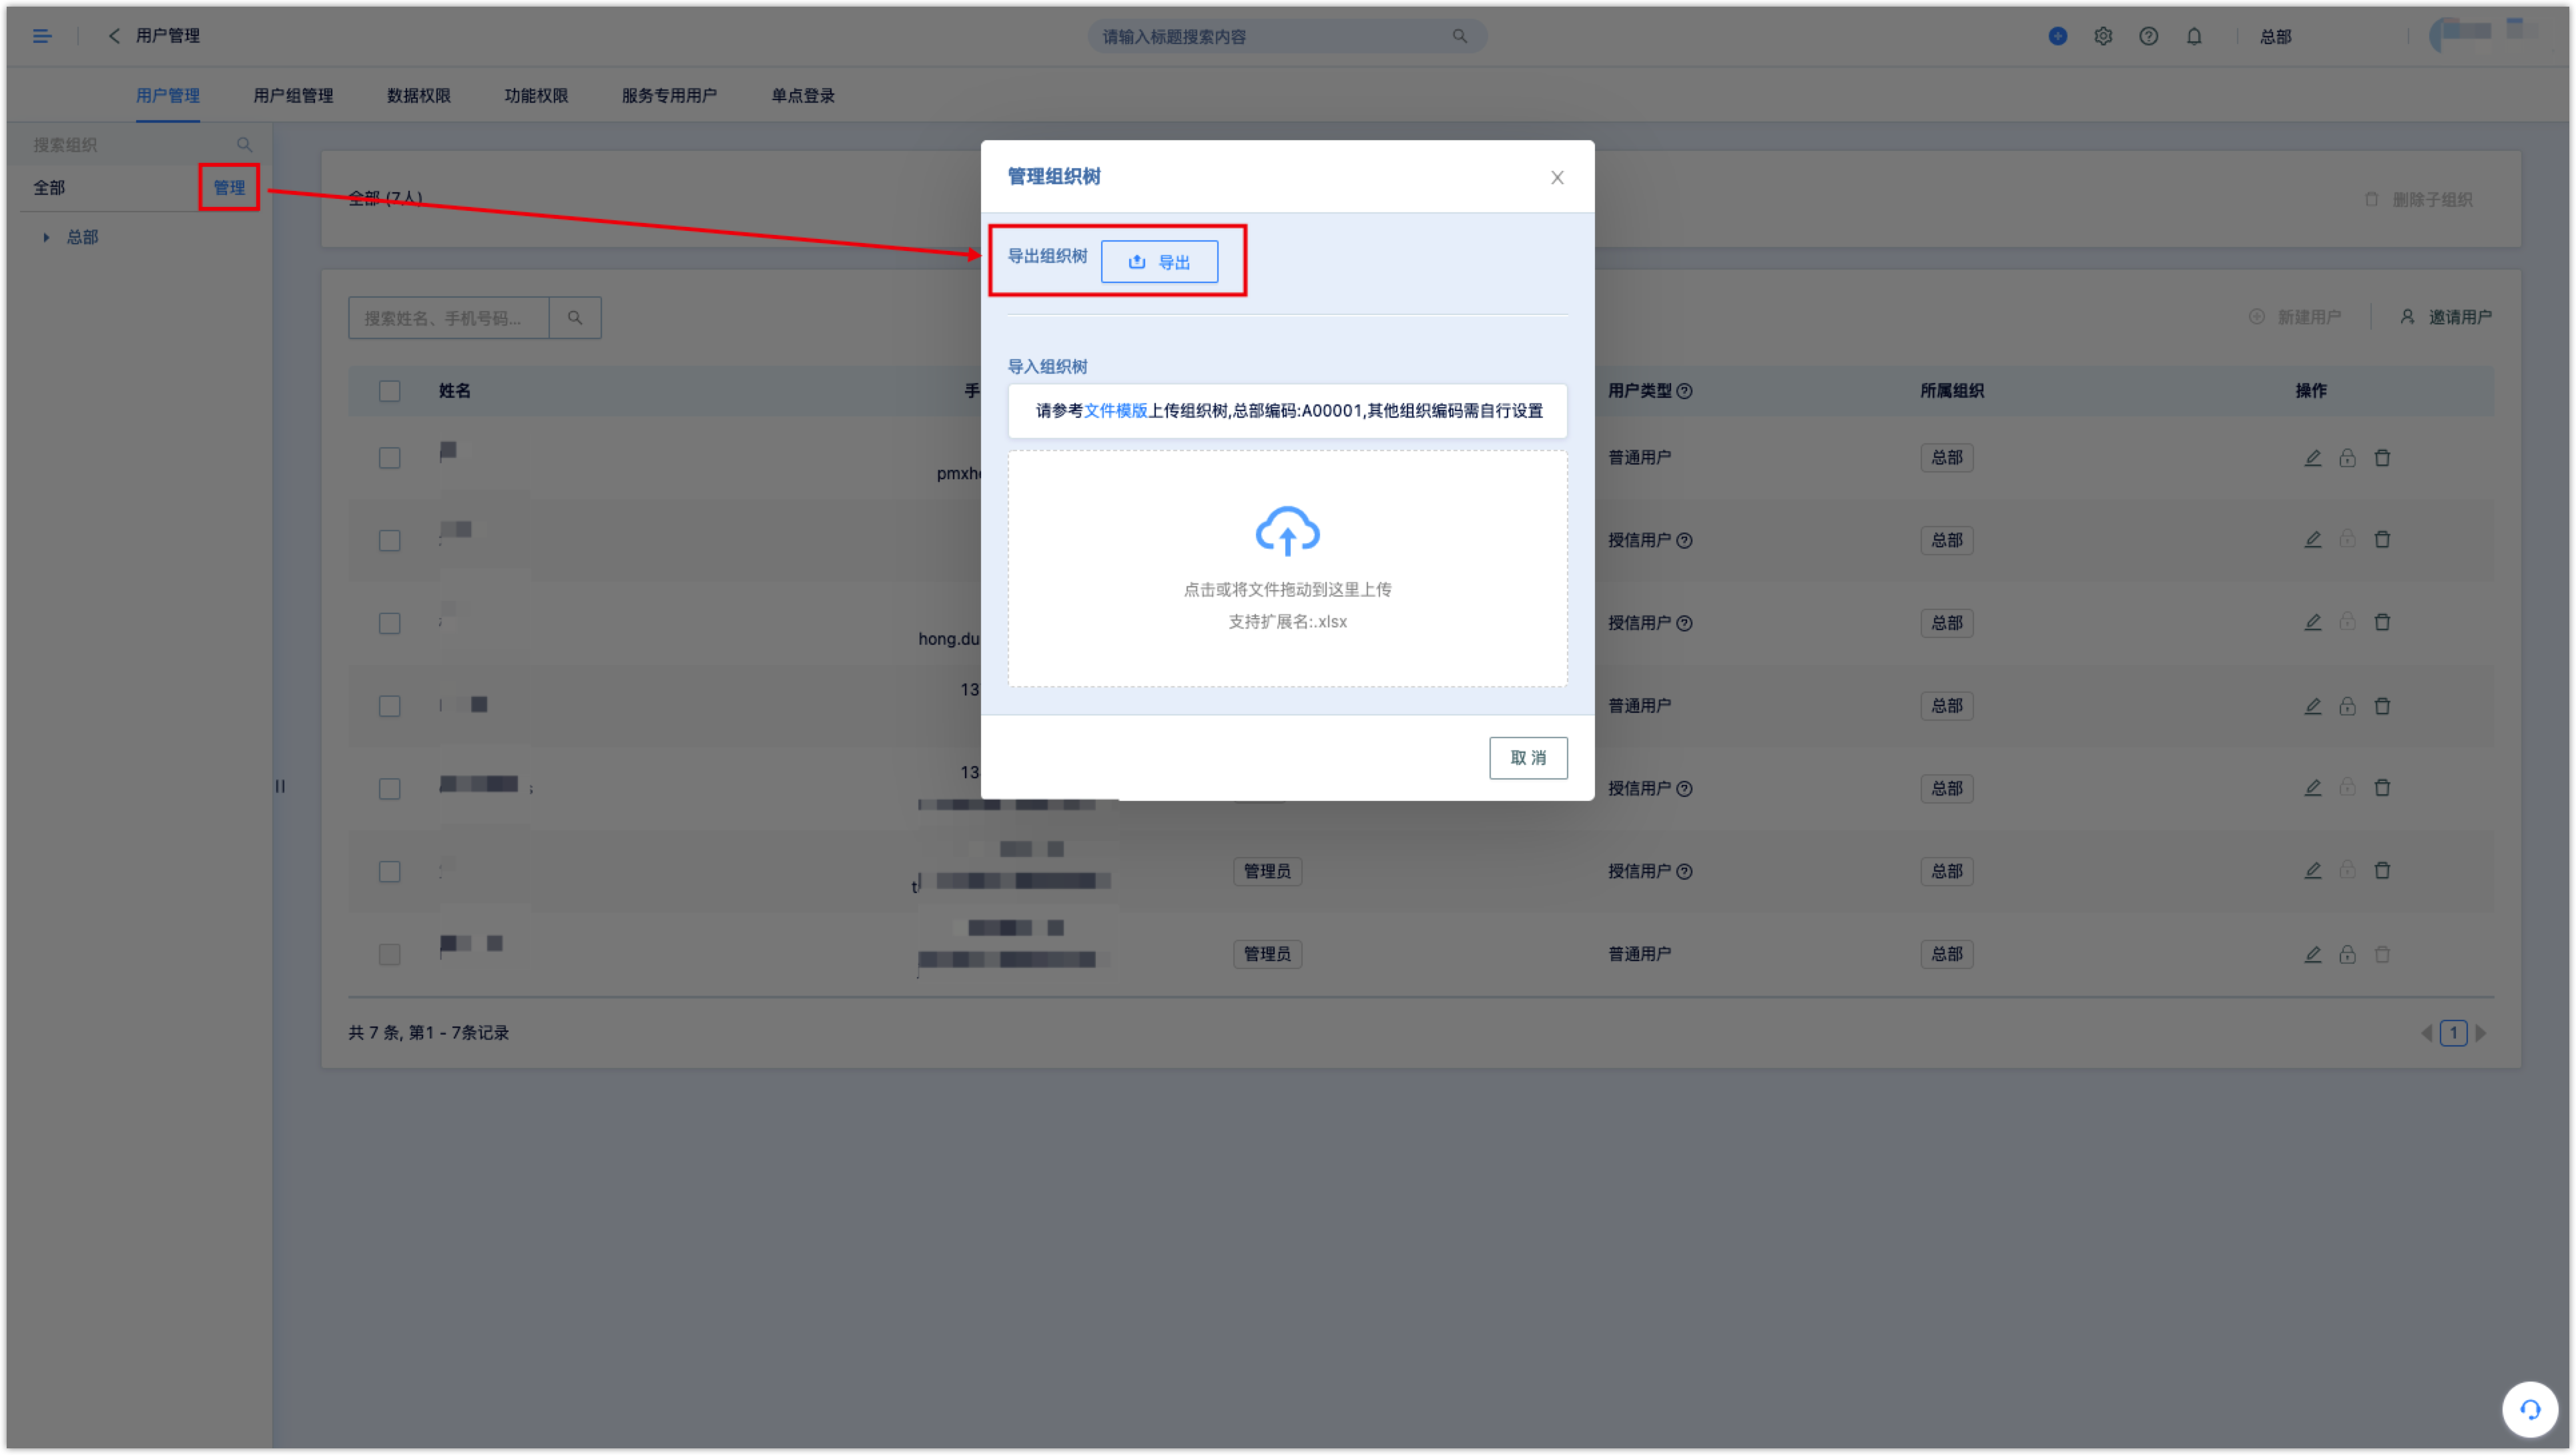
The system also supports exporting the existing organization tree.
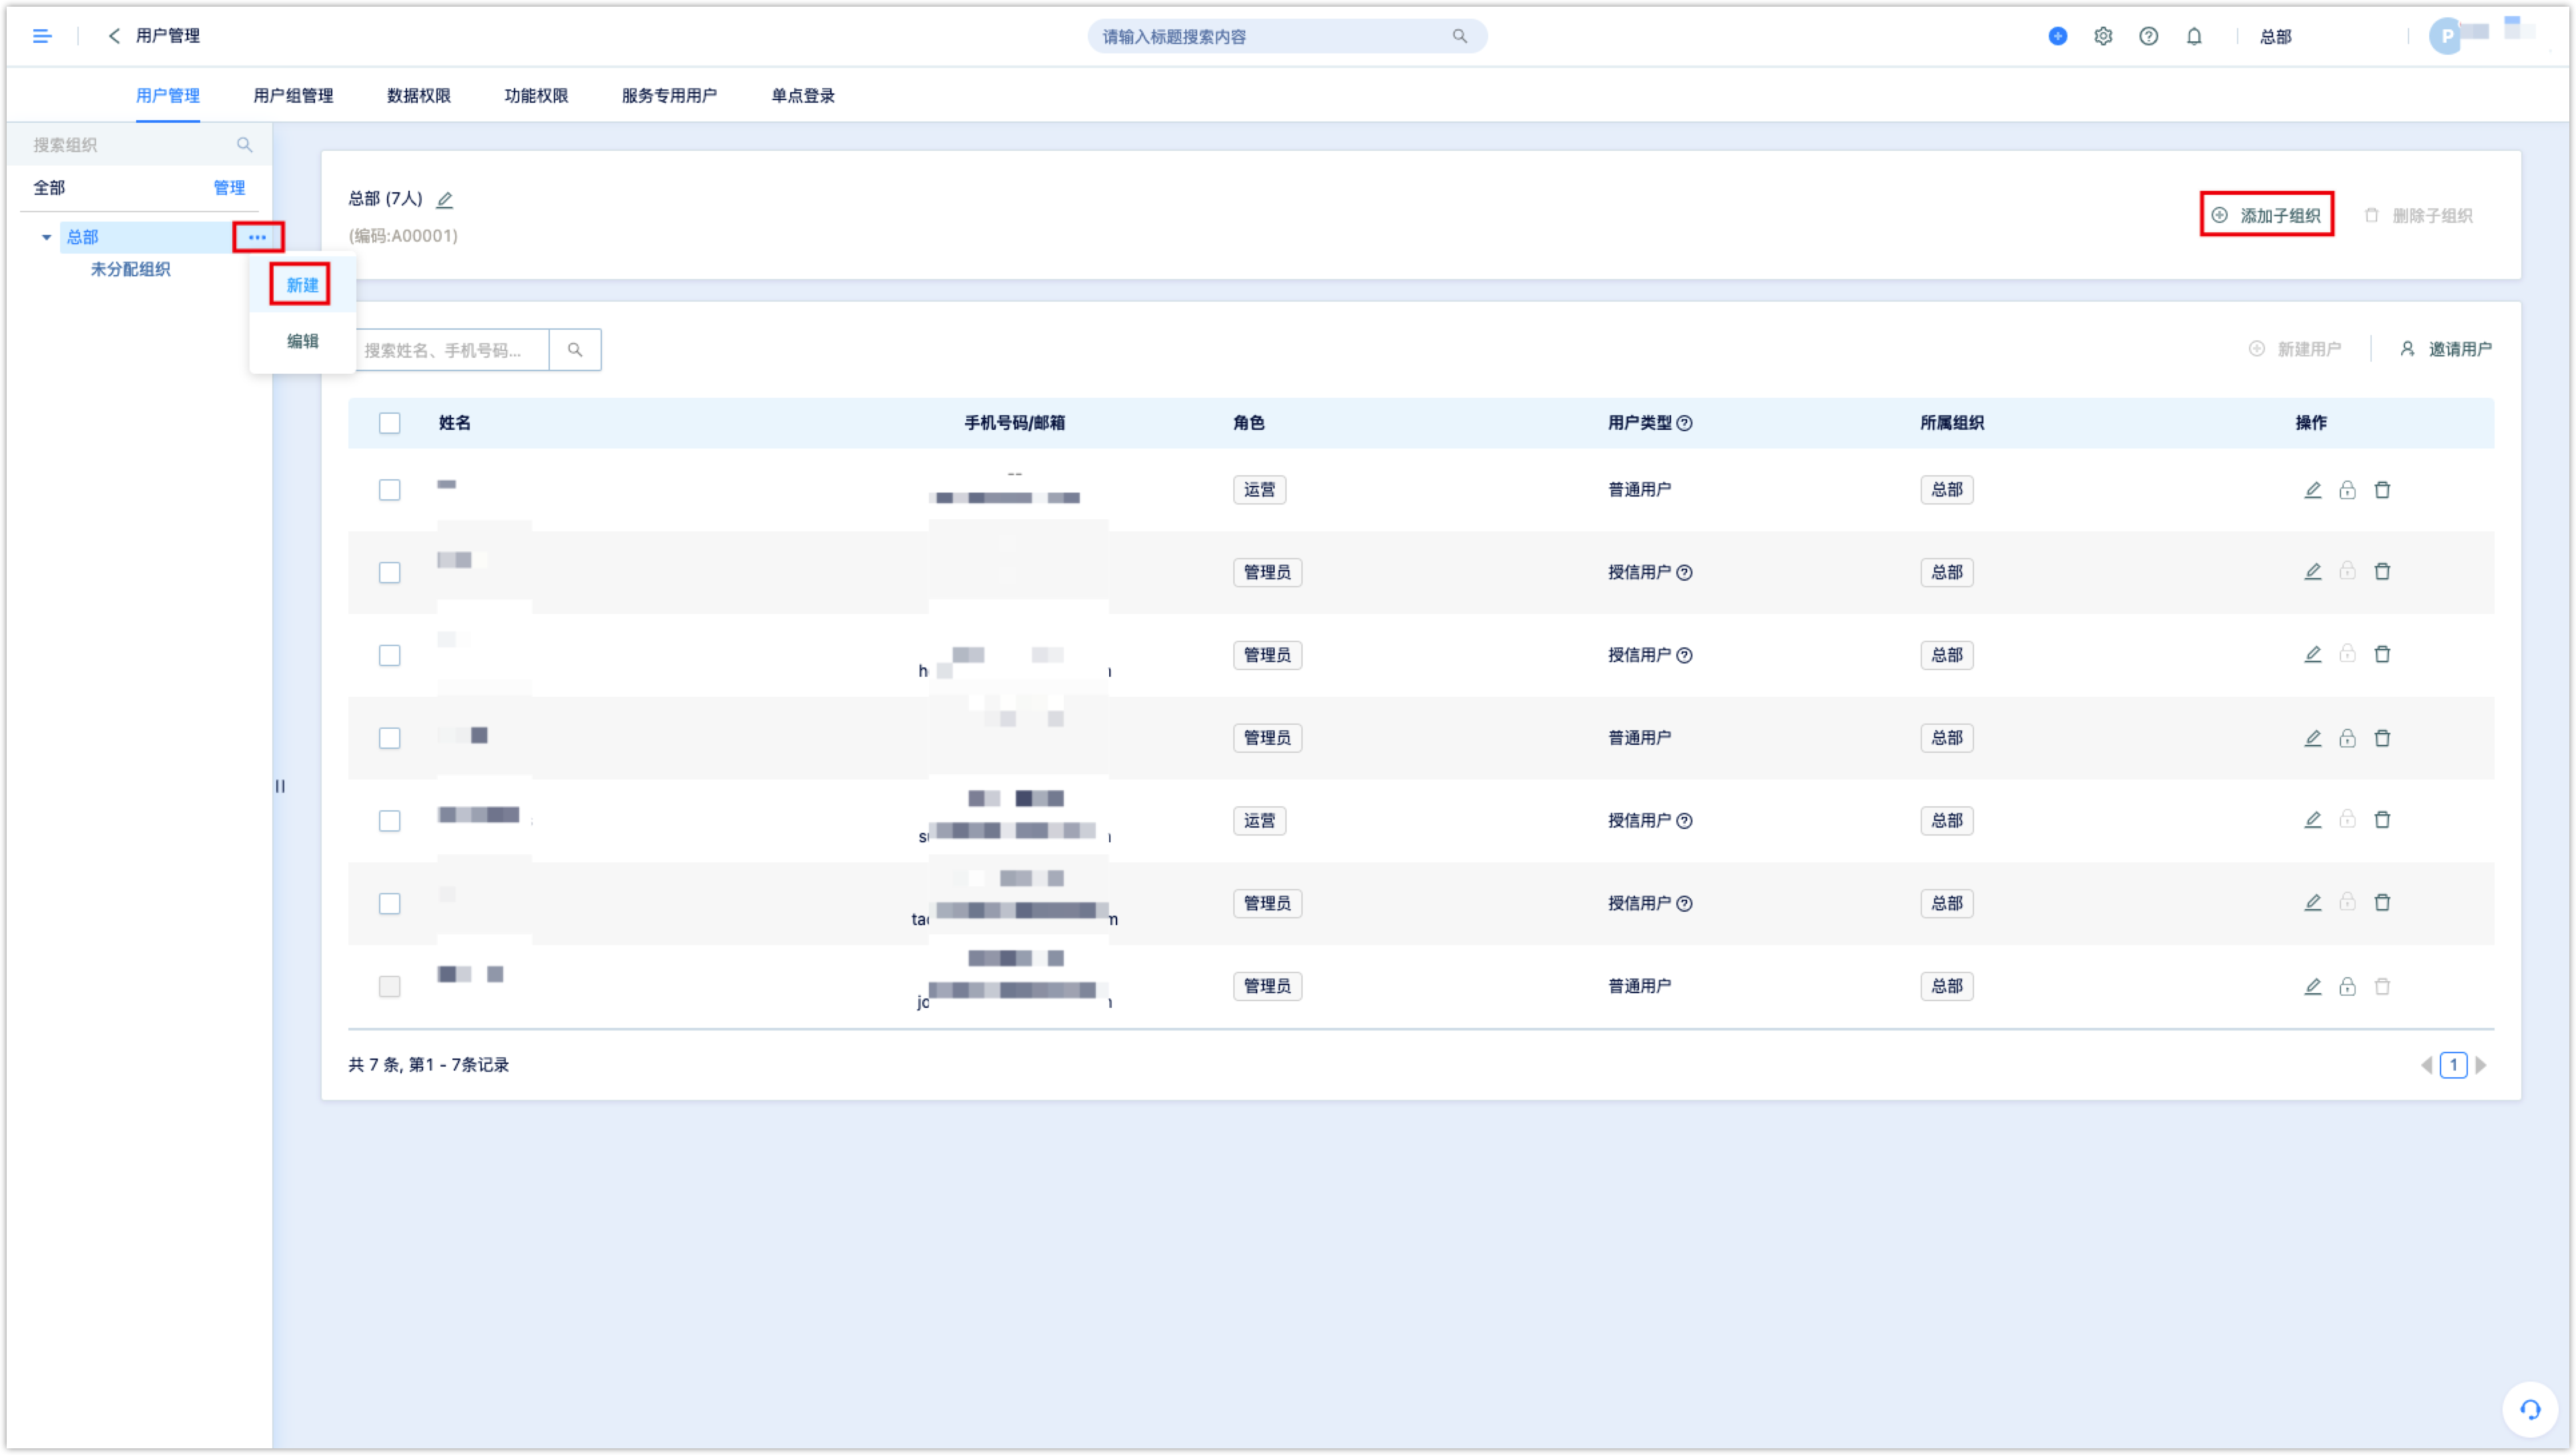
 2)Creating Organization Tree Manually
Click [Headquarters], click the [New] button in [···] or the [Add Sub-Organization] button on the right to create a new sub-organization under headquarter.
Managing Organization:
After the organization is created, users can be assigned to organization when being edited or invited.
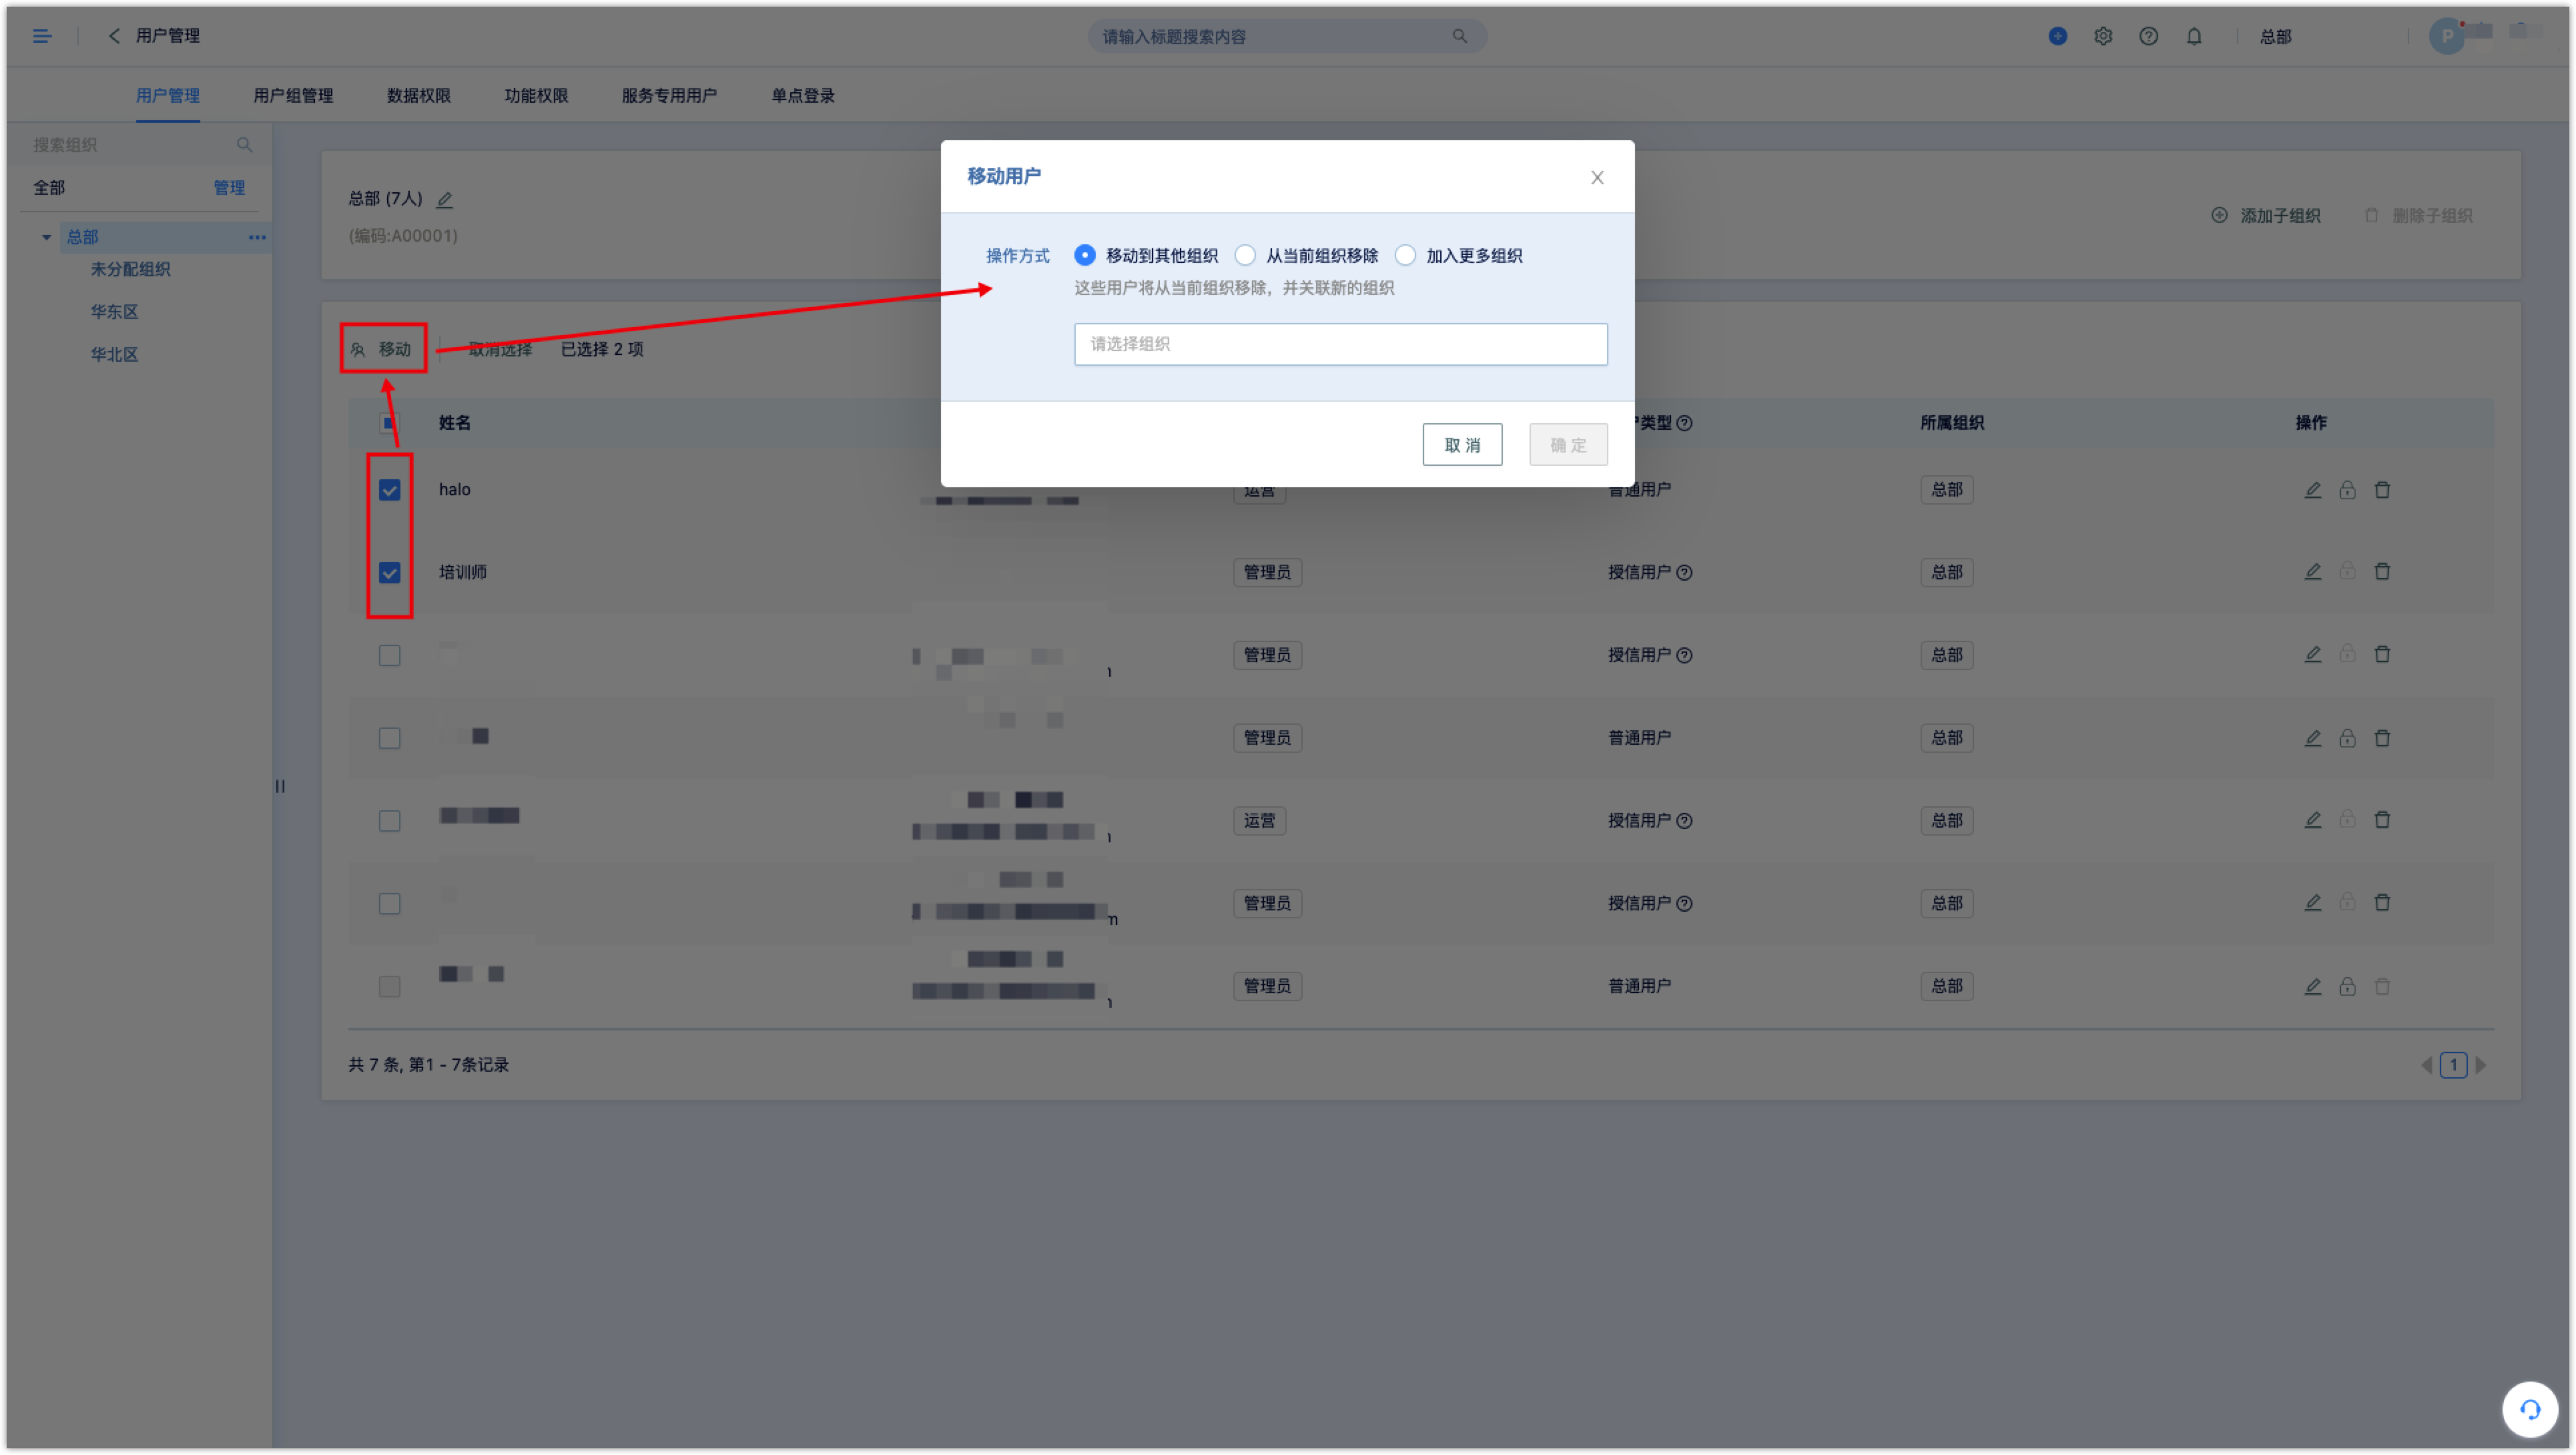
Existing users can be moved to organization.
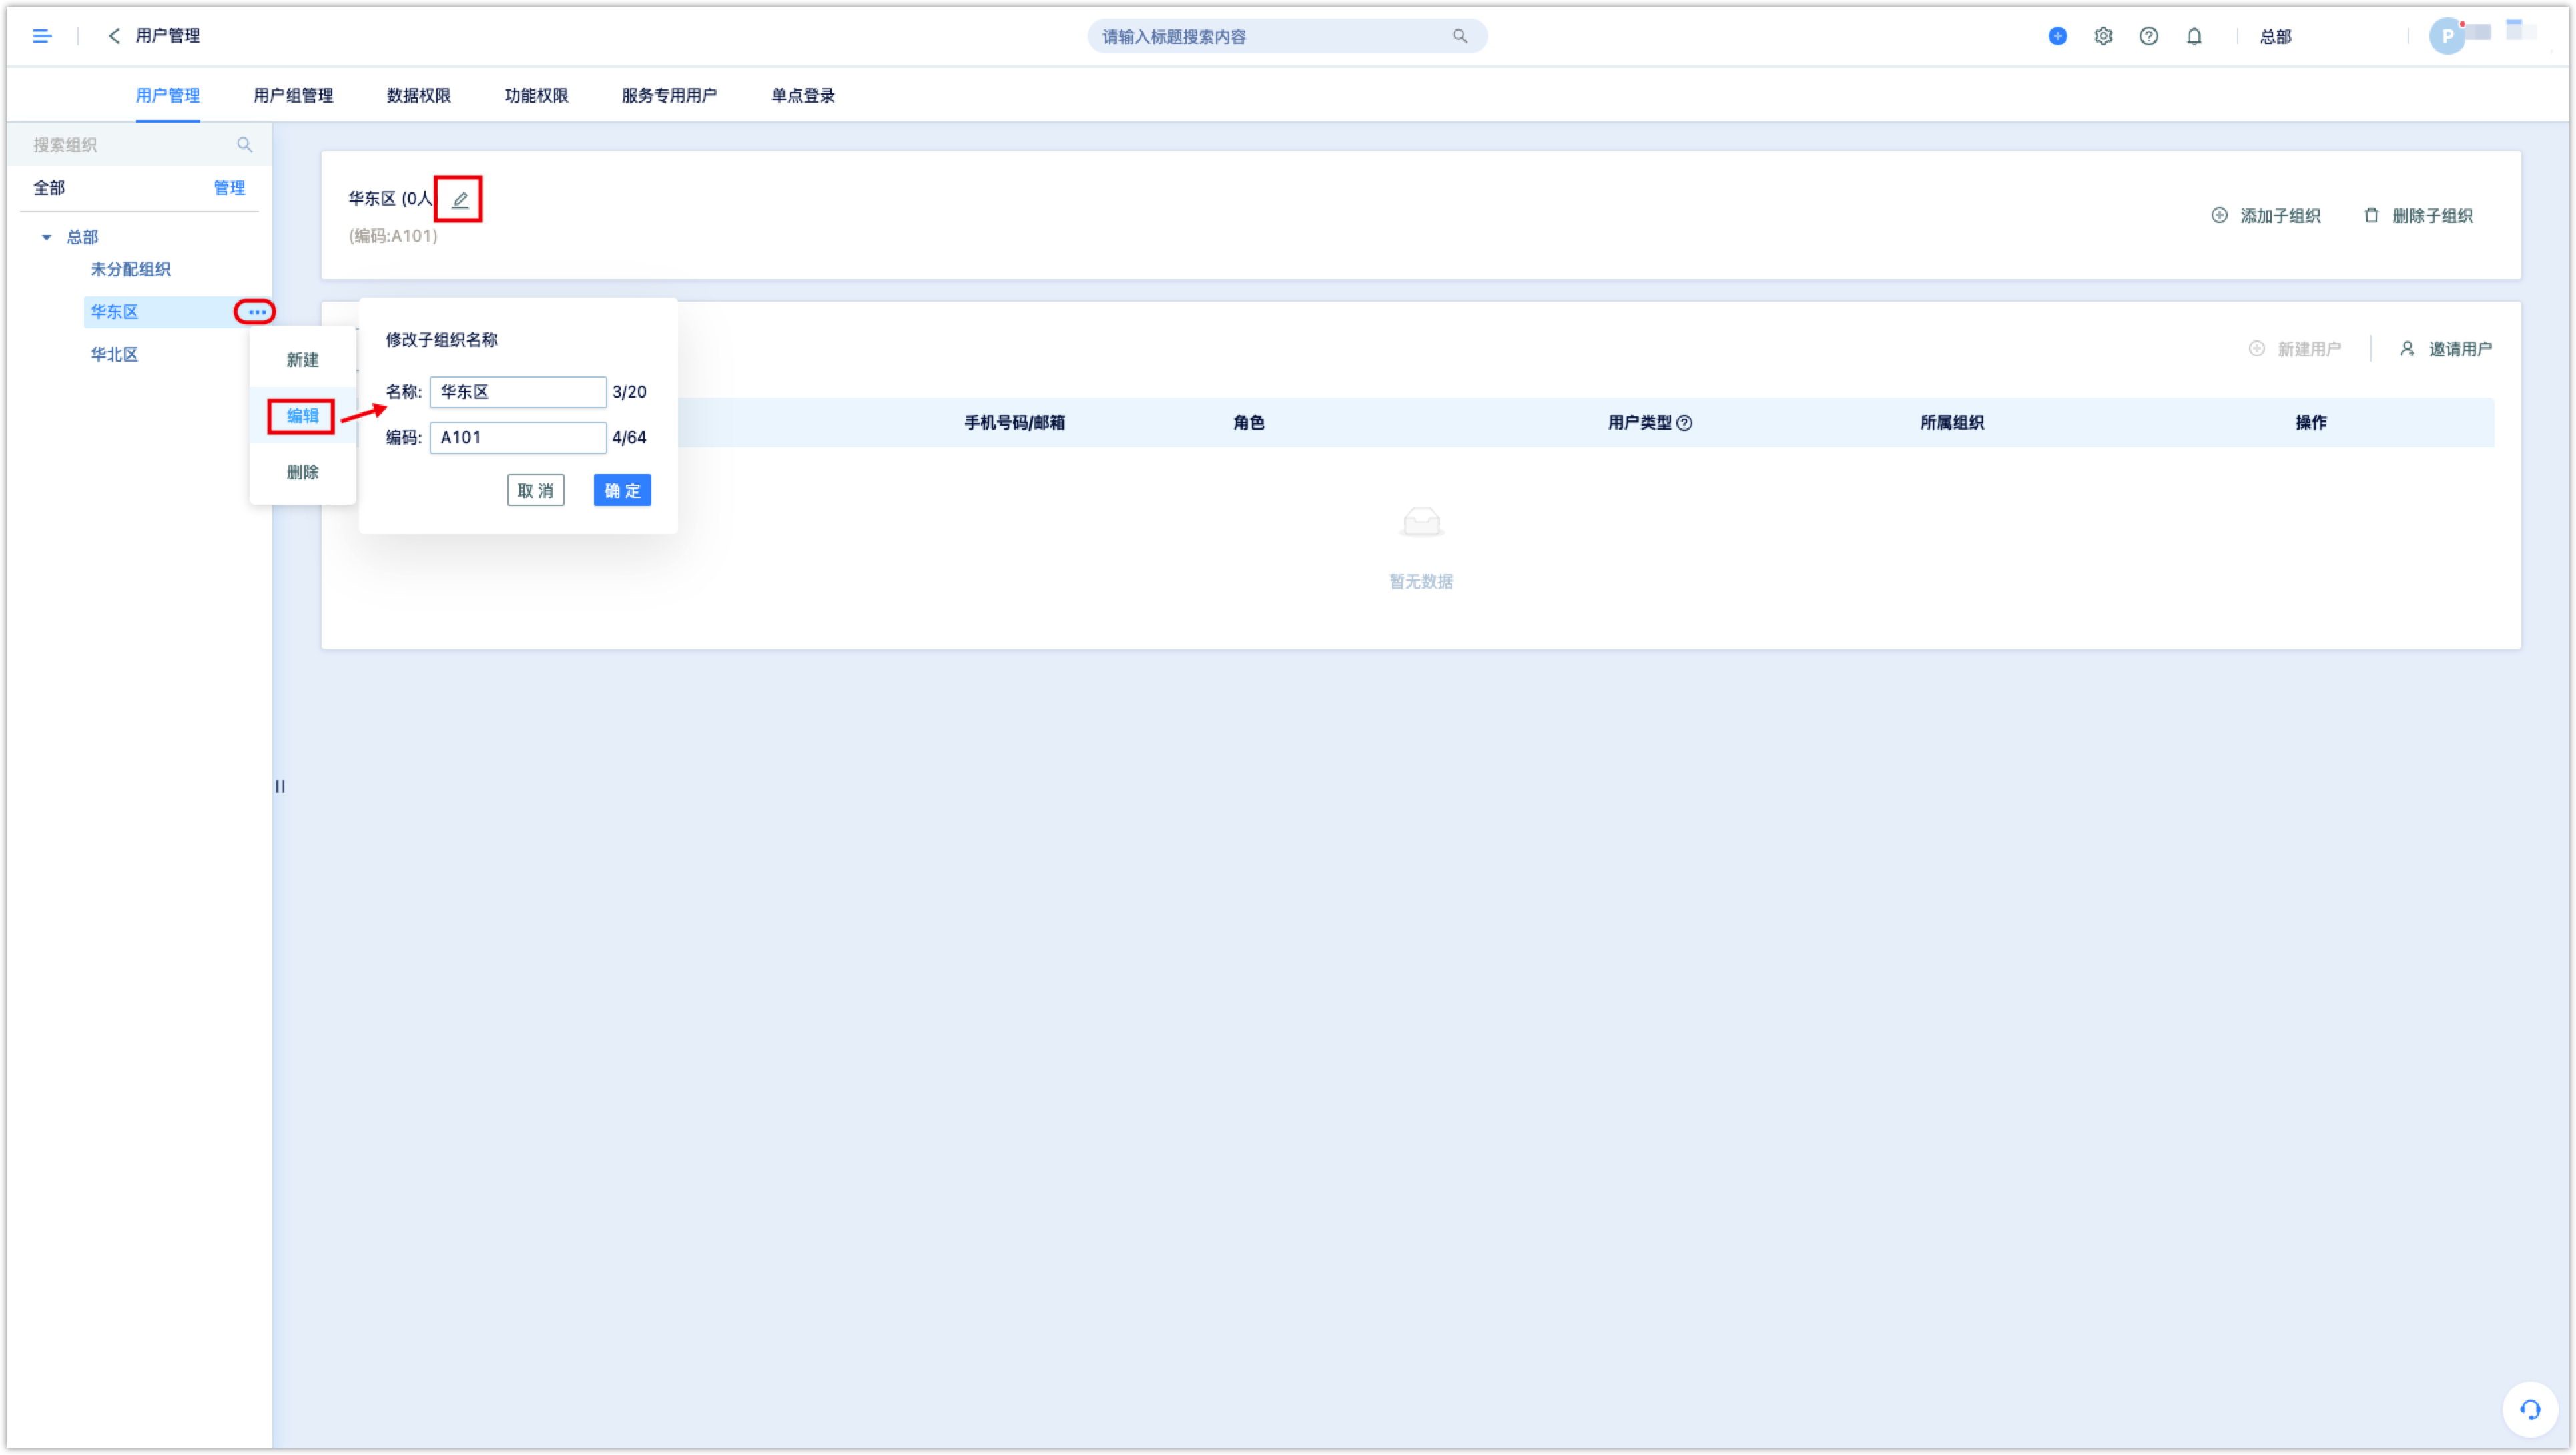
Organization can be delated or renamed.
In order to better utilize data permissions, it is recommended to assign users to the corresponding organization. DM Hub supports assigning user to multiple organizations. If a user belongs to multiple organizations, the user needs to choose which organization to use when logging in to DM Hub. All operations of the user in the tenant can be determined under which organization the operation is performed.
4.2.2User Group
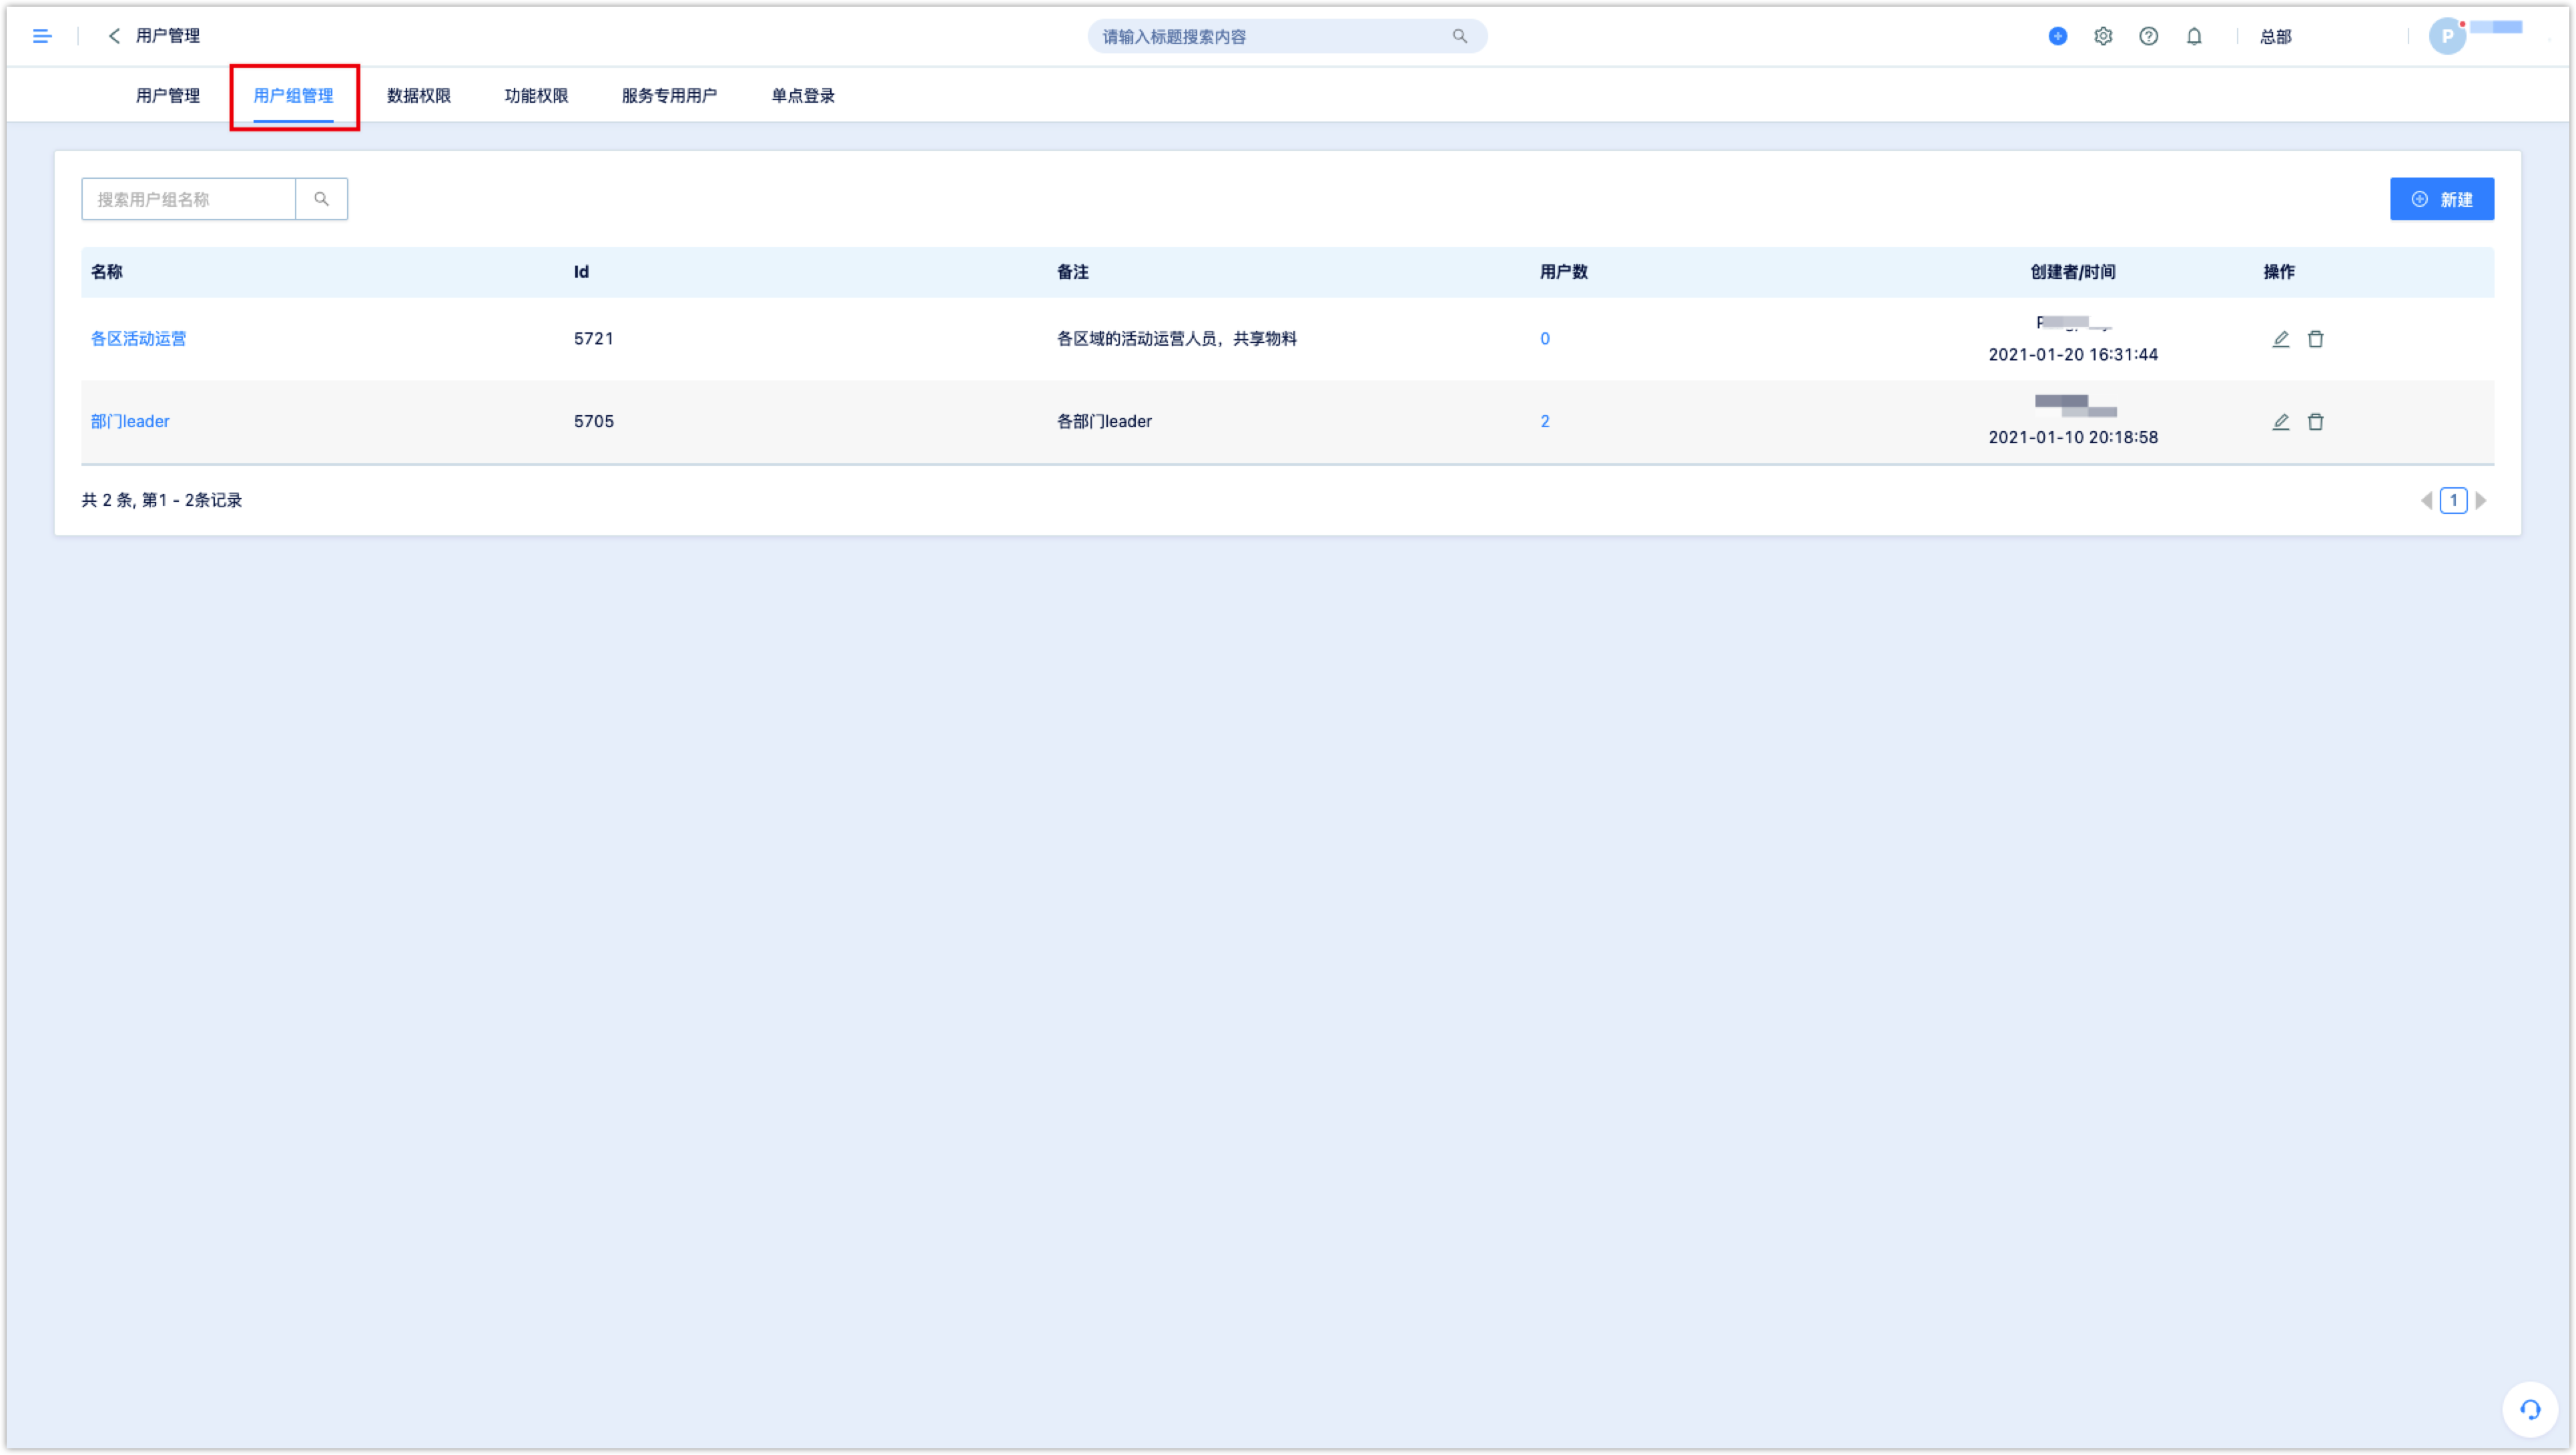
Click [User Group Management] to view all user groups.
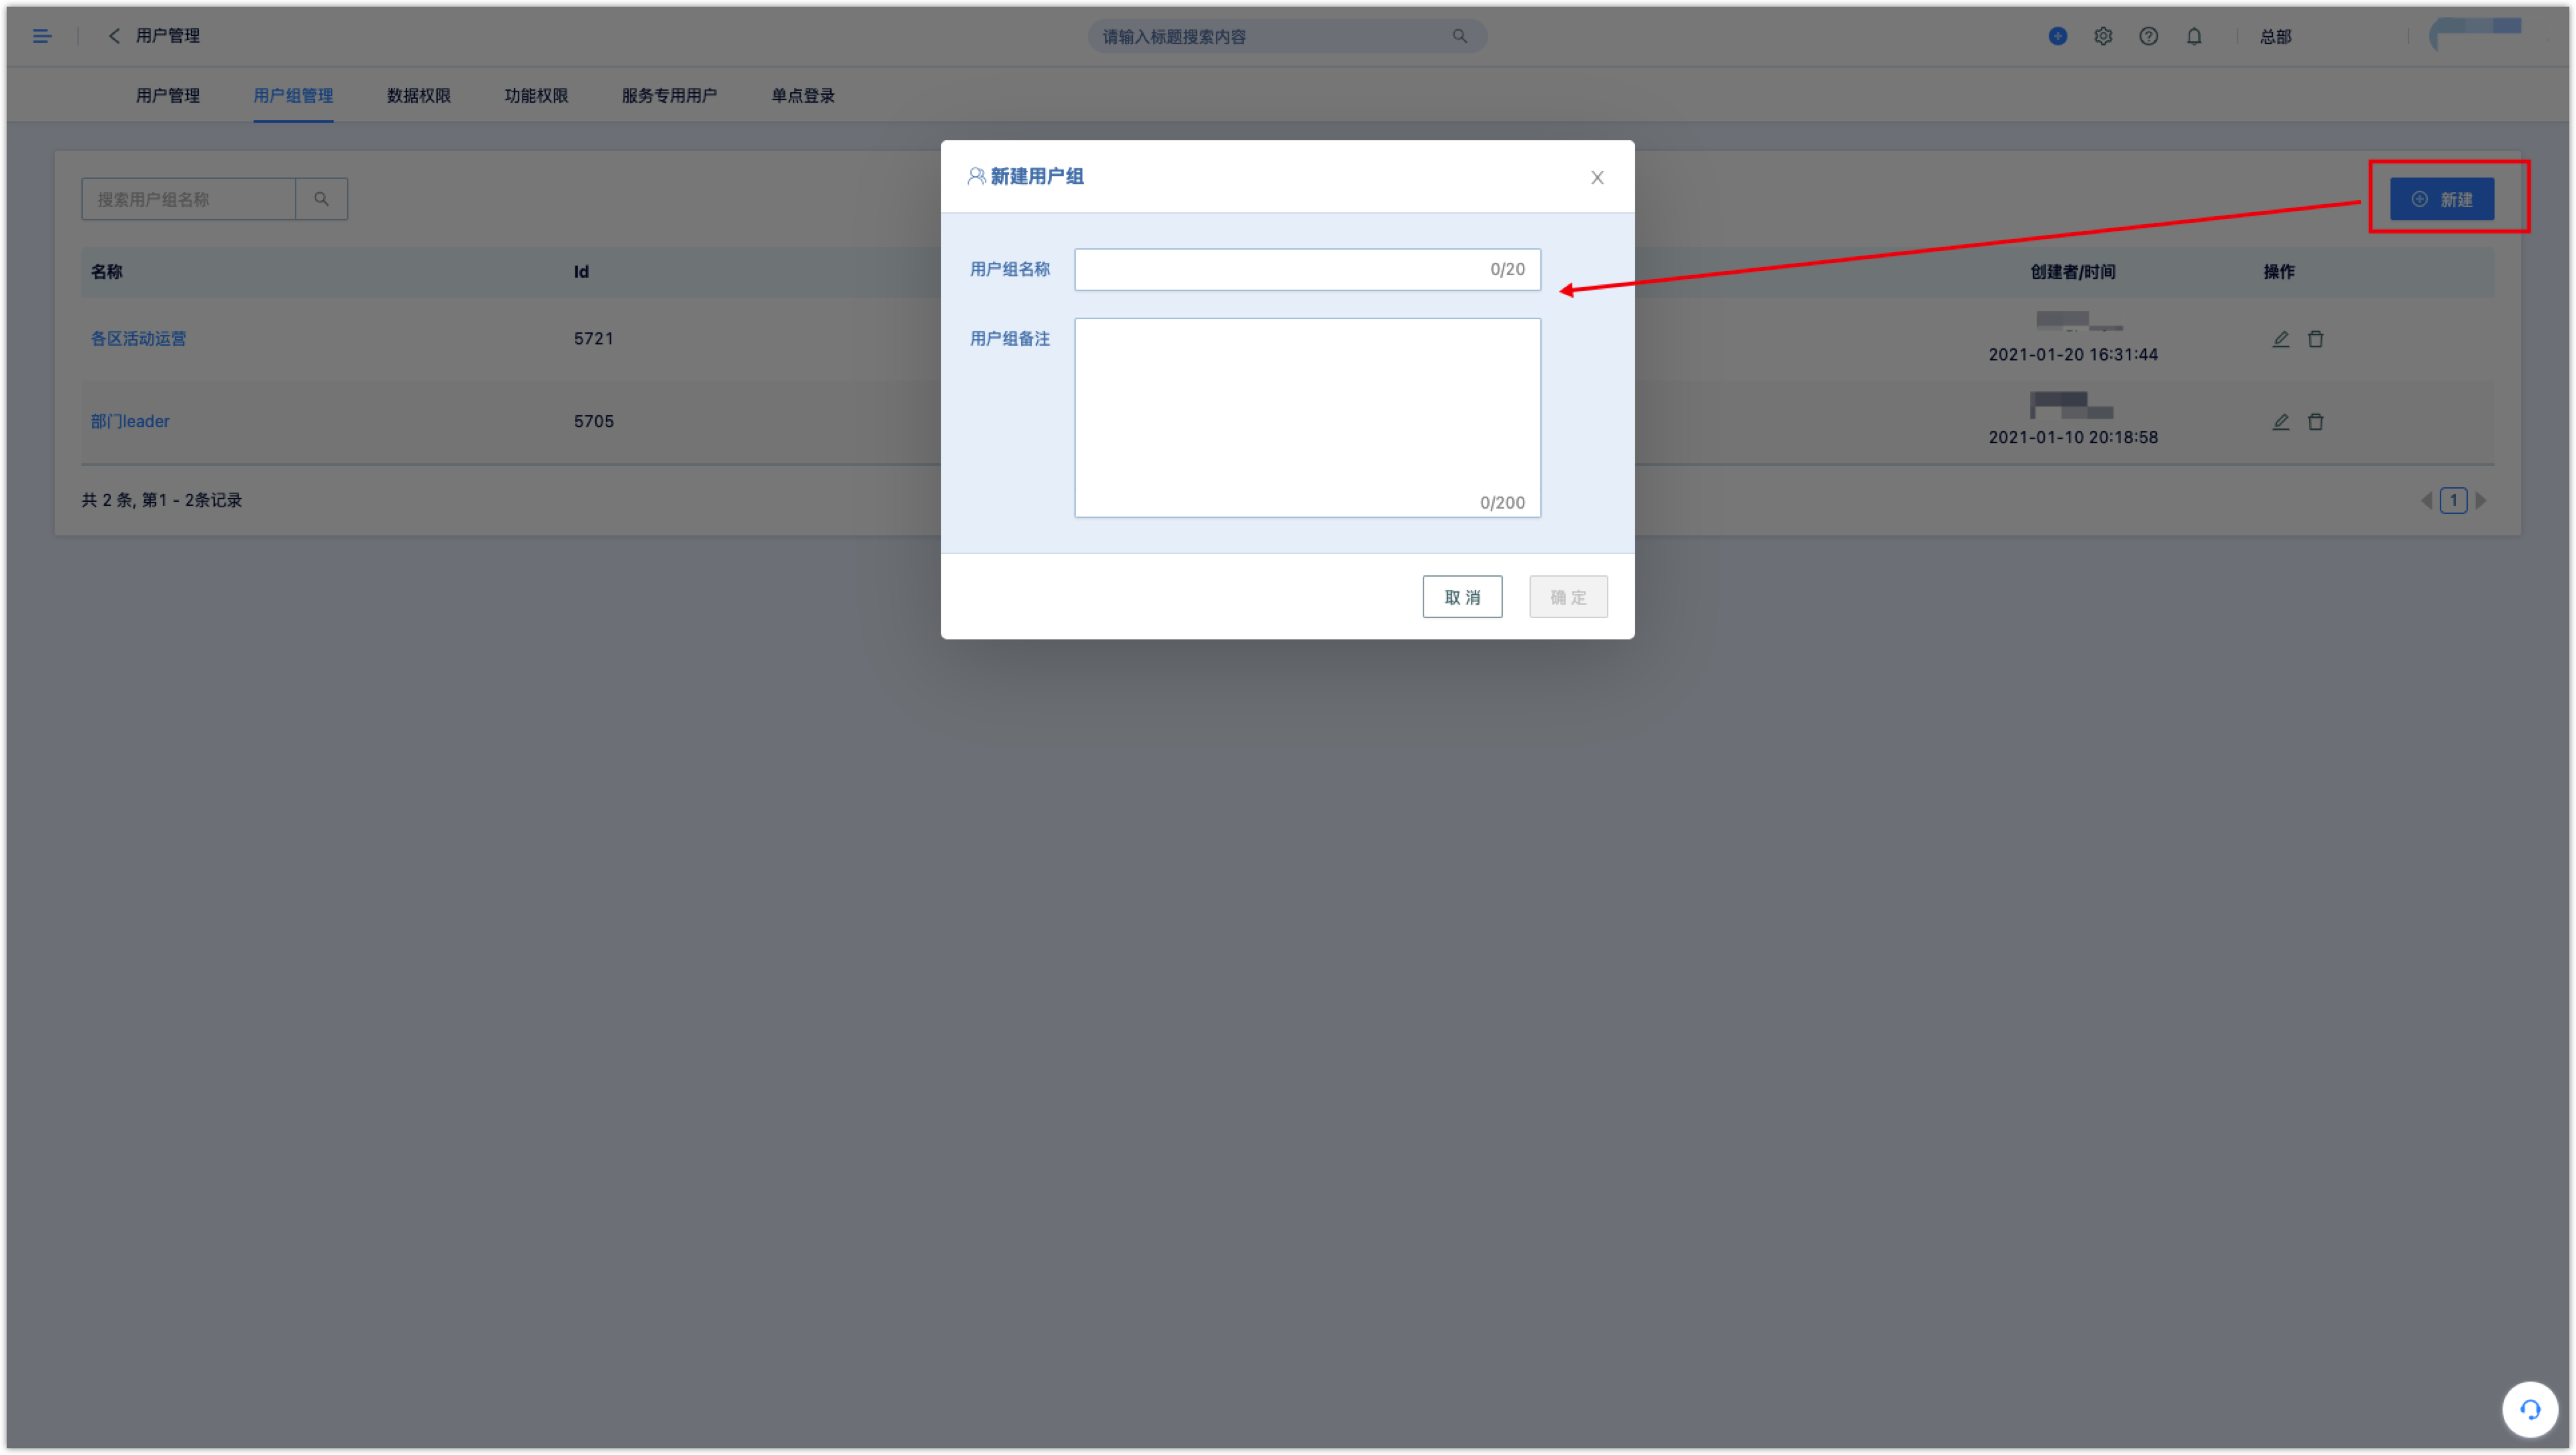
Click [New User Group], input user group name and remarks to create a user group. Both the name and remarks are required. Up to 100 user groups can be created.
After creating a user group, click on the user group name to add users to the user group. Up to 50 users can be added to each group. Select user to remove the group.

4.2.3Data Permissions – Basic Data Permissions
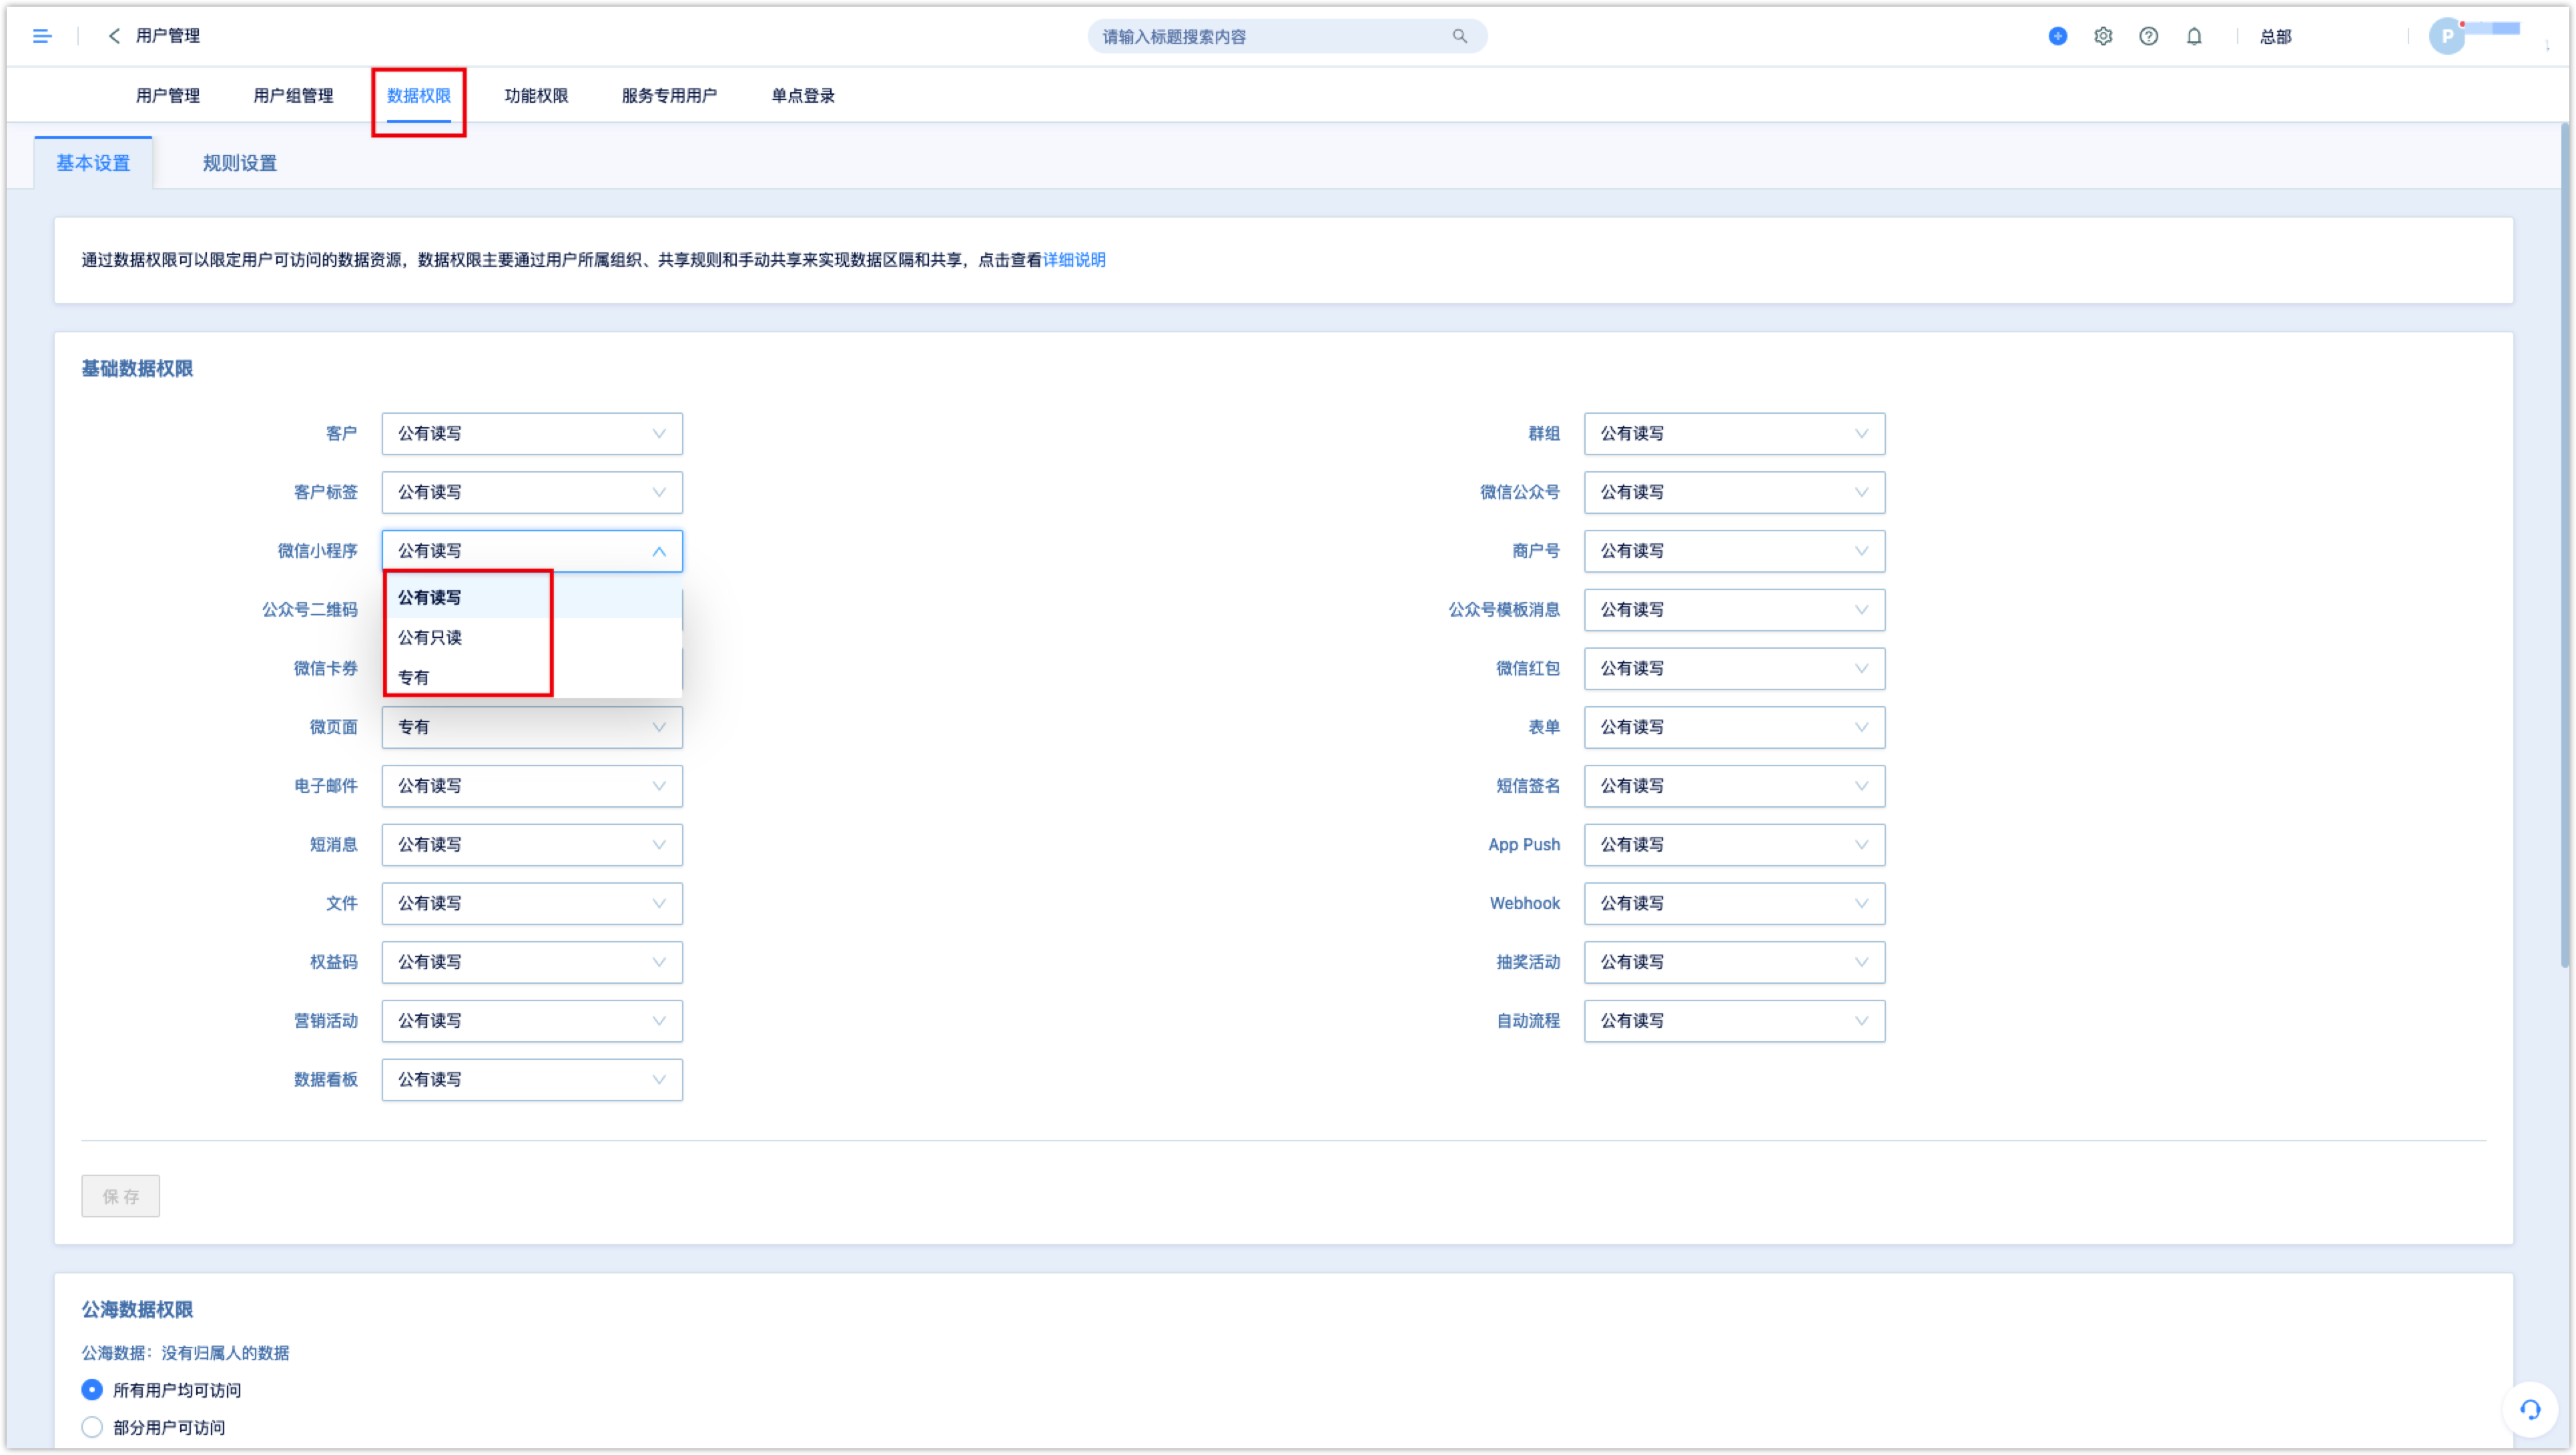
Click [User Management-Data Permissions-Basic Settings-Basic Data Permissions] to set whether the data in each function in the system is public or proprietary, that is, whether all kinds of data that have been attributed can be visible or ediable to other users or organizations.
- Exclusive: The data is only visible to the organization and its parent organization to which the creator belongs to.
- Public read and write: the data is visible to all users, and the data can be read and edited.
- Public read-only: All users can view the data, but only the owner of the data, the owner organization and its parent organization can edit it
- For tenants with a large amount of customer data (such as million level), it is recommended that Customers is set it as public
If the data is set as proprietary, only users with permission to the data can access the data.
For example, user 1 belongs to organization A and organization B, and chooses to enter organization A when logging in to the system. At this time, user 1 creates data in the system (such as text messages or WeChat Page), DM Hub will attribute the data to the selected corresponding organization A as the owner and organization. If the data object (such as a WeChat Page) is set to a proprietary type, then the newly created WeChat Page is limited to data permissions, all users of the organization A and its parent organization can access this data, and organization B have no access to the data.
4.2.4Data Permissions – Data Sharing Settings
As mentioned above, after a user is assigned an organization, the data created by the user will automatically generate corresponding data permissions to form a data partition between organizations. However, in some cases, cross-organization collaboration is required, and data sharing is required.
Sharing Rule
Data sharing can be achieved by setting some rules.
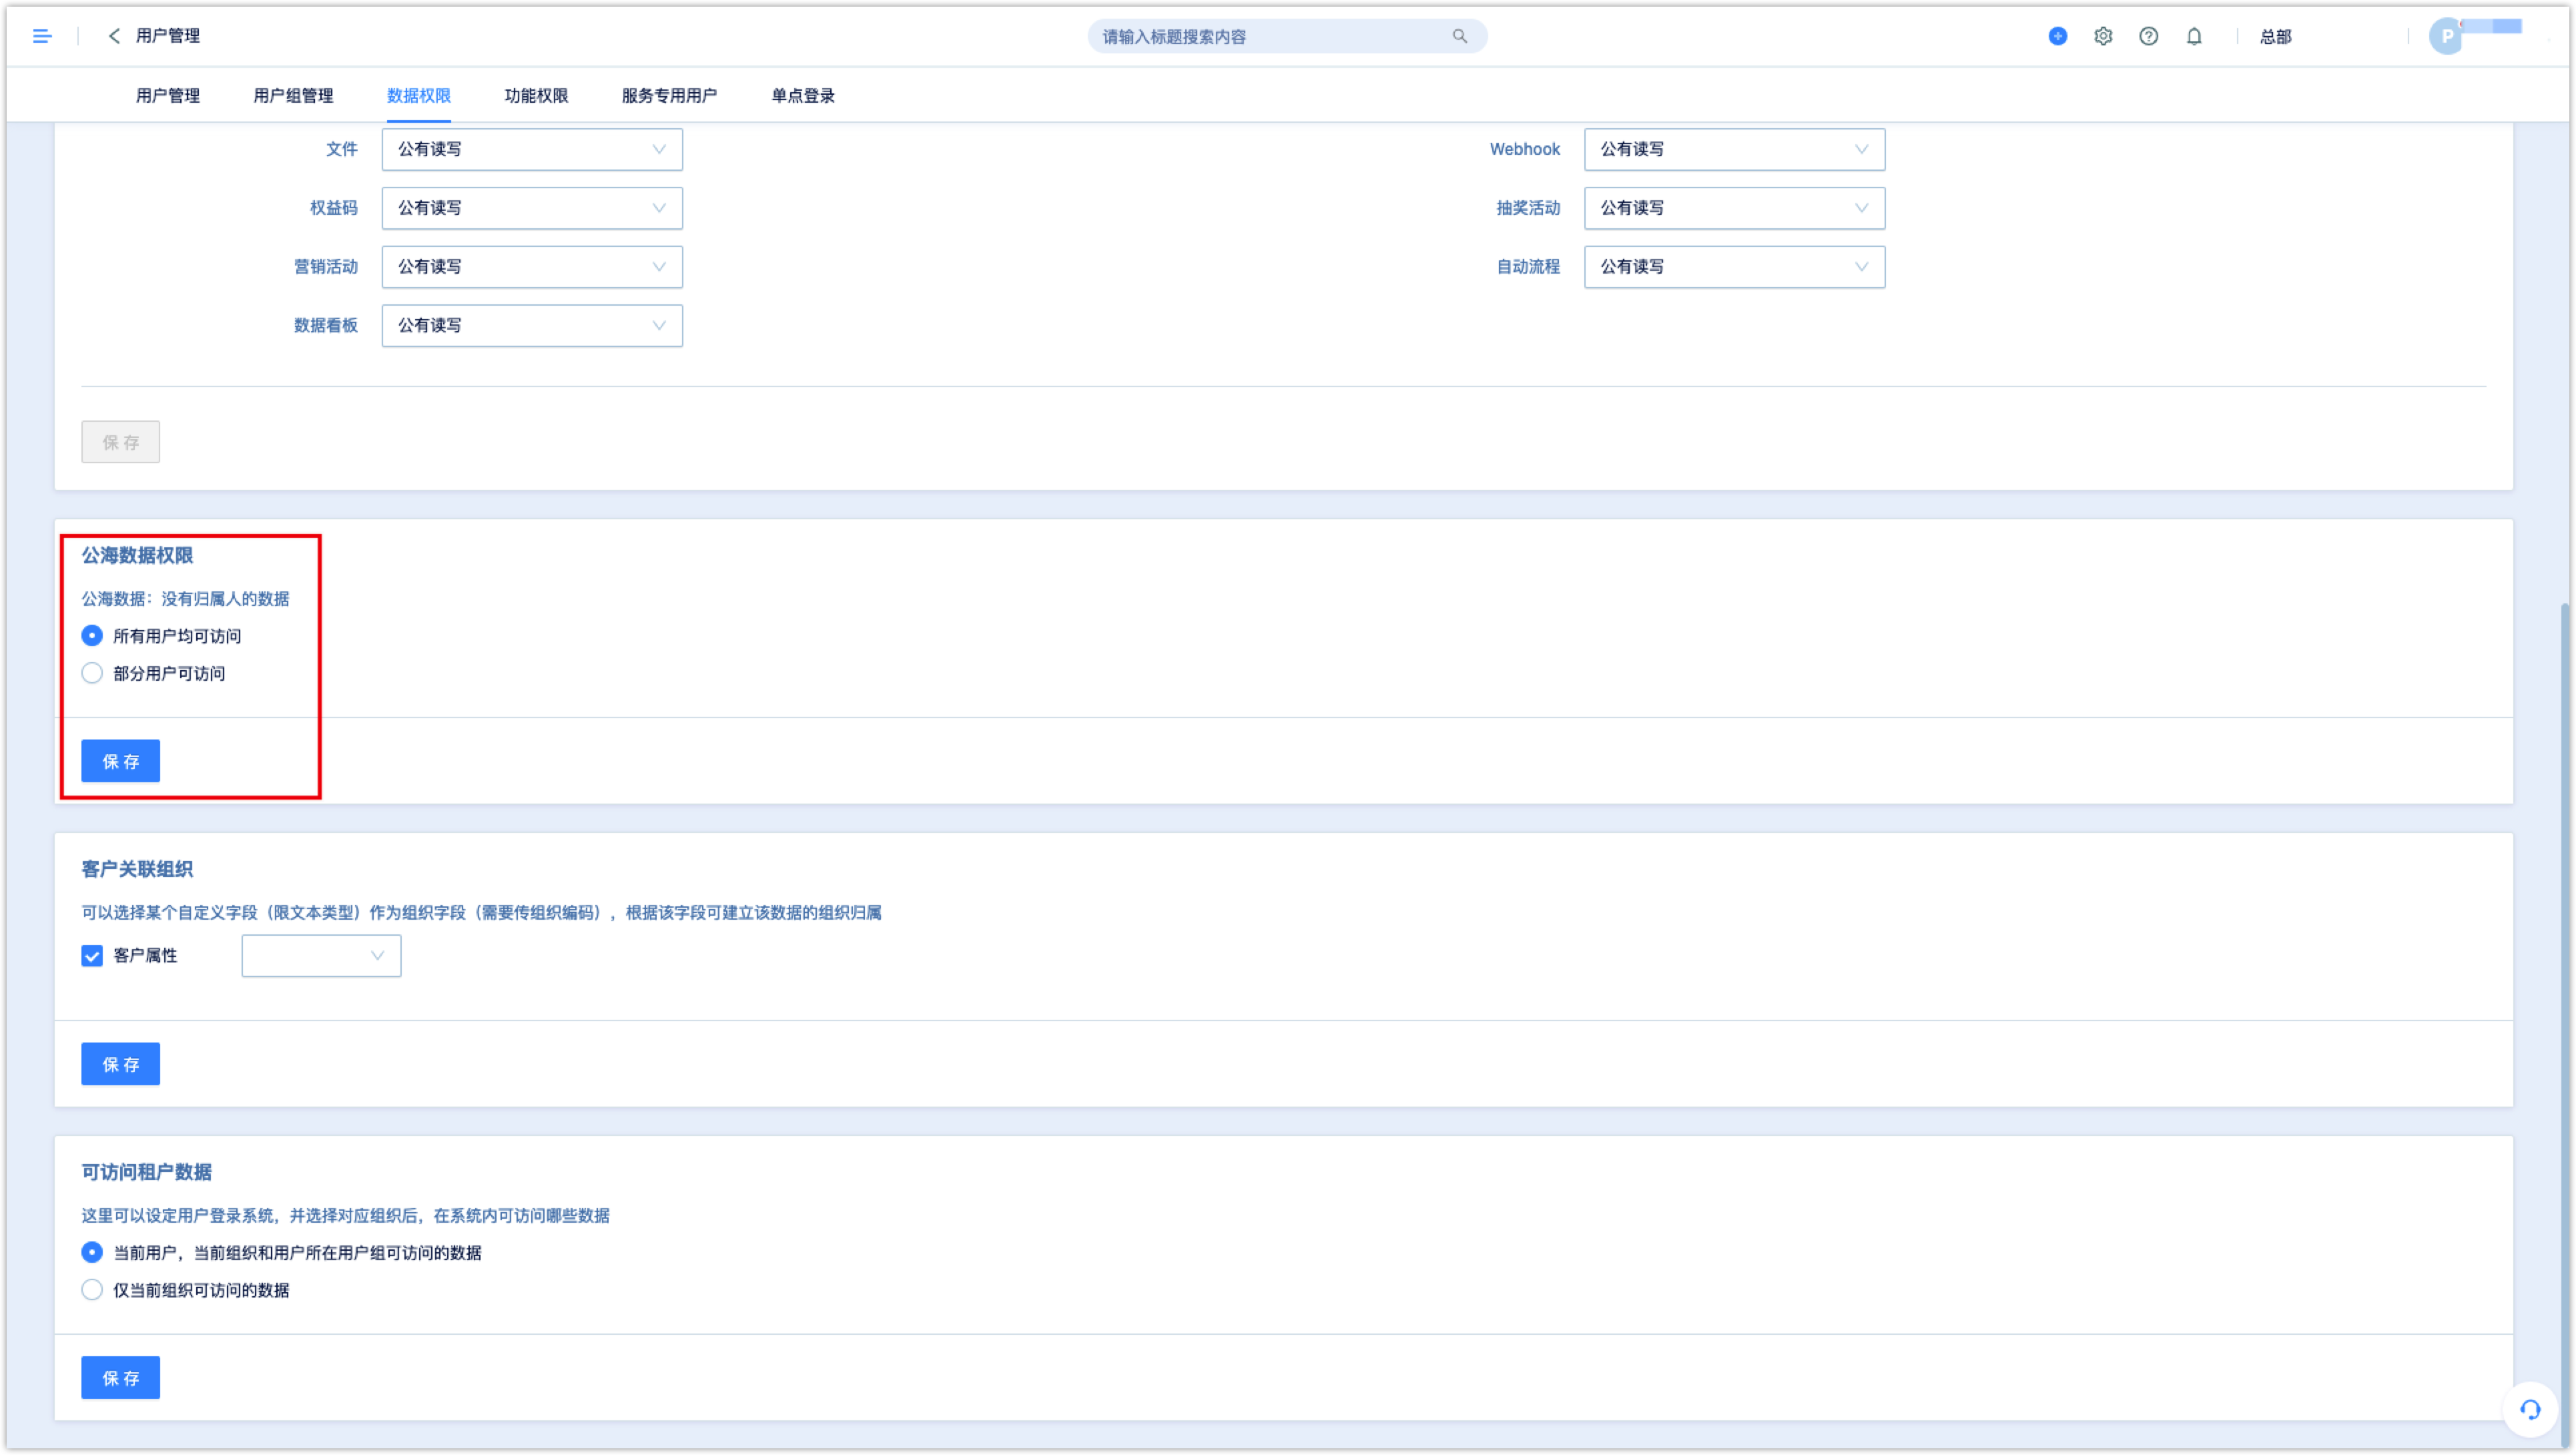
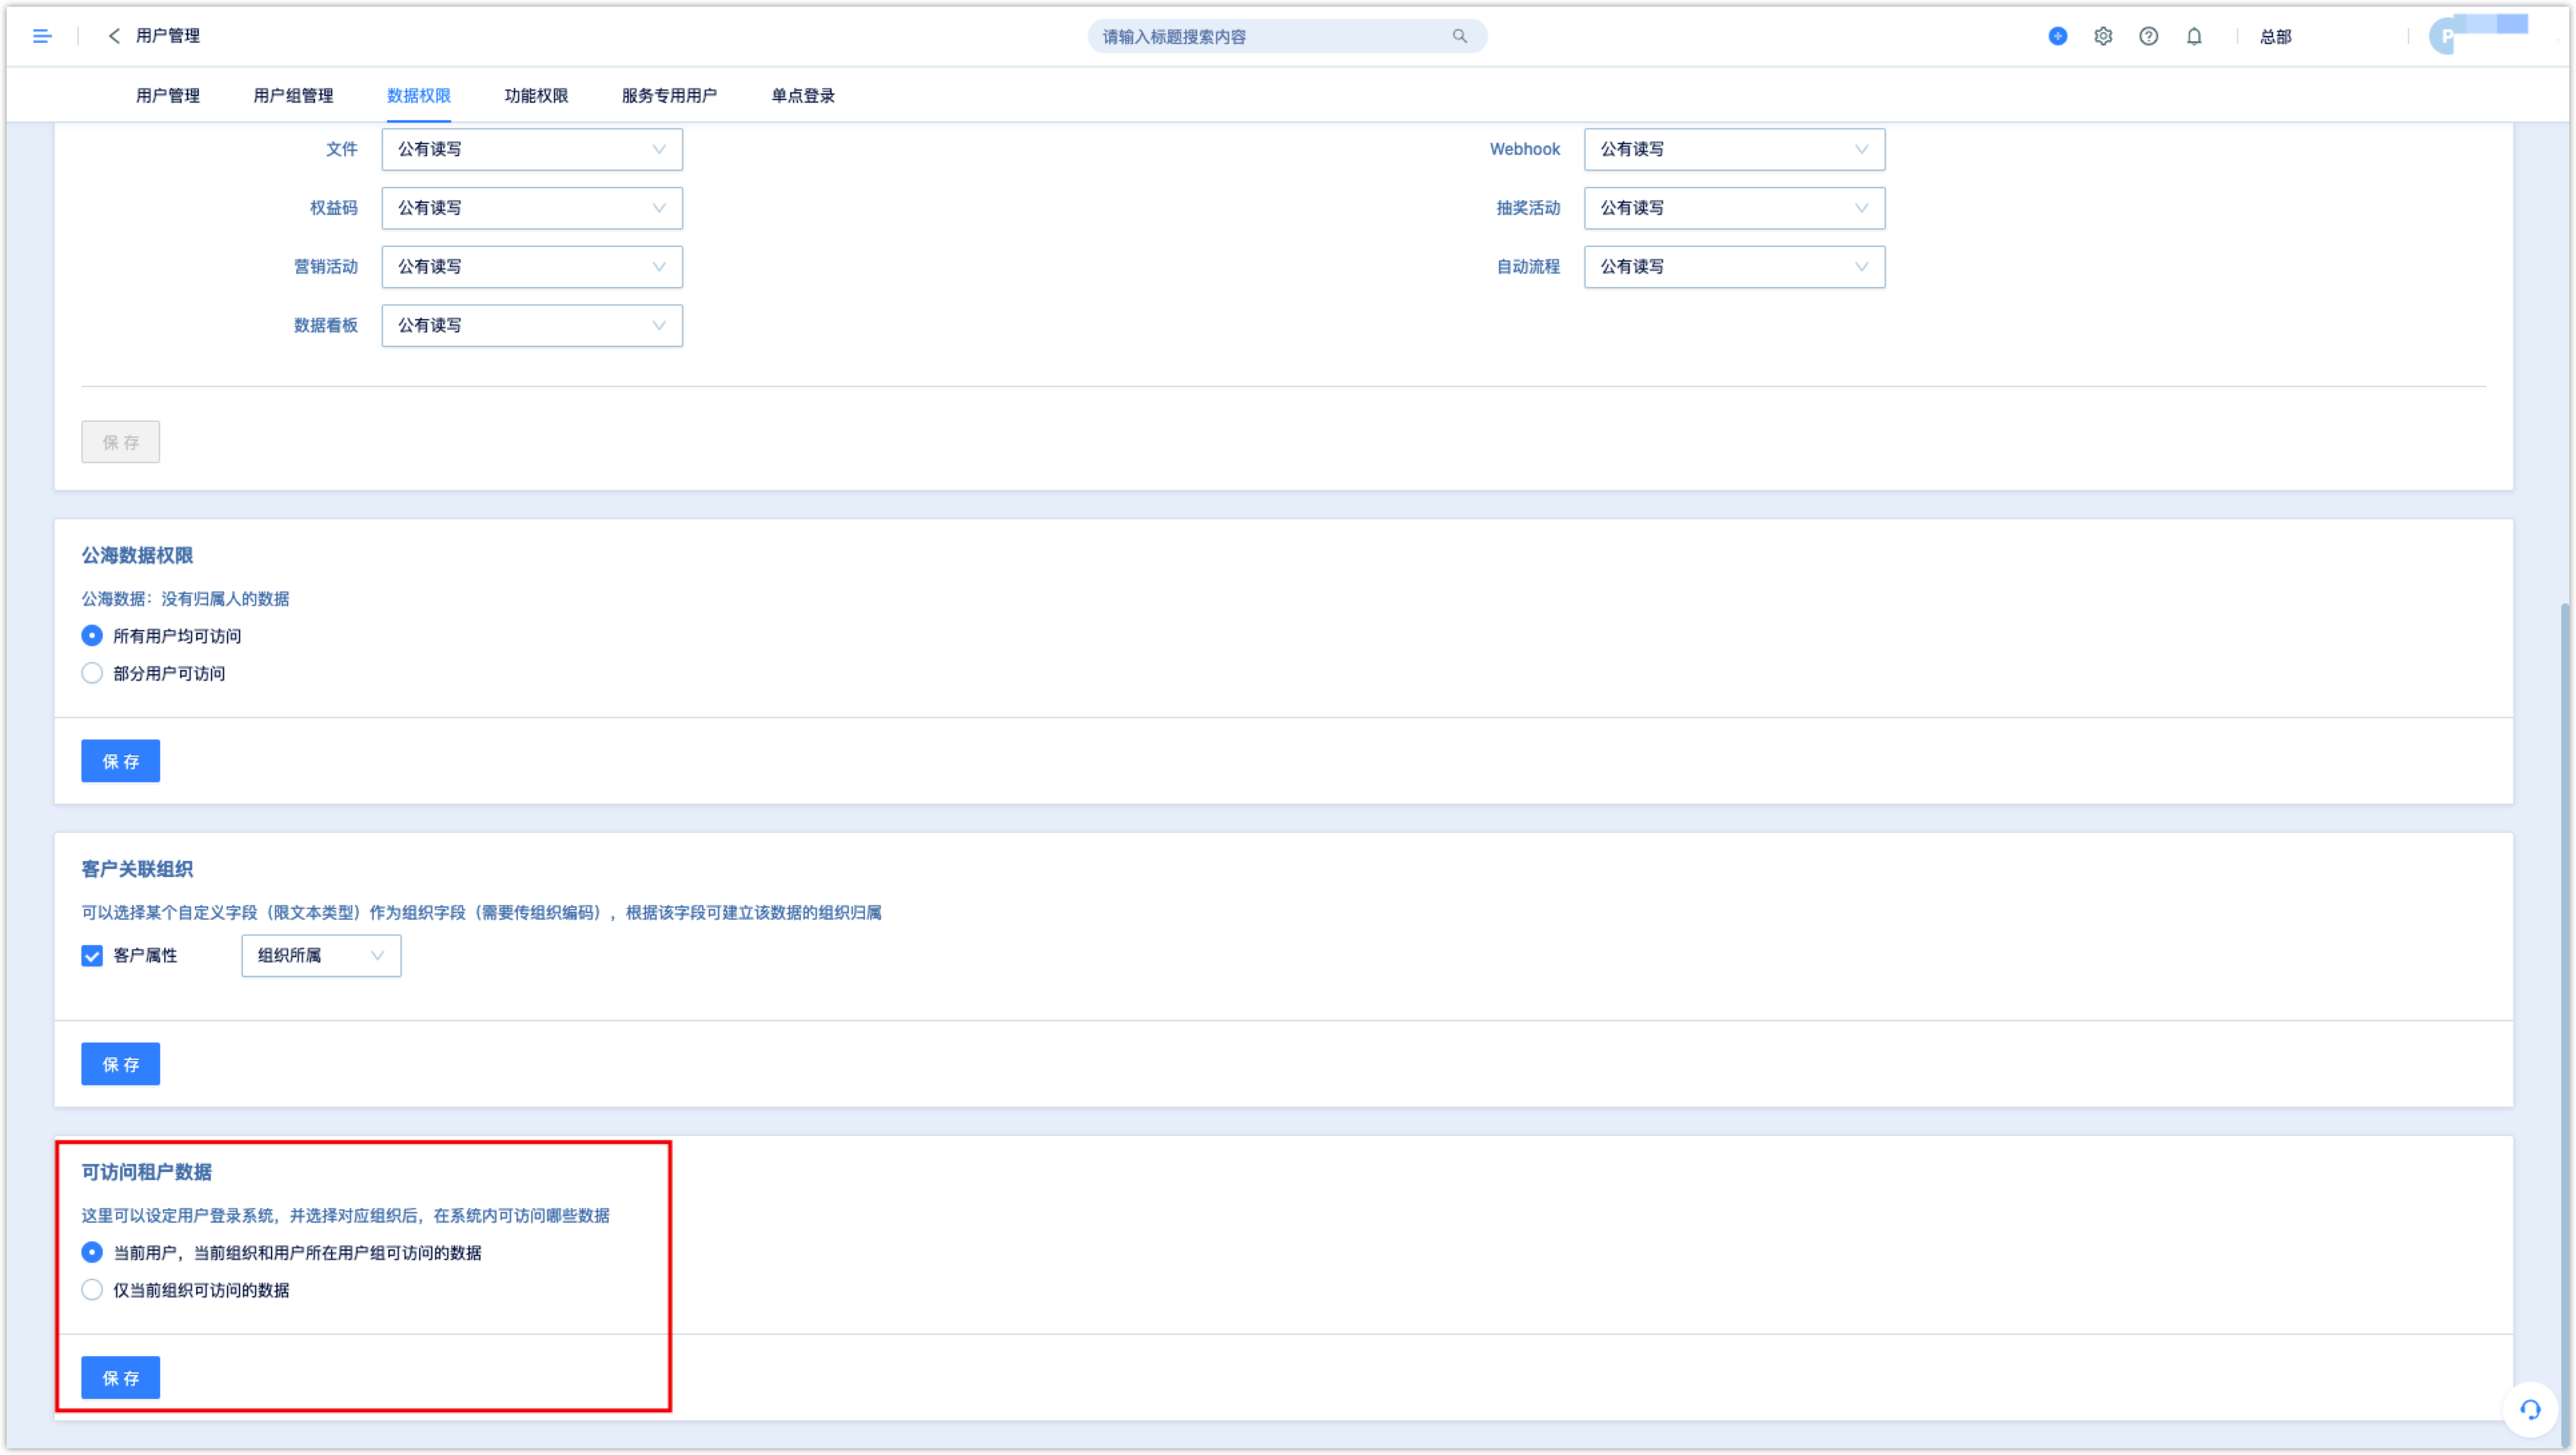
1)High seas data permission: Data without owner, can be set to be accessible to everyone or only some organizations. Select [Accessible to some users] to limit the organizations that are allowed to access the data.
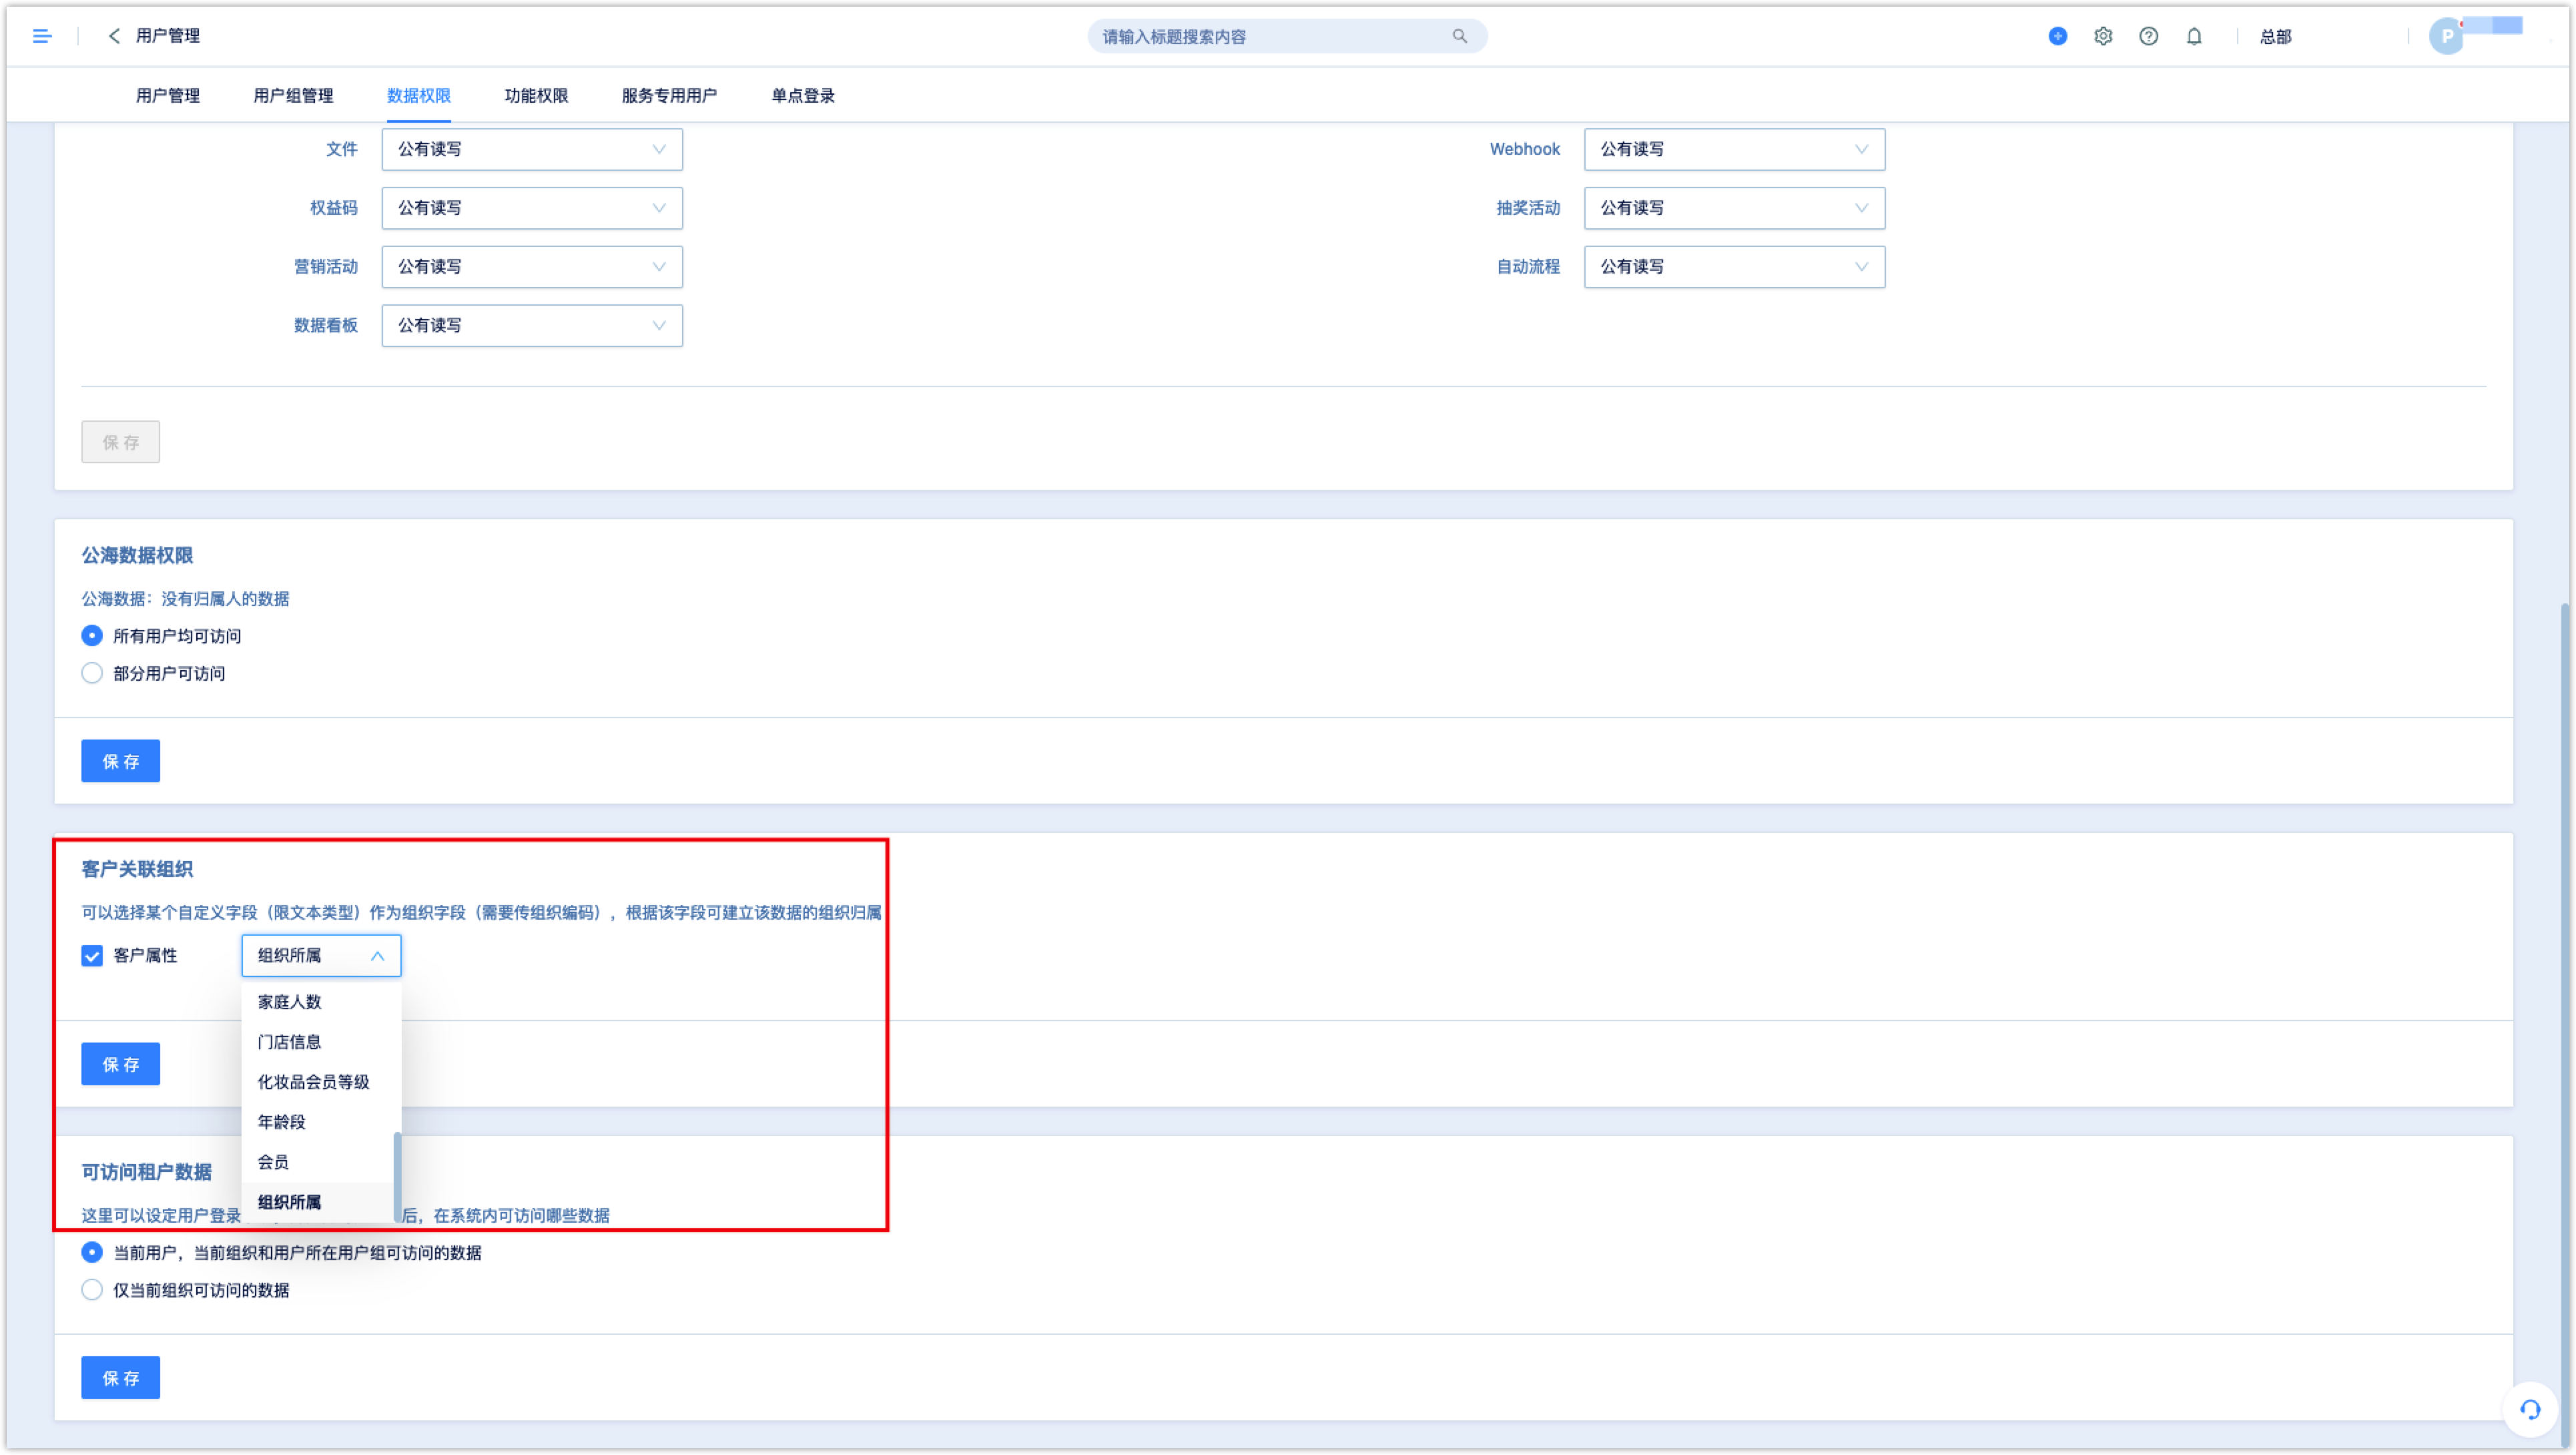
2)Customer-related organization (Applicable to customer objects): text-type customer attribute can be selected as the attribution to organization field. Input the organization code in this attribute, then the customer data will be assigned to the organization.
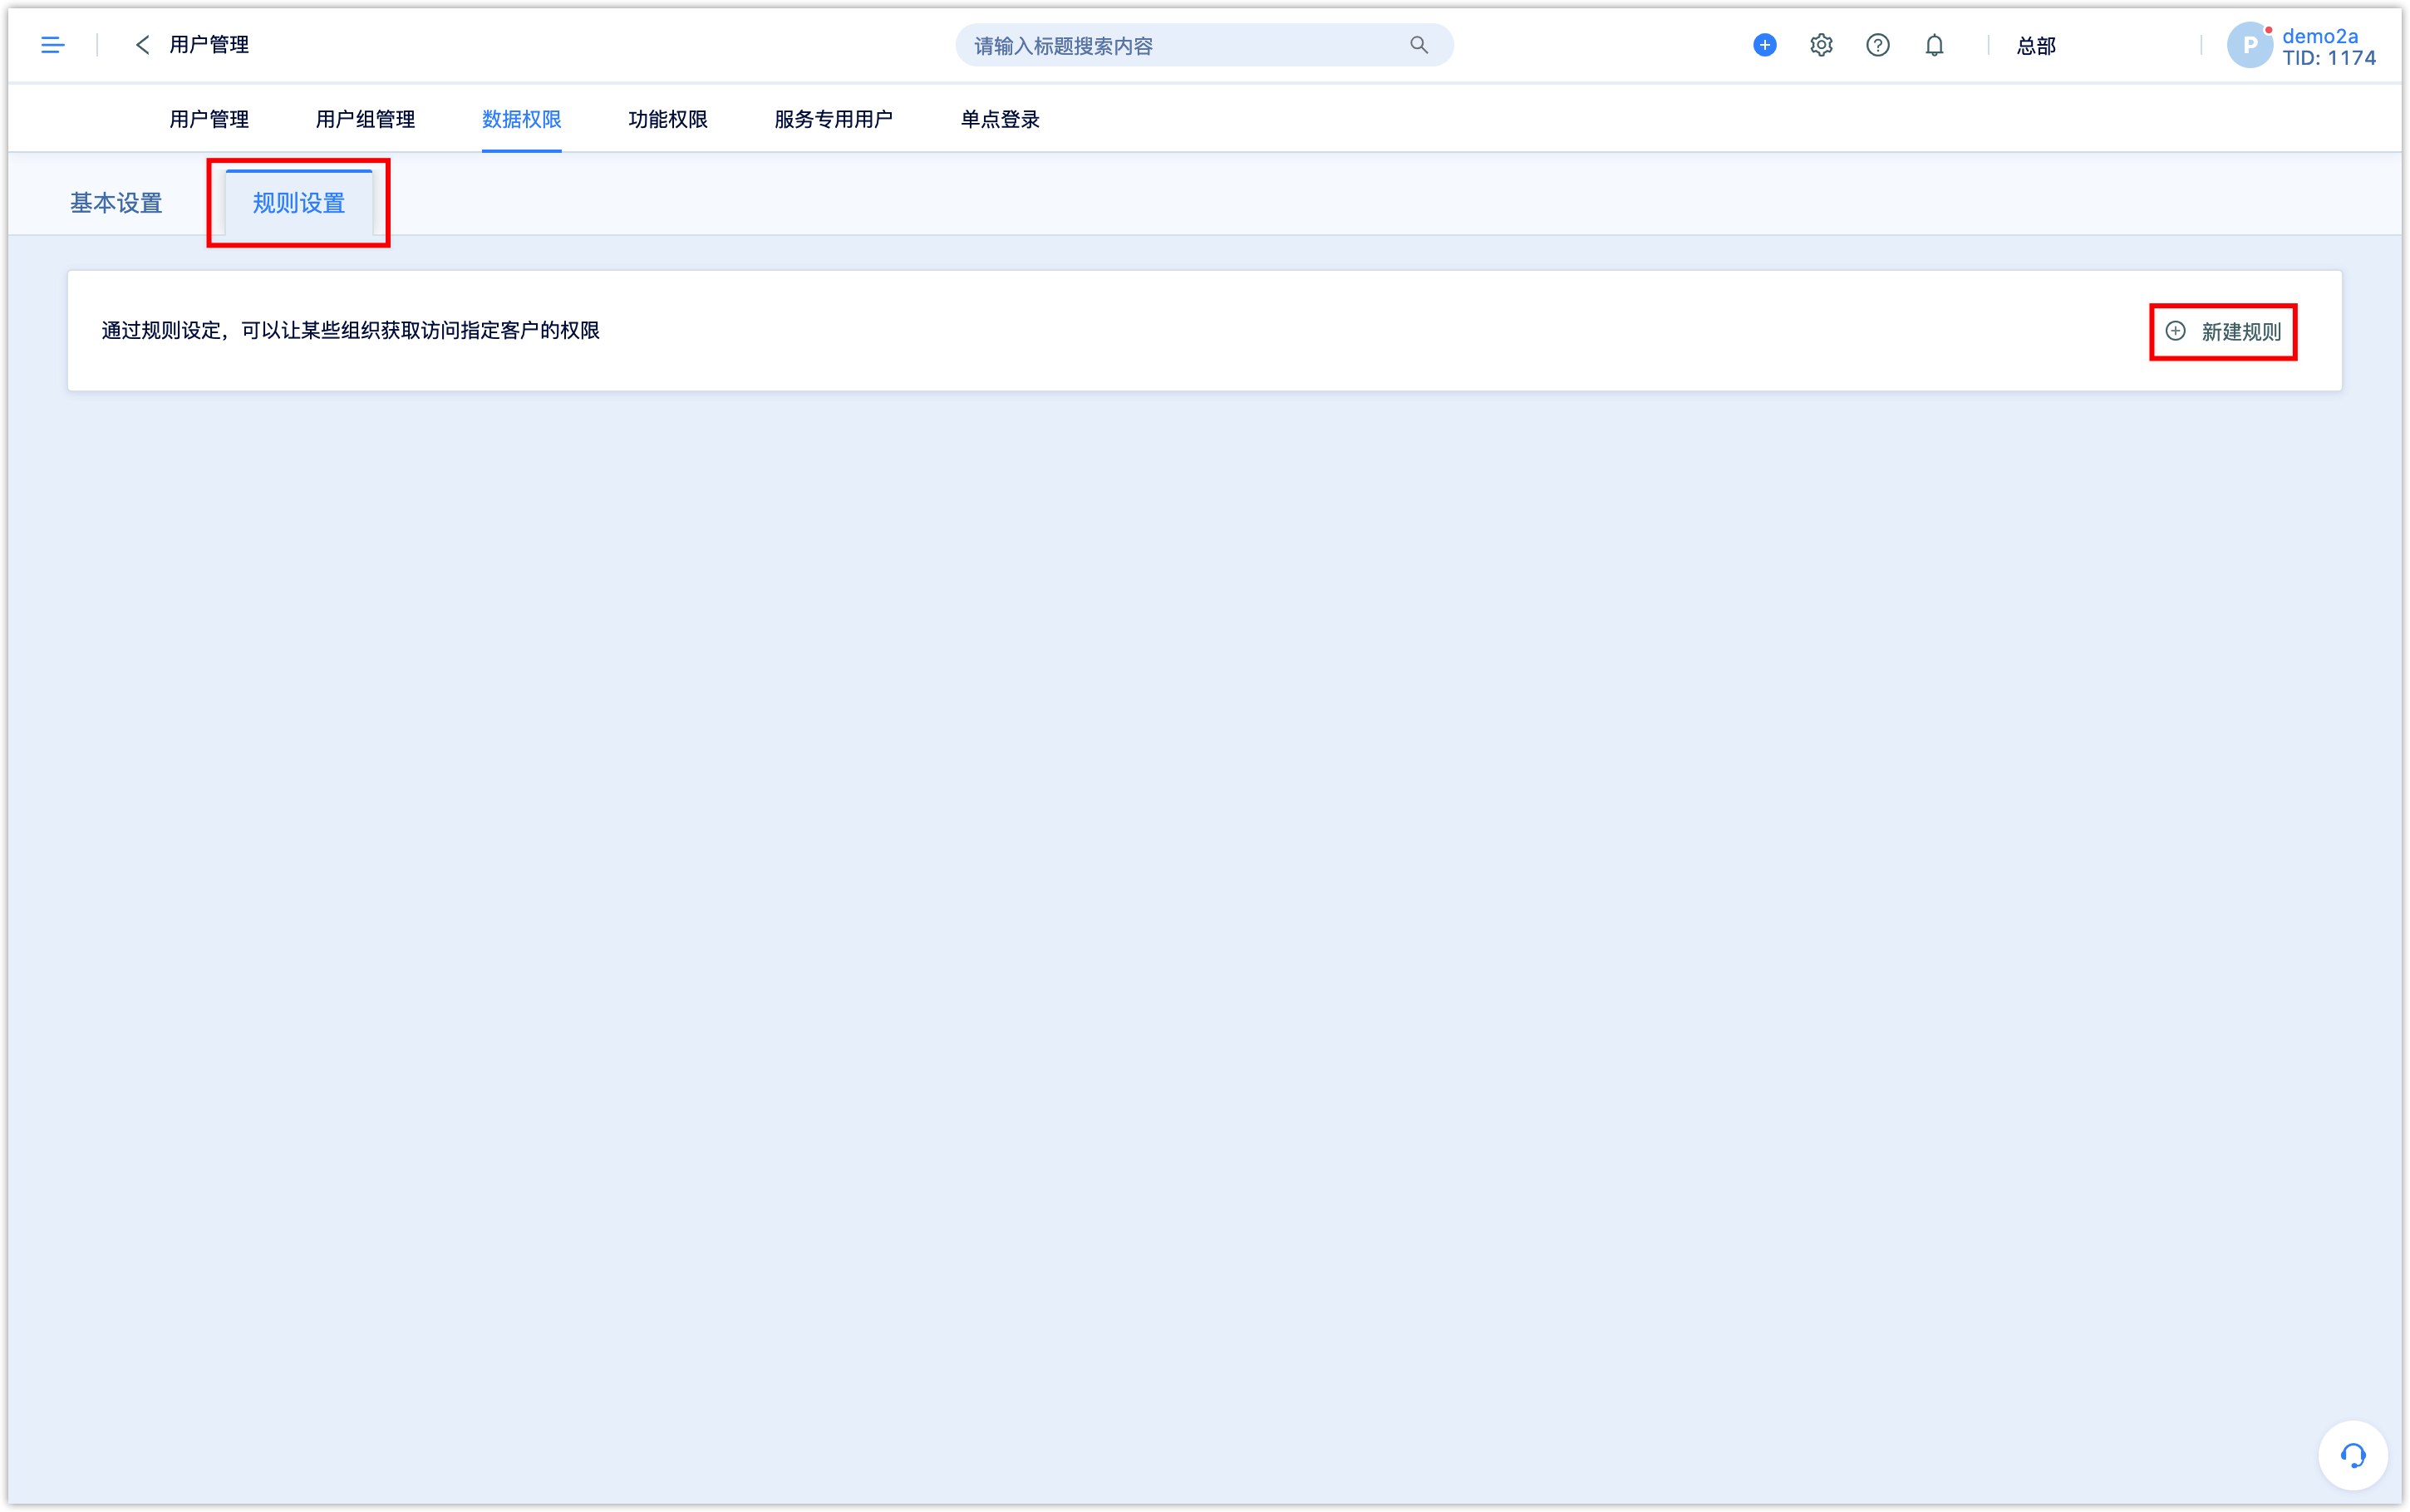
3)Rule setting (Applicable to customer objects only): Some rule conditions can be set so that customers who meet the conditions can be viewed by the designated organization. Up to 50 rules can be built
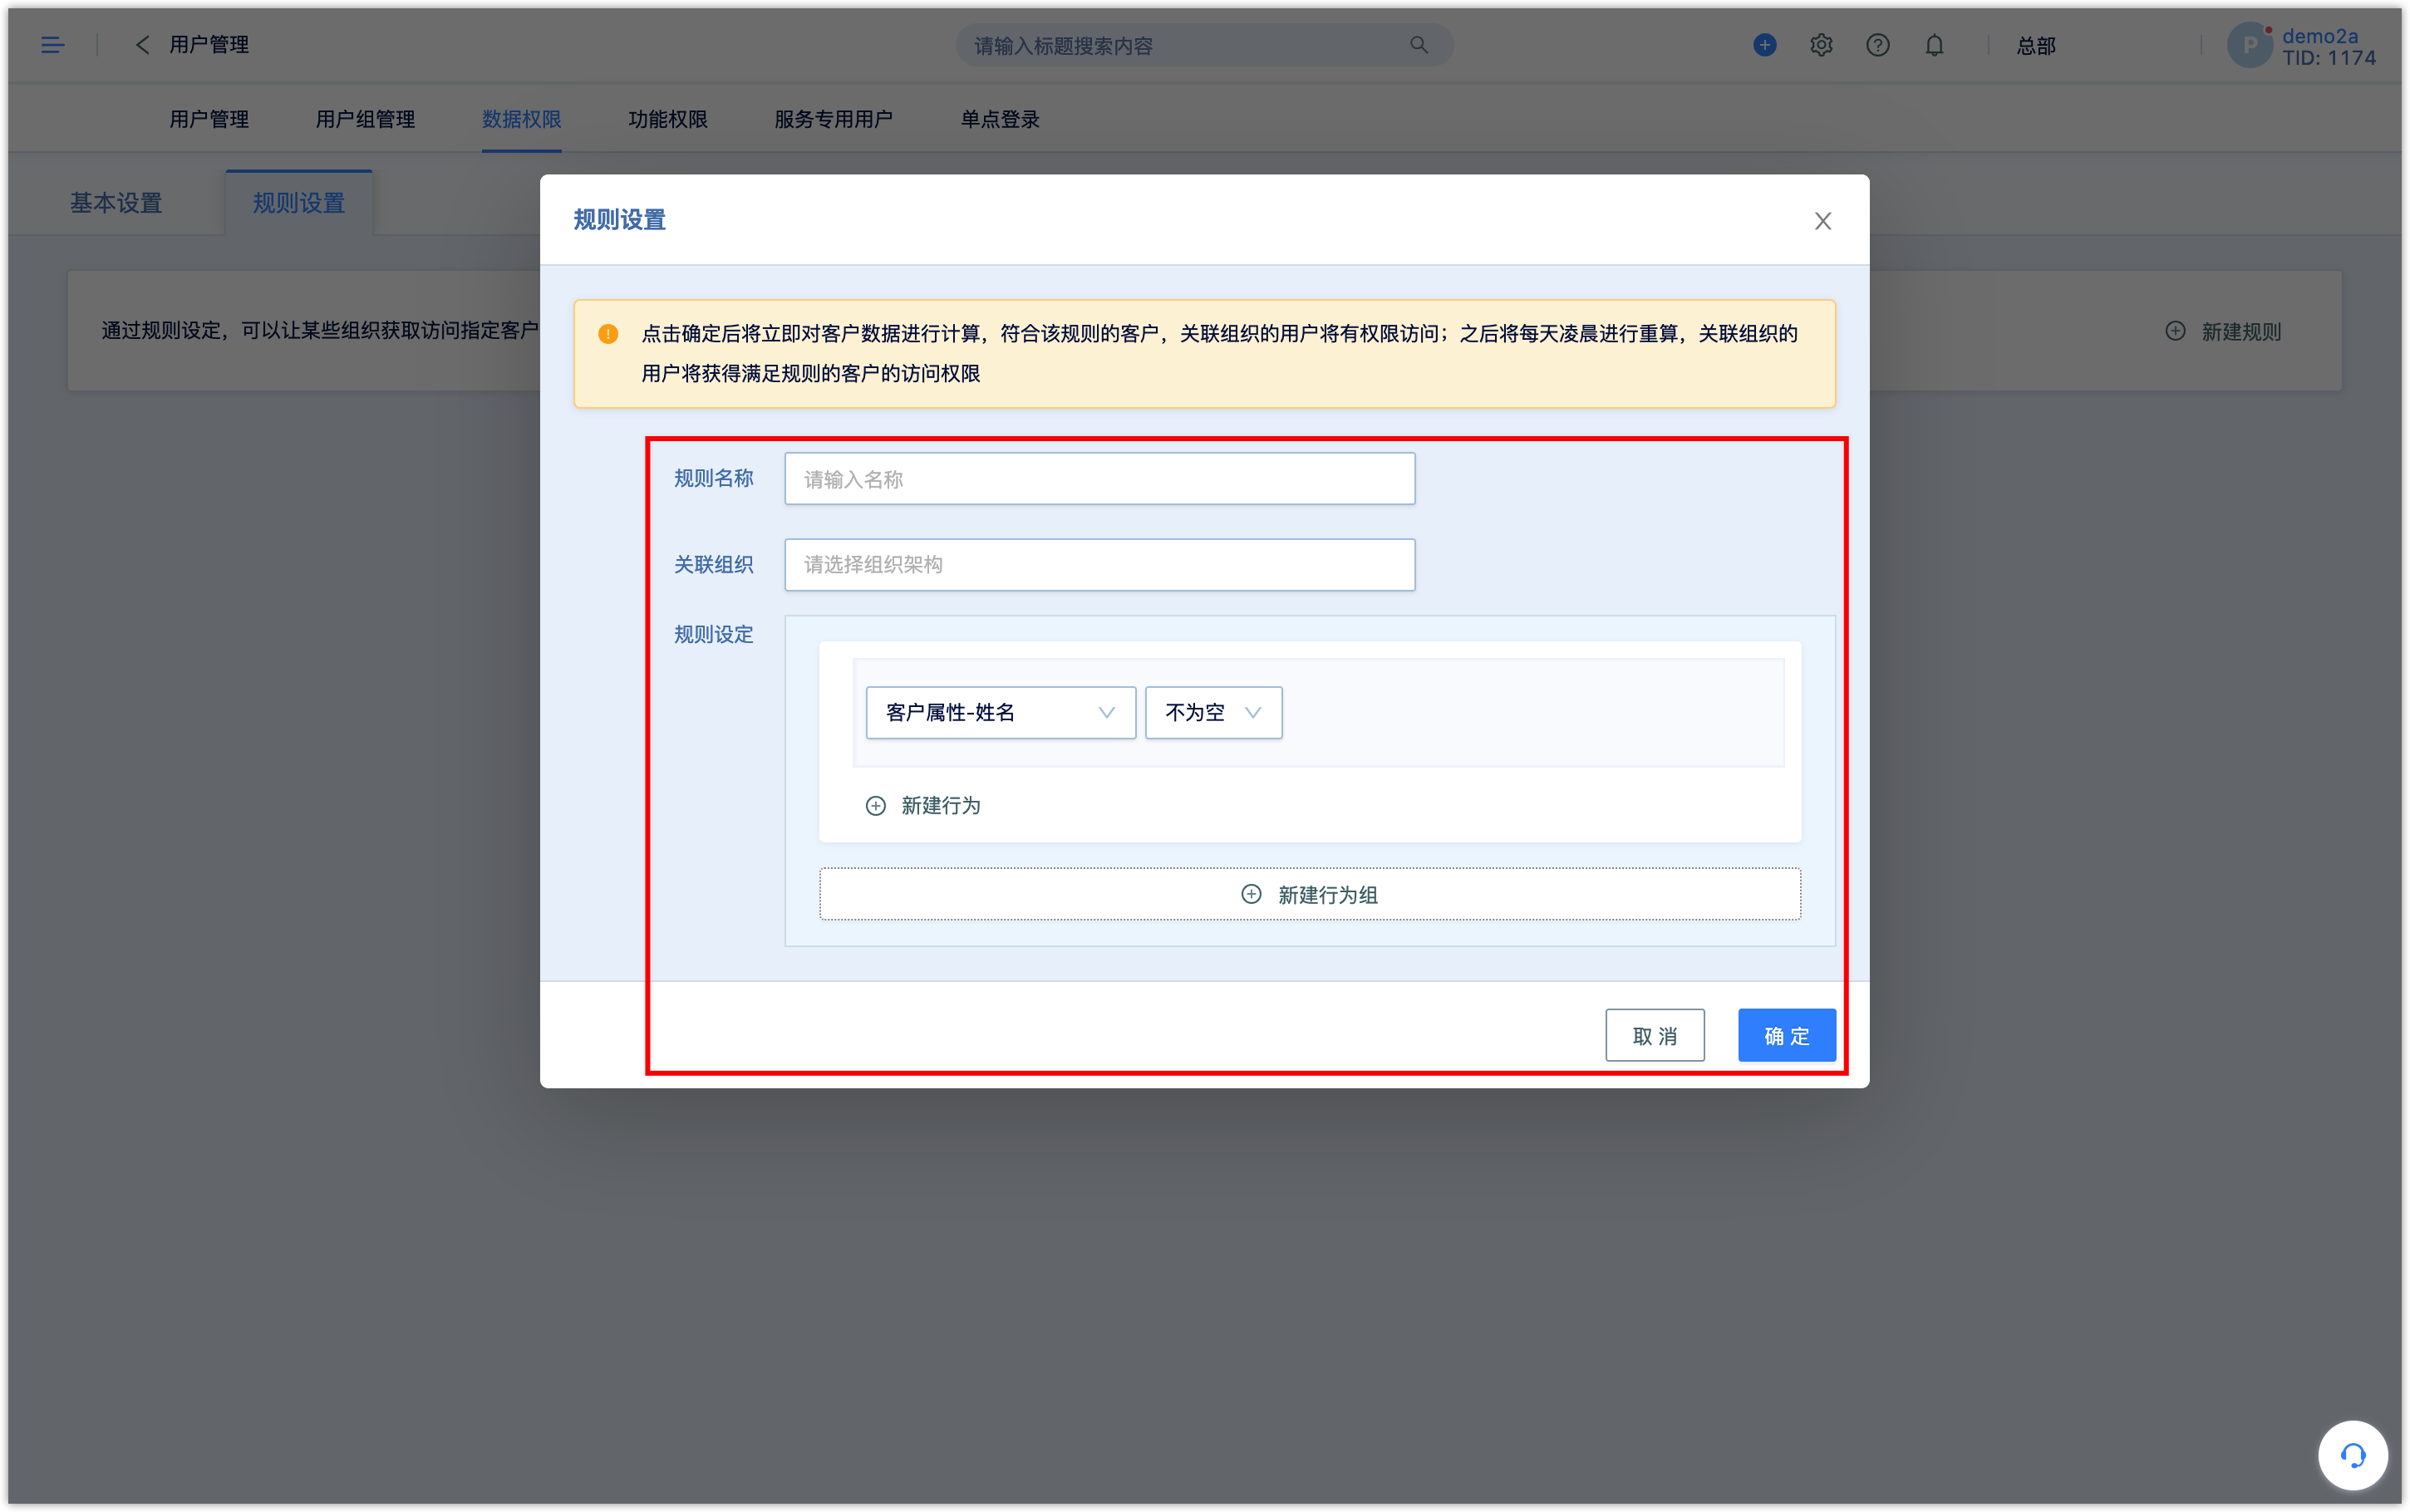
Click [Rule Settings], click [New Rule].
Set the name of the rule and assign to organization, and the customers who meet the conditions can be viewed by the users in the selected organization.
Manual sharing
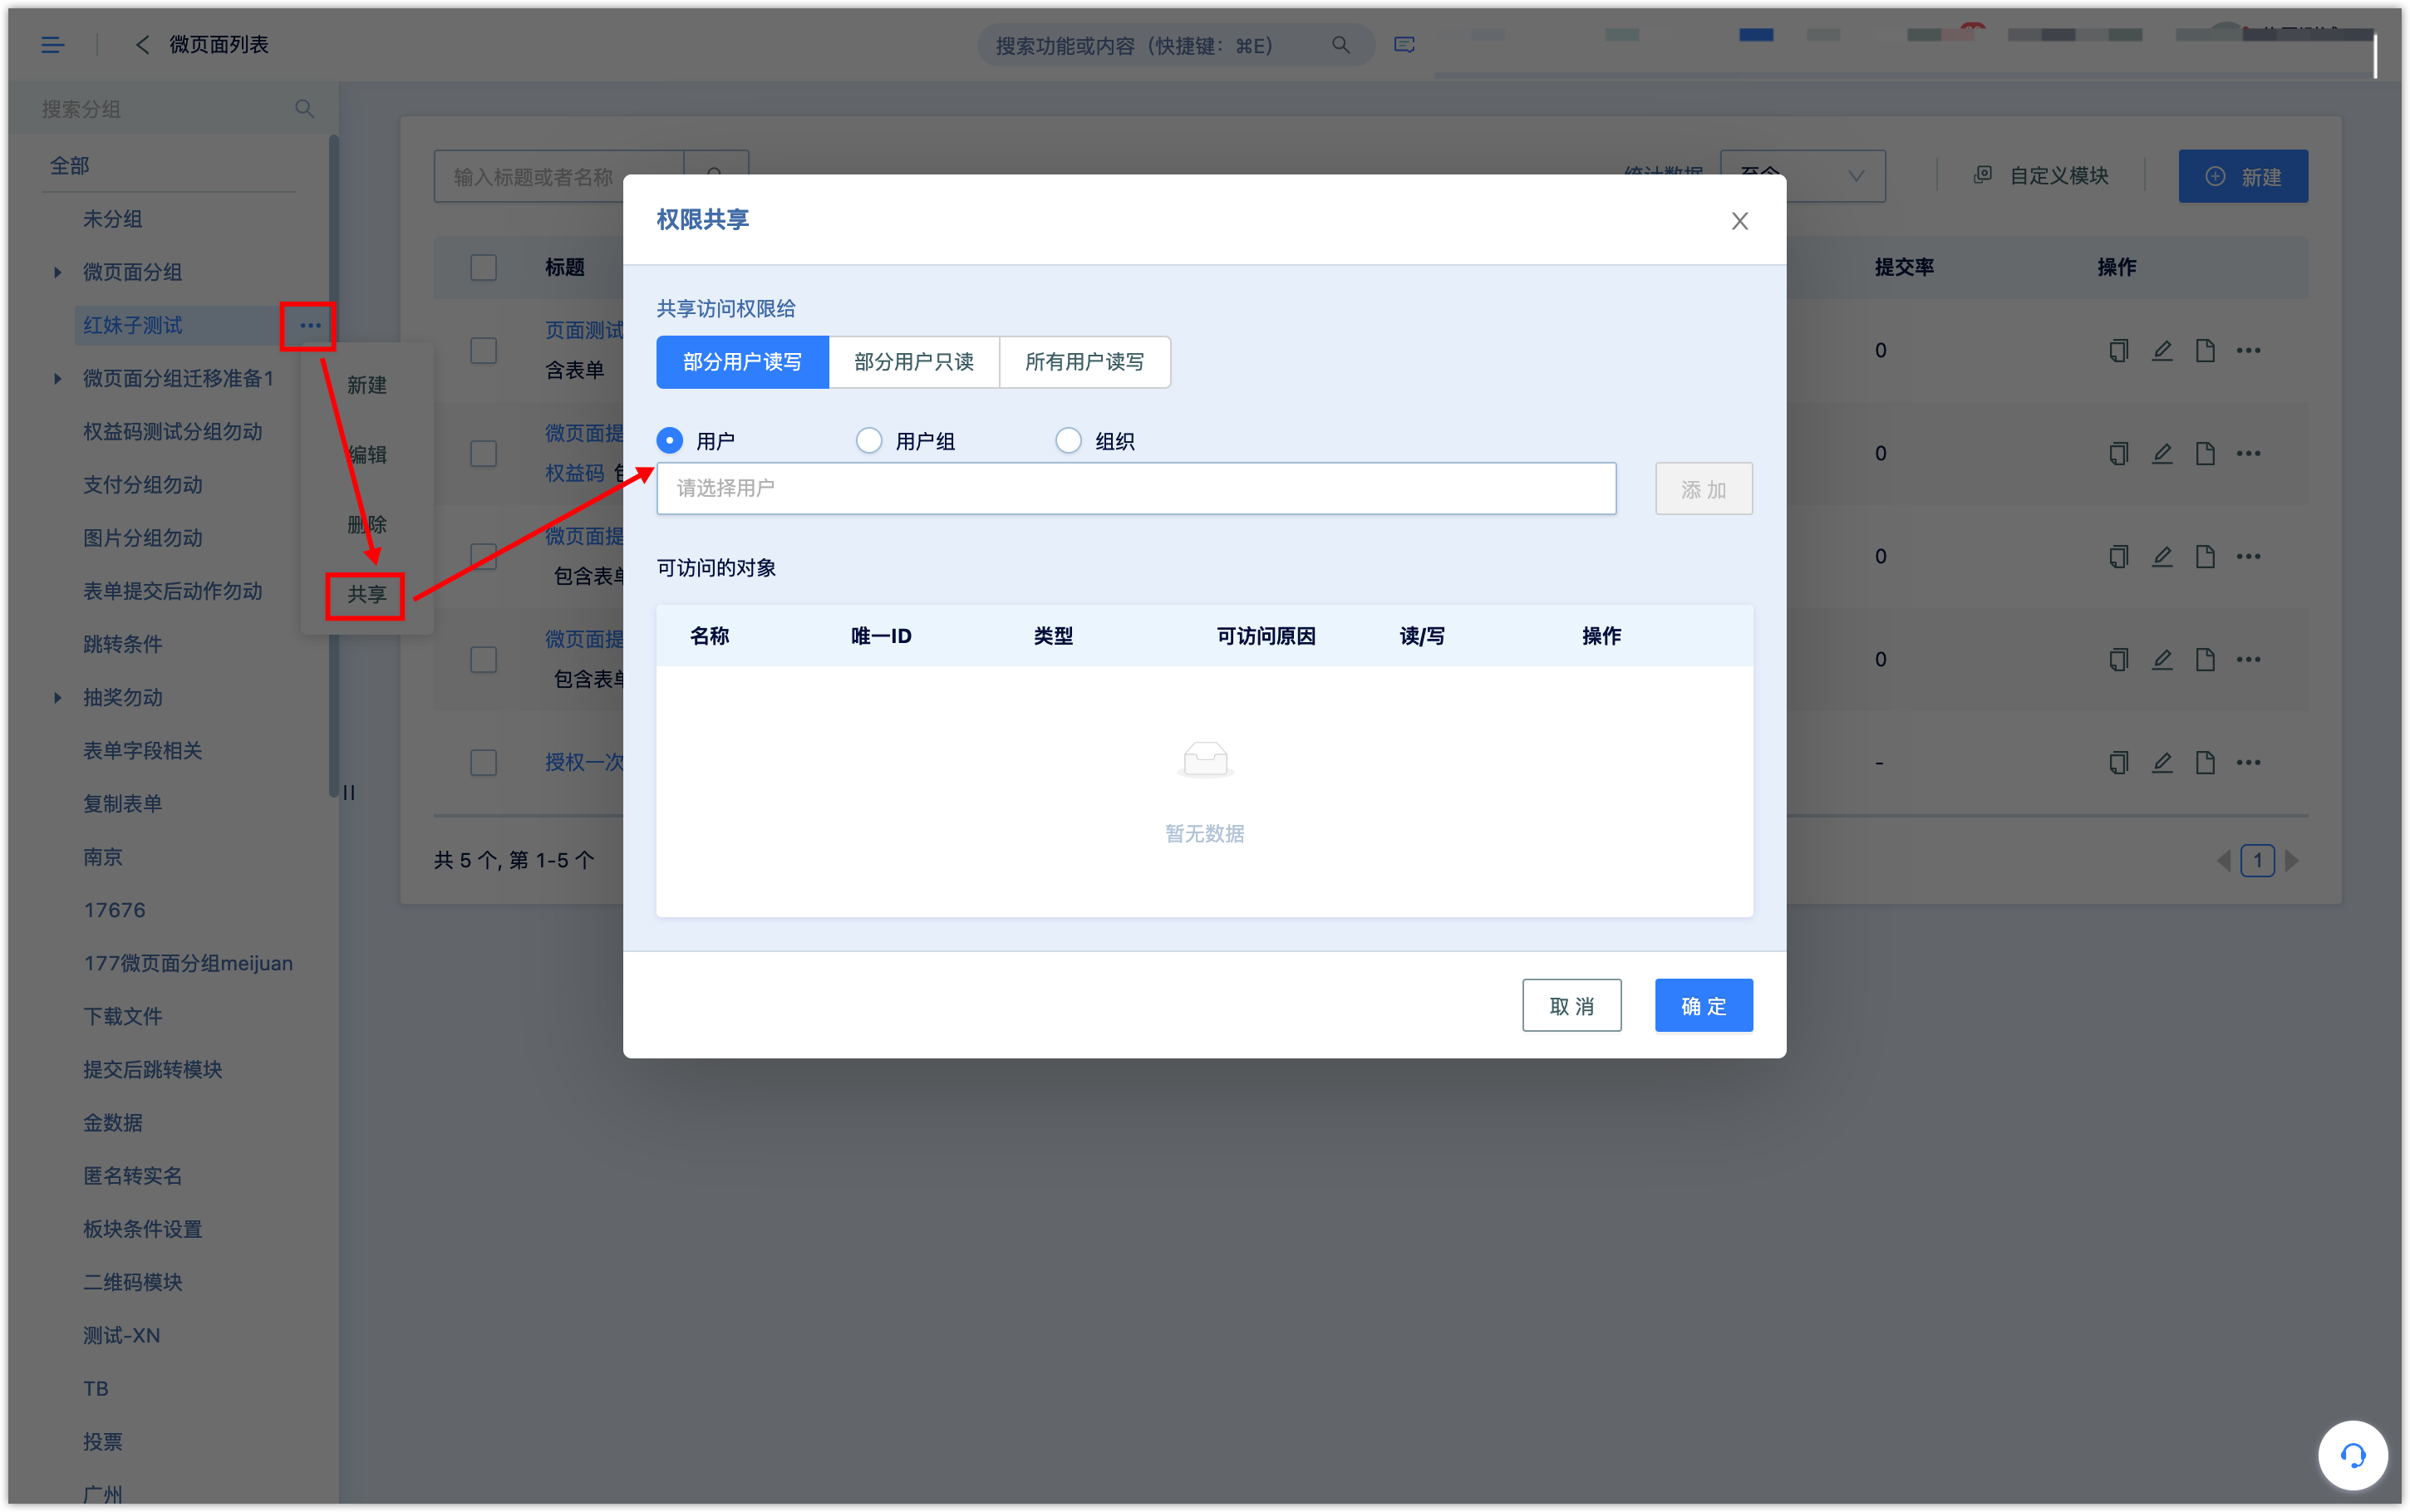
Note: After the data object is set to public read and write, there will be no restriction from data permissions, thus, there will be no manual sharing operation. In addition, even if customers, groups, and customer tags are set aso exclusive, manual sharing is not supported at current.As shown in the figure below, in the operation bar of a certain piece of data (such as WeChat Page data), click the permission sharing button (provided that the user has obtained the permission sharing operation permission of the object in the function permission) to share the data permission. Data can be share to users, user groups or organizations.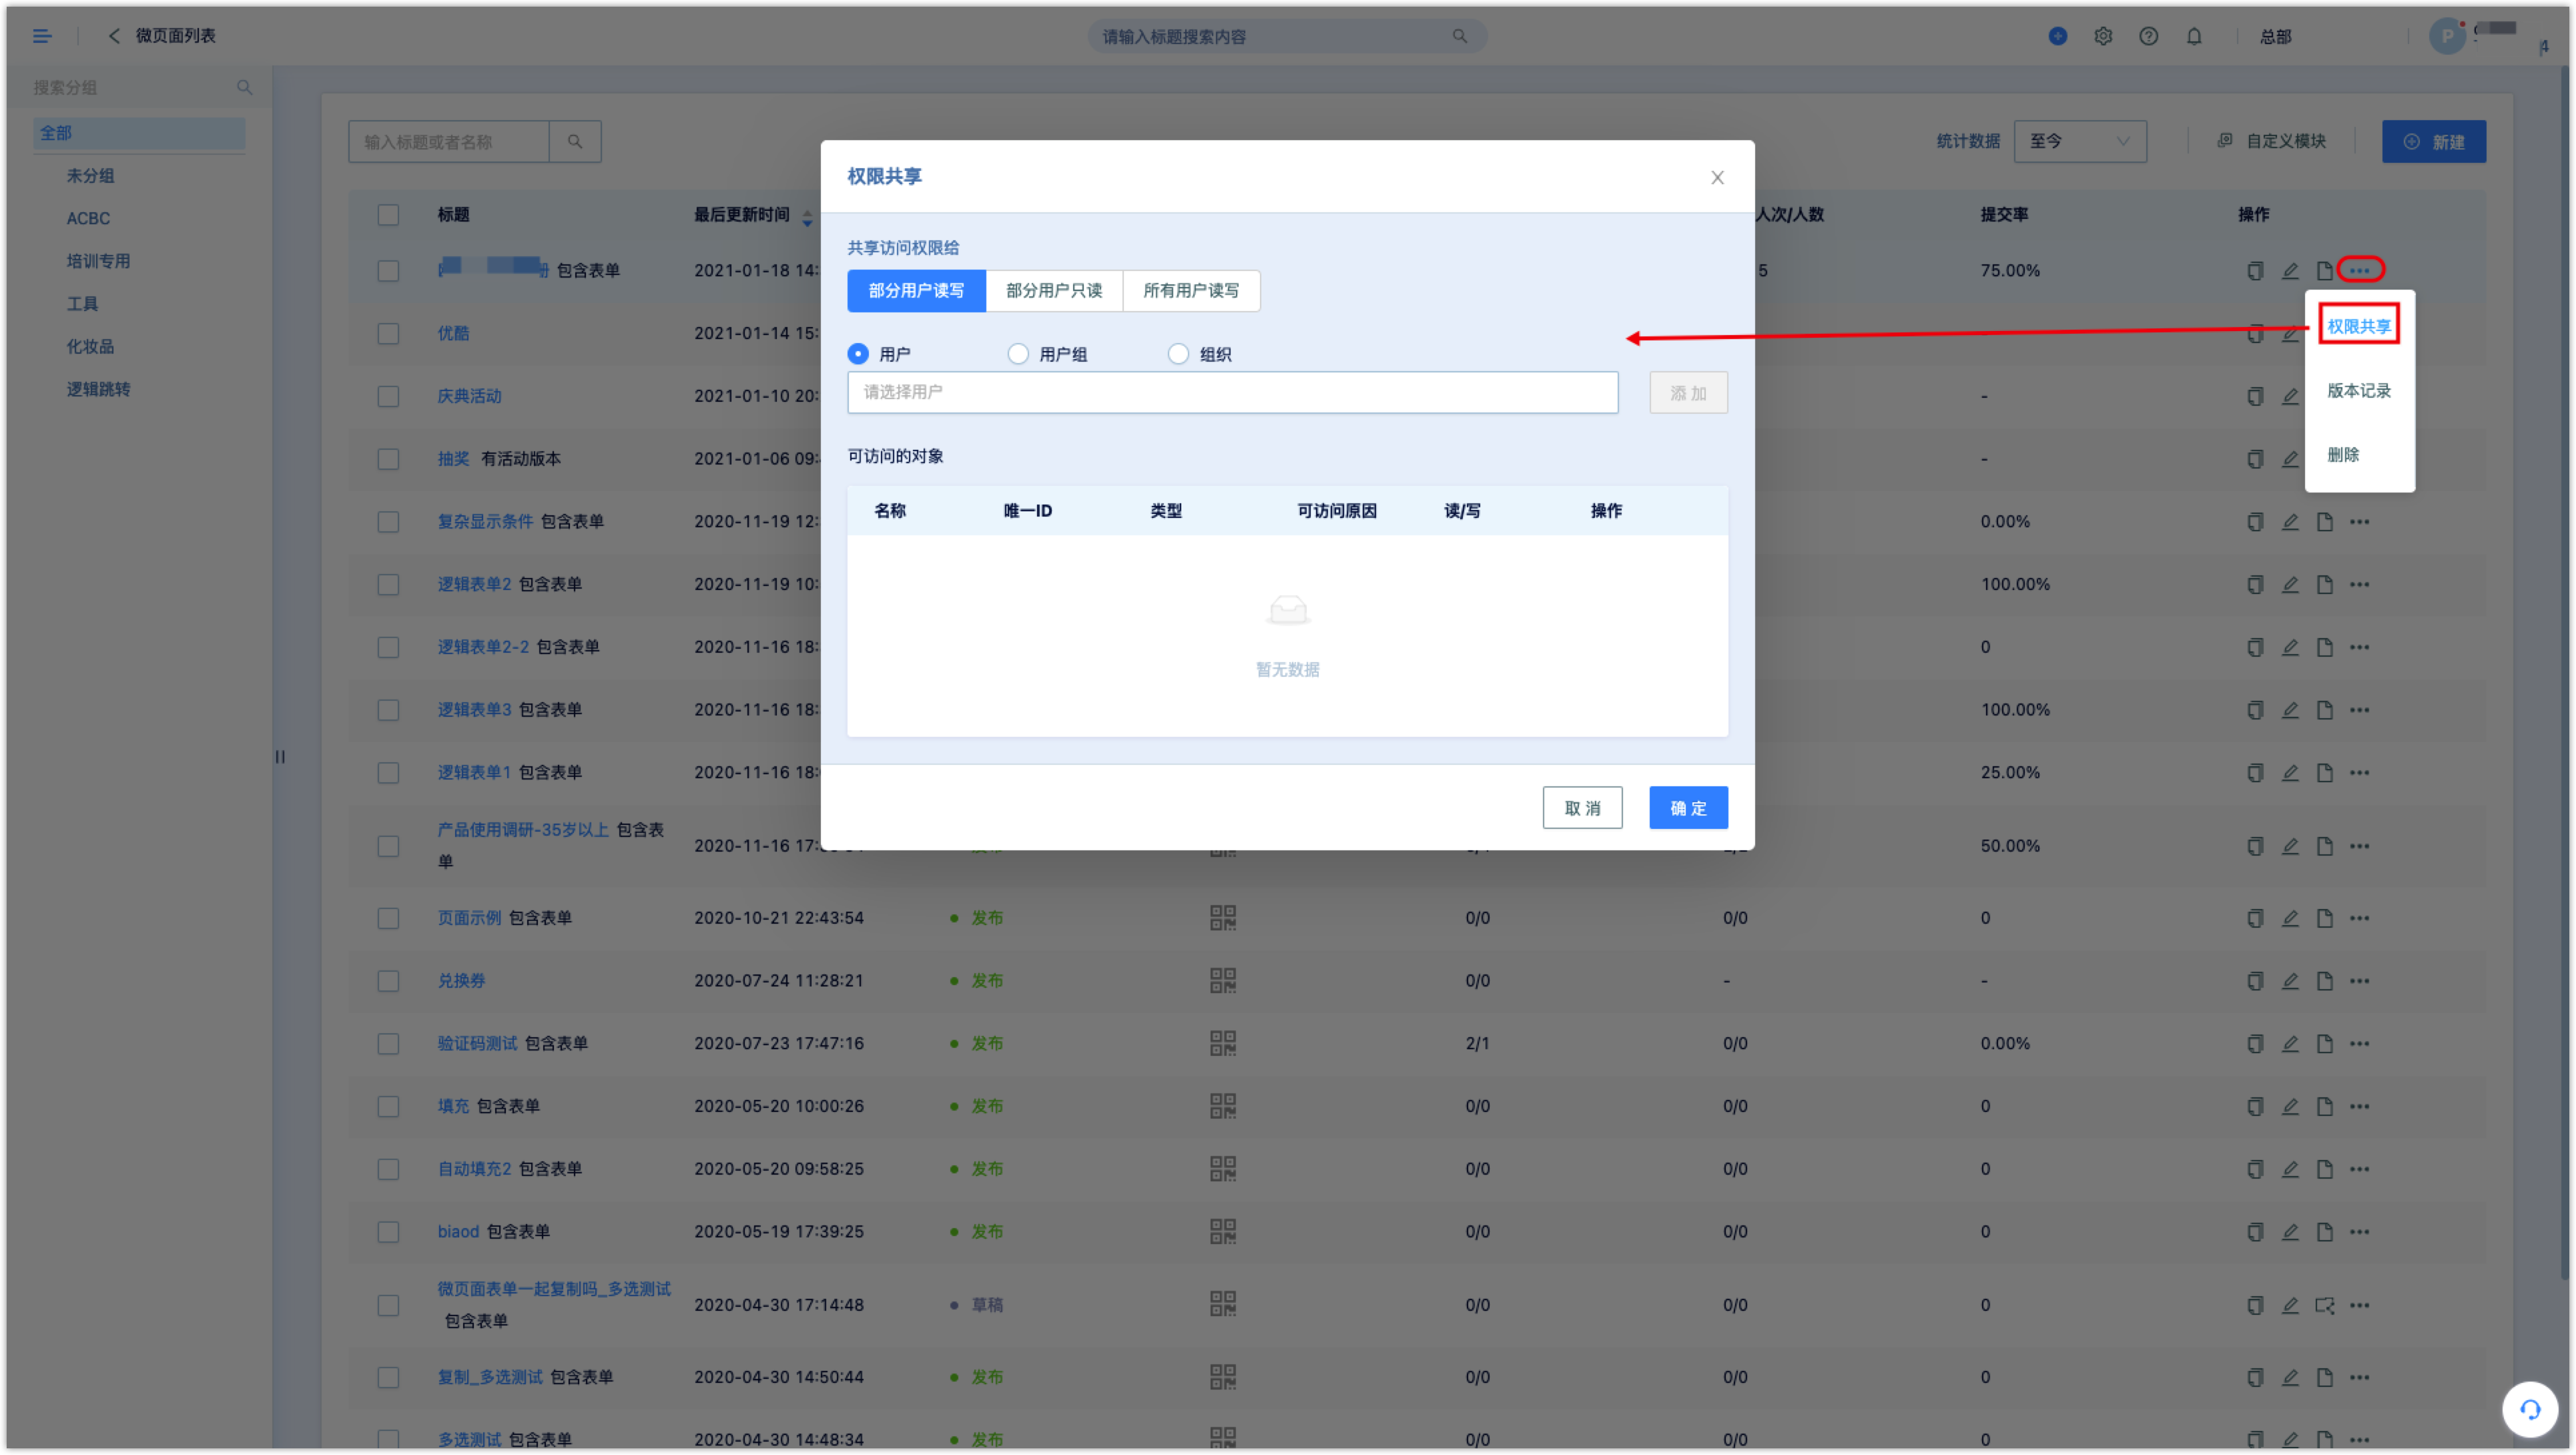
In addition to sharing specific content, DM Hub also supports direct sharing of content group. Select a specific group, click the [···] button, and click [Share] to share the content of the group with the organization or users.
Note: Assuming that group 1 of organization A is moved to group 2 (but group A cannot see group 2), users of organization A will not be able to see group 1 (possible reason: the other group B that can see both group 1 and group has been moved). Although users of organization A cannot see group 1, organization A can still view the corresponding content under all groups.
4.2.5Data Permissions-Data Visible After Login
Access to tenant data: After the system has set data permissions, a user logs in to the tenant and selects an organization, the data that can be seen is divided into two categories. The administrator can set the data that users can view by default.
- Data accessible to the current user, the current organization and the user group to which the user belongs to: including data visible to the current organization, as well as data shared by other users to the user (may be directly shared to the user, or may be shared to the user group of the user, or data shared to the user’s organization).
- Data accessible only to the current organization: all visible data of the organization currently entered by the user (data belongs to the organization and user)
4.2.6Data Permission-Other Instructions
Other rules for data permissions:
- If the user is modified, moved to another organization, or deleted, the ownership of the data created by the user remains unchanged
- If the customer actively interacts with the content belonging to the organization (such as scanning the QR code, submitting the form, etc.), then the customer belongs to the organization
- Headquarters users are not controlled by data permissions and can access all data records (here refers to data permissions, if the function permissions do not allow access to certain functions, the user still cannot access)
- Deleting content in batches requires verification. If the user only has read-only access to some of the content, deletion is not allowed.
5.Service Dedicated User
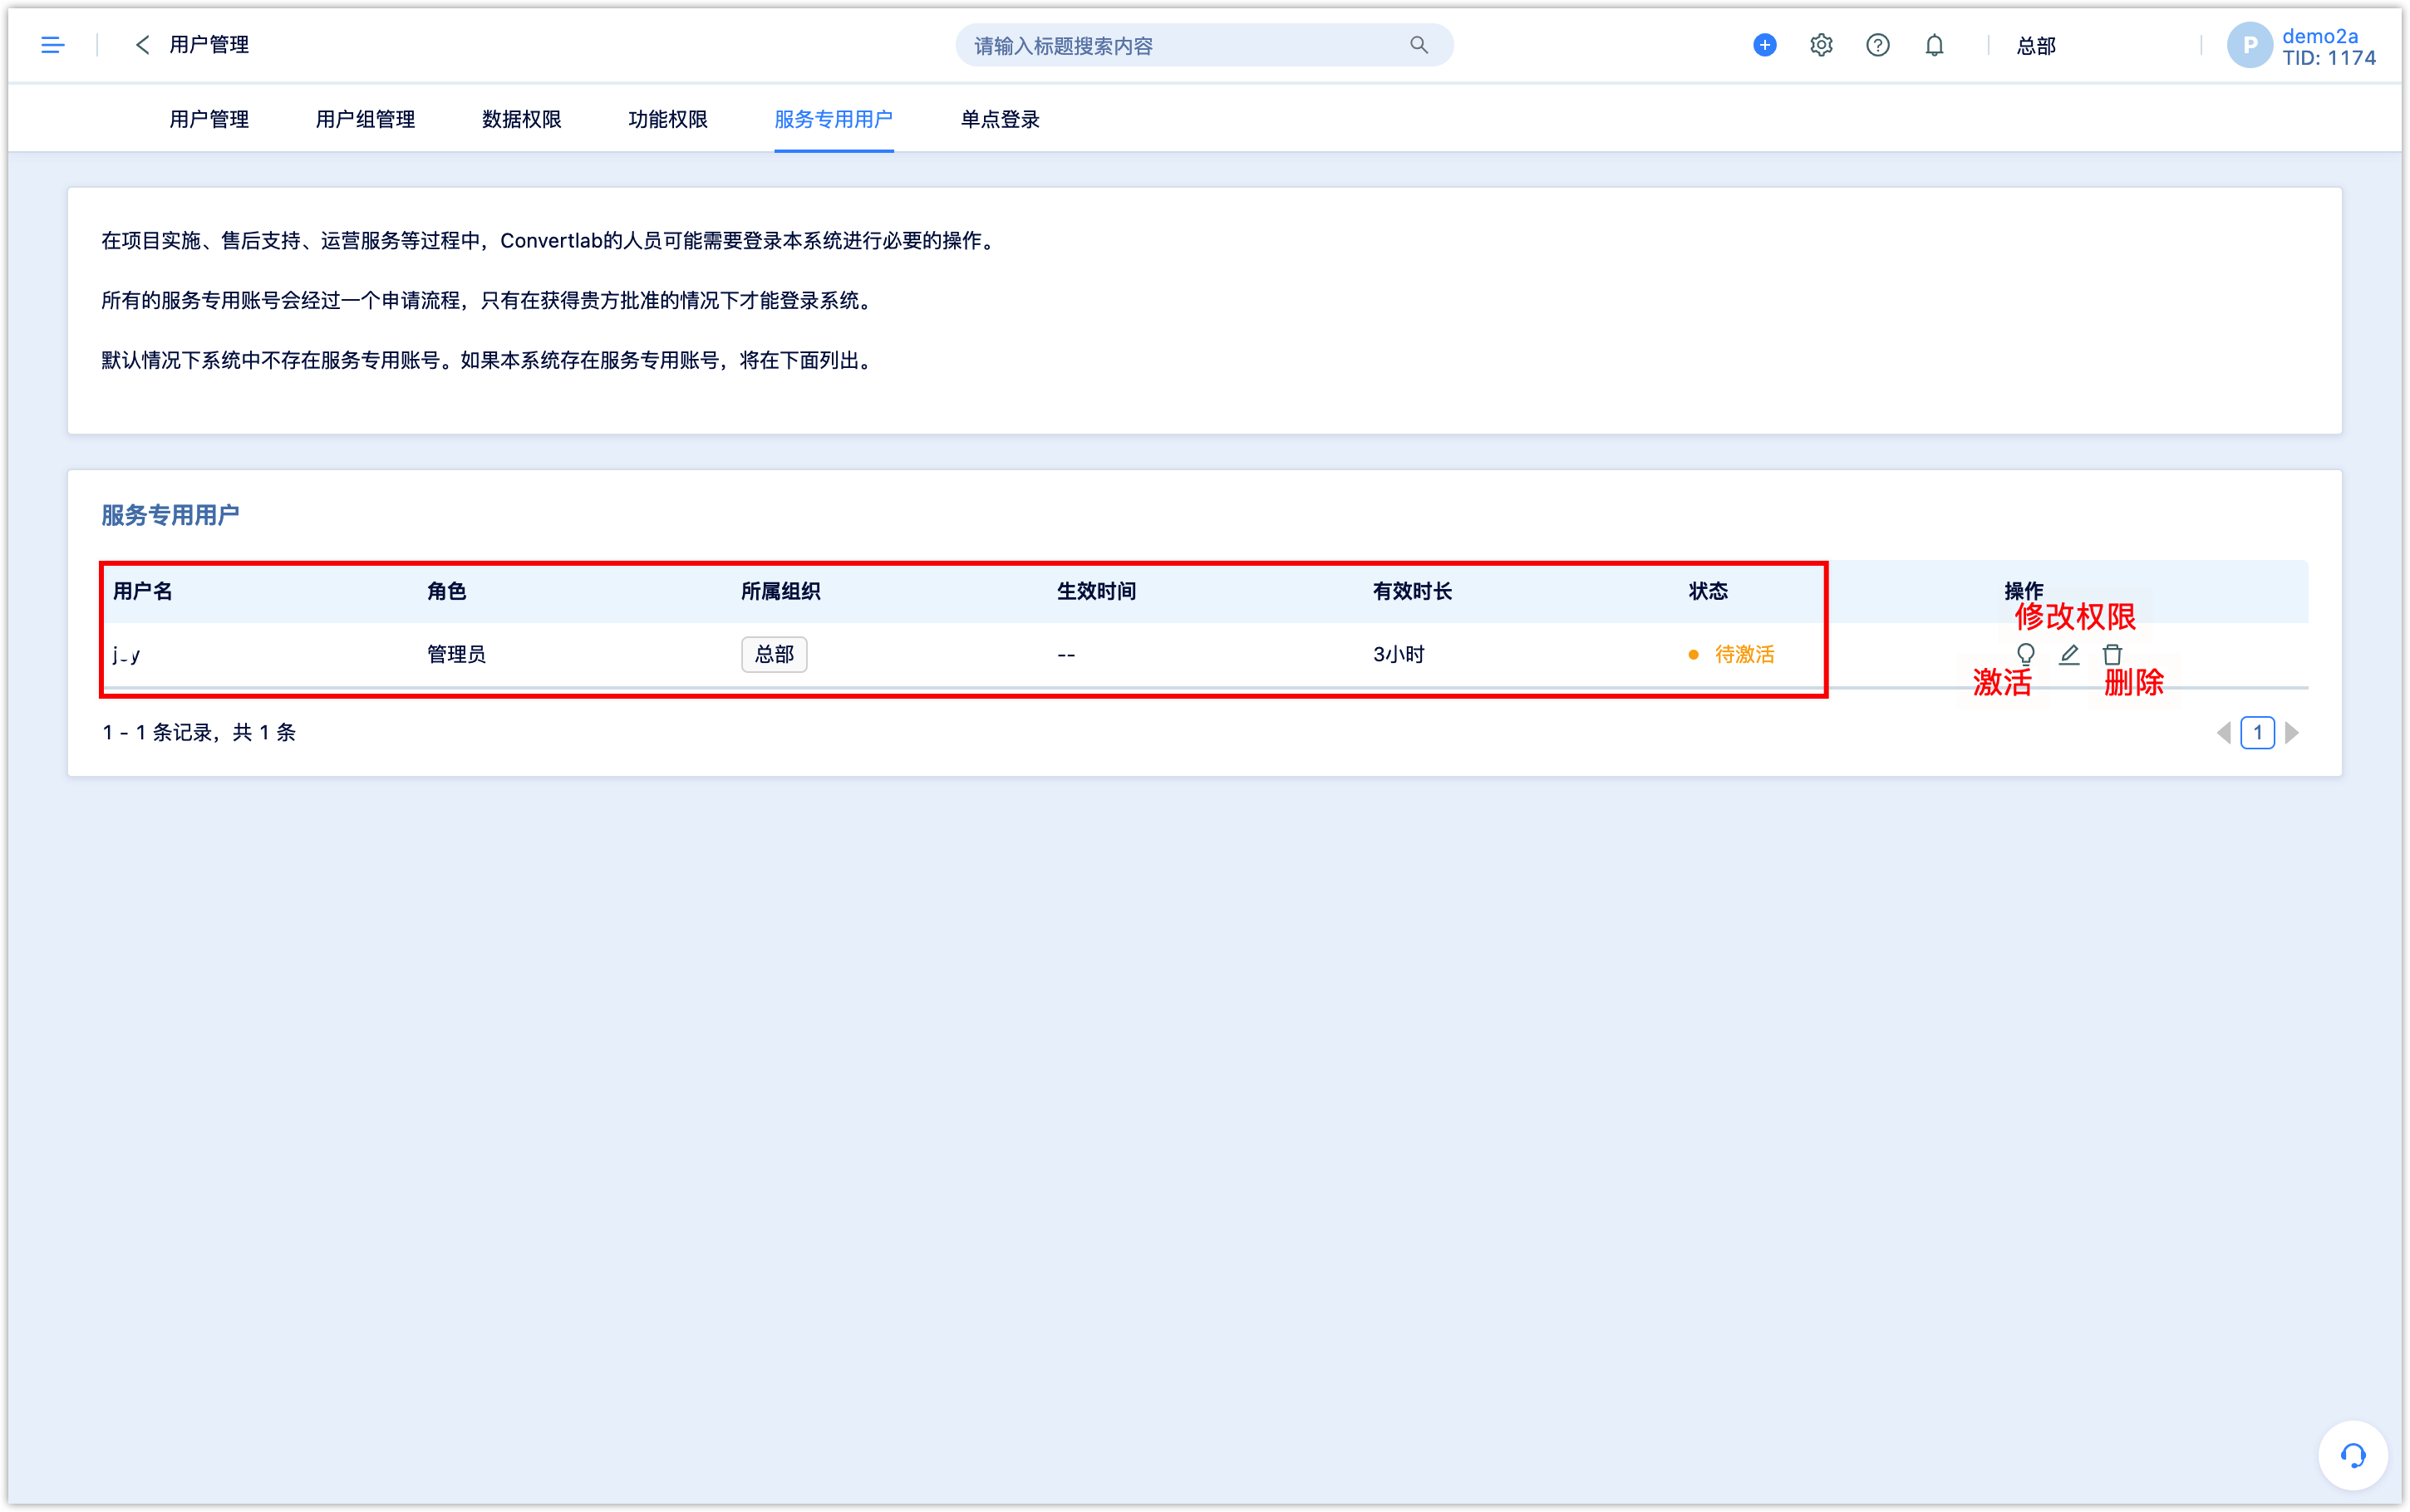
When a user encounters a problem in use, and the problem cannot be located through communication with the online customer service, and the customer service or implementation personnel are required to enter the enterprise account to locate the problem, the customer service or implementation personnel will apply to the system for a service dedicated user. After the dedicated service user is created, information will be displayed on this interface. Service-dedicated users need to be activated by the tenant administrator to log in to the system. The administrator can also set permissions for service-dedicated users.
Click [User Management-Service Dedicated User] to view the users that have been created, and the administrator can activate, modify, and delete them.
6.SSO Single Sign On
SSO allows users to log in to different systems without creating account iin different system.
DM hub supports SSO through authentication service provider of oauth2 authentication protocol, such as OKTA. After SSO setting is configured, user identity provided by third party authentication service provider can be used to log in to DM hub.
6.1Configuring SSO in DM Hub
Click [User Management – Single Sign on] in the menu bar and turn on OAuth2 SSO Setting.
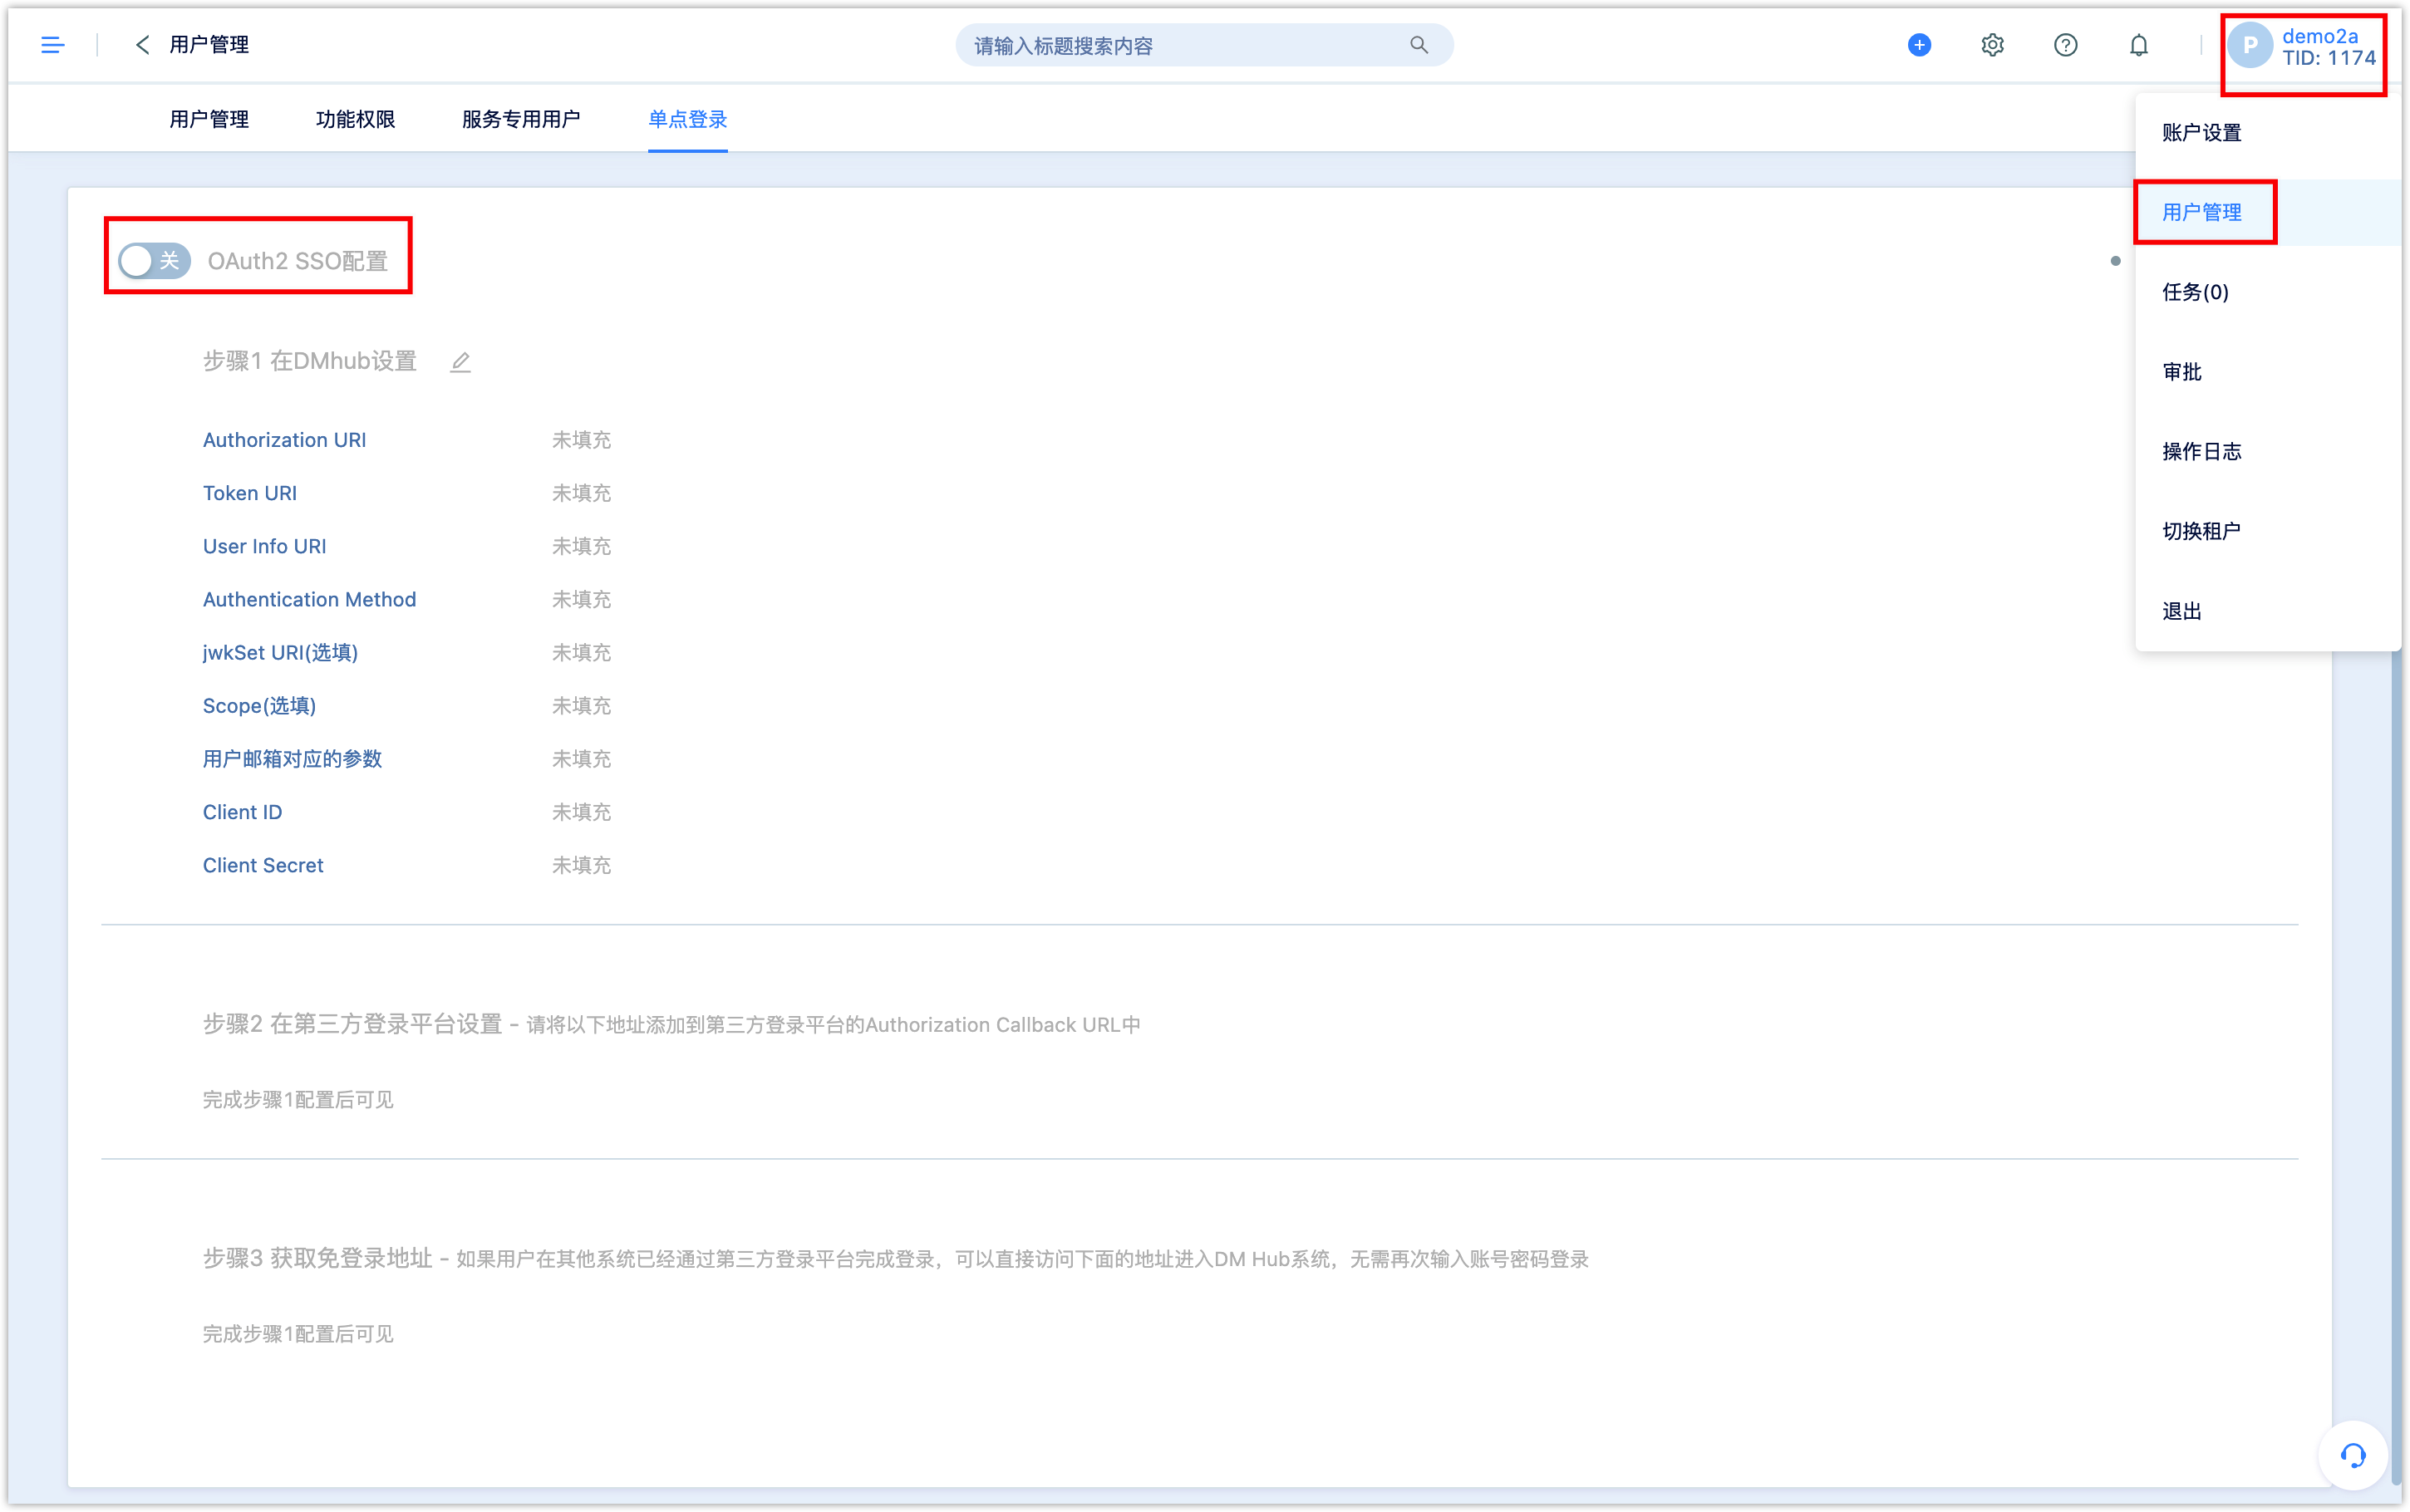
Step1: Click edit to configure following information (these information need to be acquired from third-party service provider):
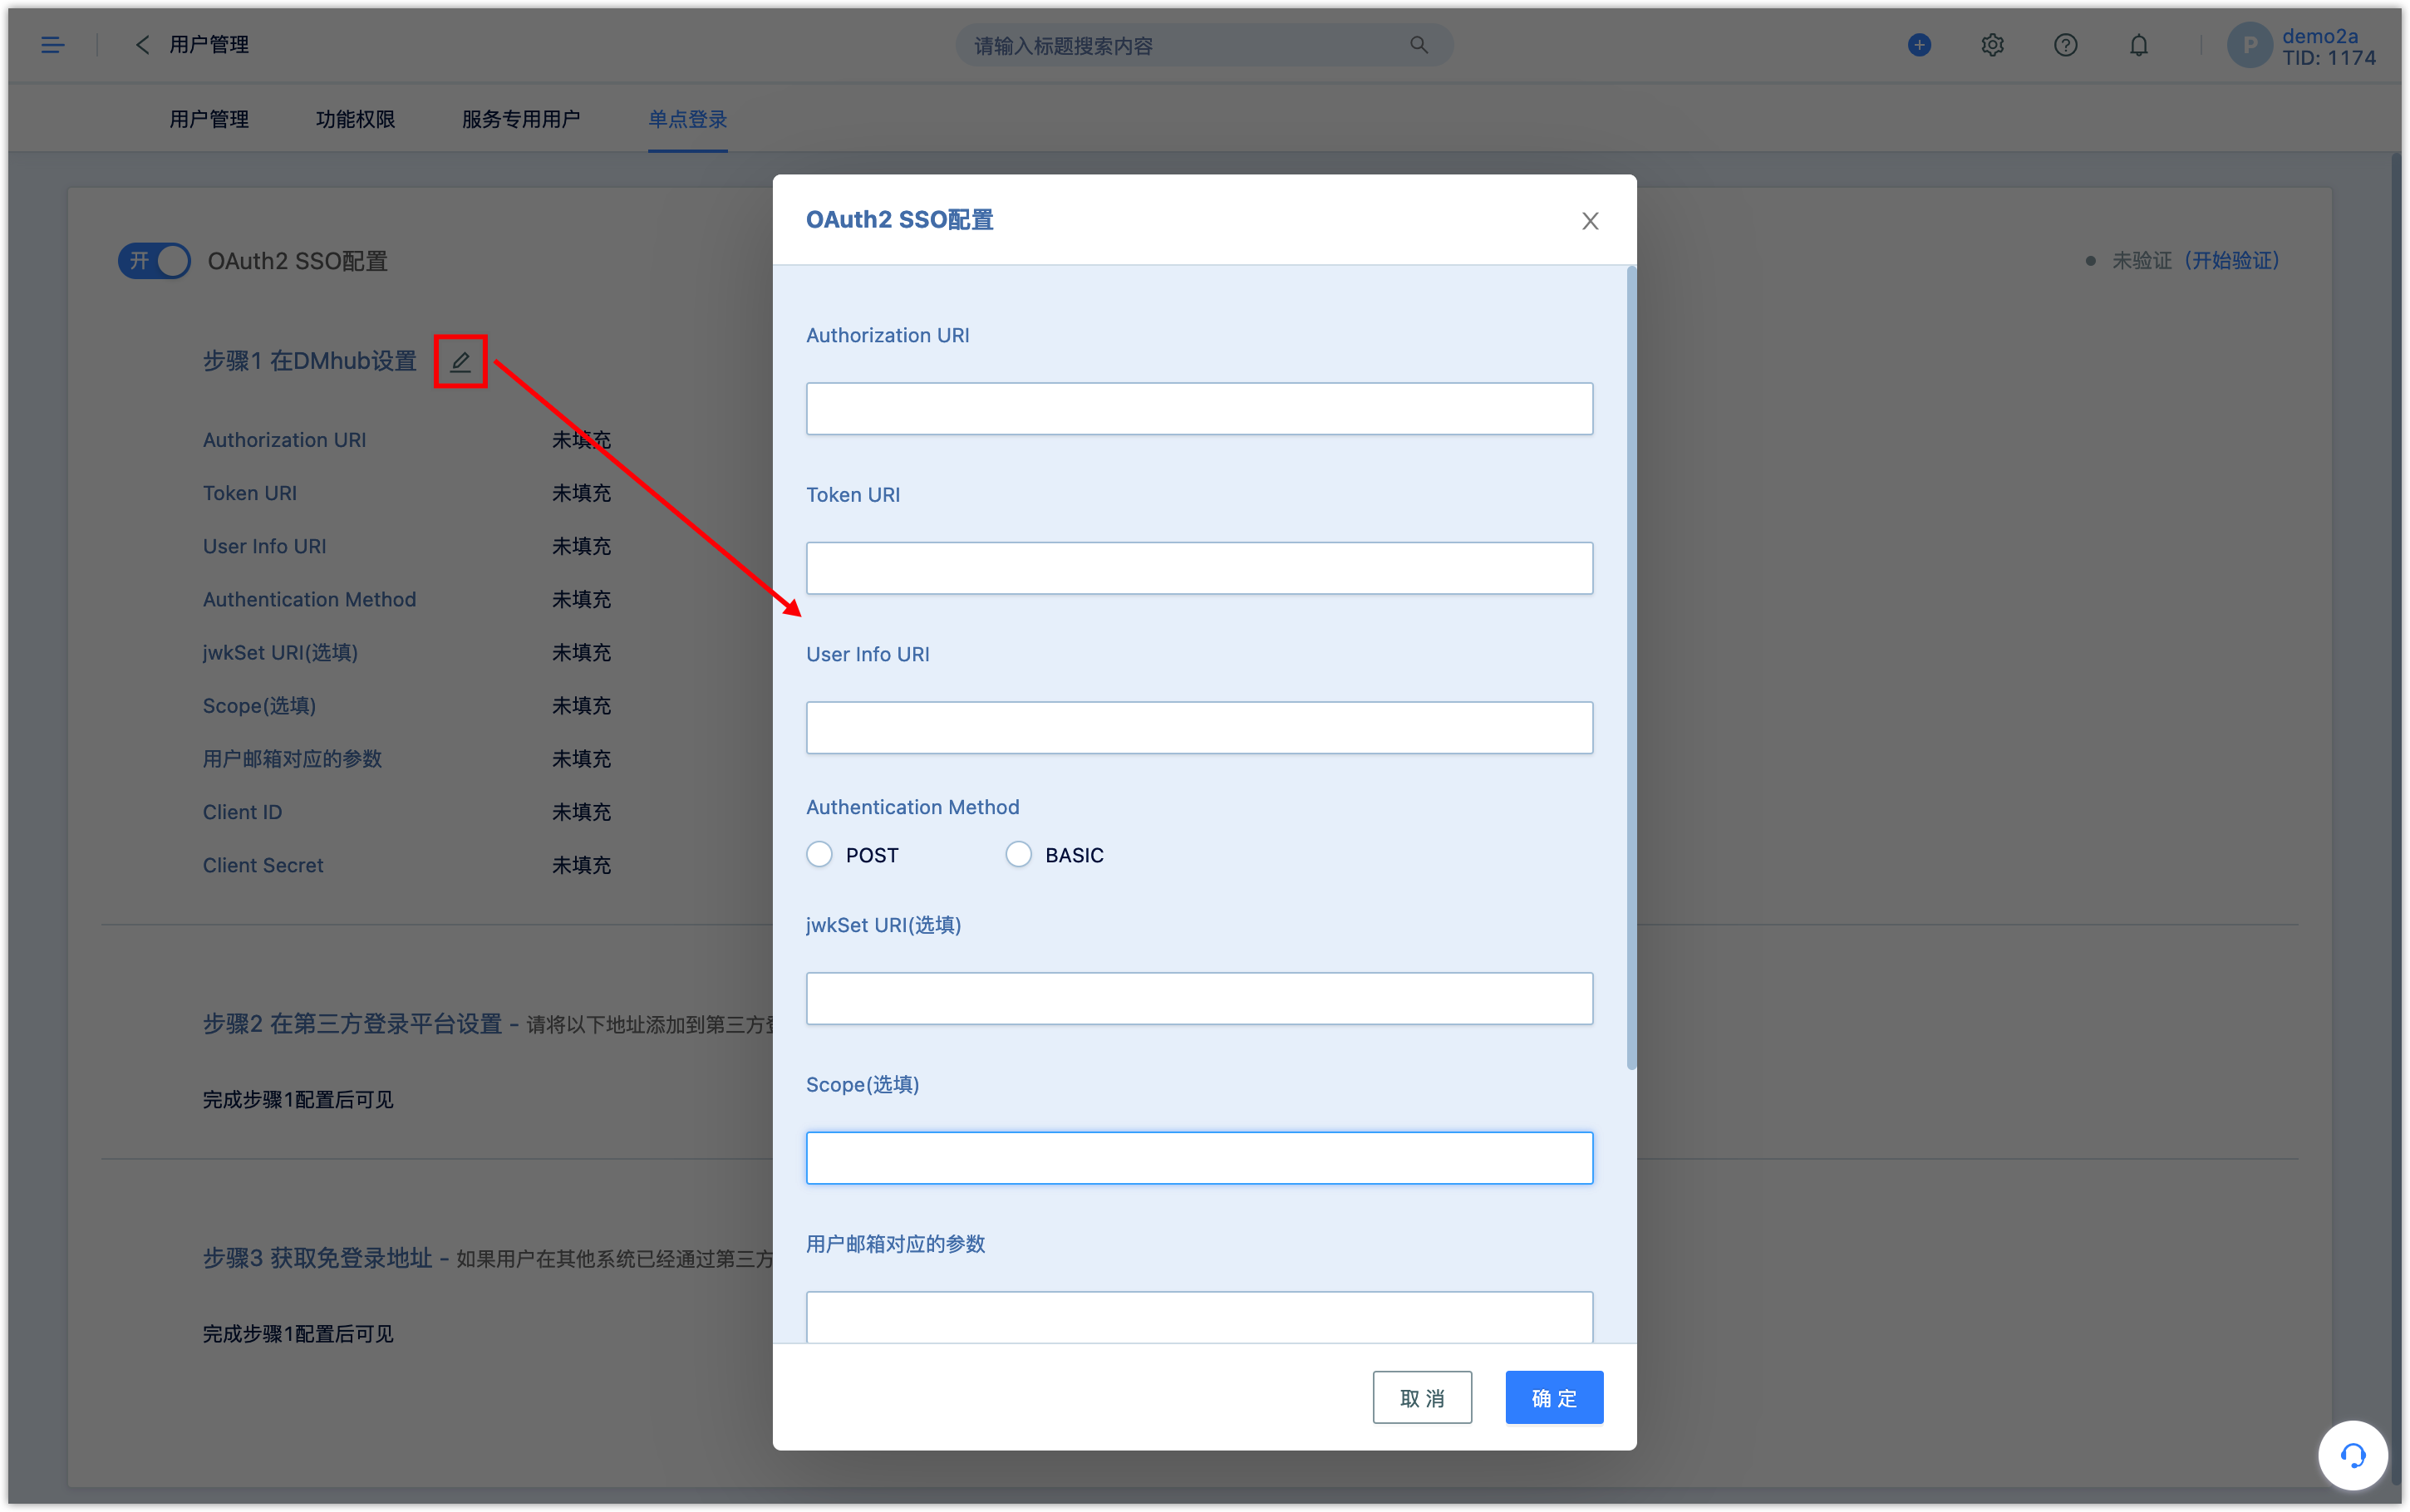
| Item | Description |
|---|---|
| Authorization URI | Corresponding address for /oauth/authorize on |
| OAuth 2.0 protocol authorization Server. | |
| Token URI | Corresponding address for /oauth/token on OAuth |
| 2.0 protocol authorization | |
| User Info URI | Corresponding address for / userinfo on authorization server. |
| jwkSet URI | Optional: scope of request during the authorization process, ex. Openid, email, or profile. |
| Scope | Optional: scope of request during the authorization process, ex. Openid, email, or profile. |
|Parameters Corresponding to User Mailbox|Only email address is supported to use as SSO username, user email need to be filled in here.| |client-id|OAuth2 Client Id| |client-secret|OAuth2 Client Secret|
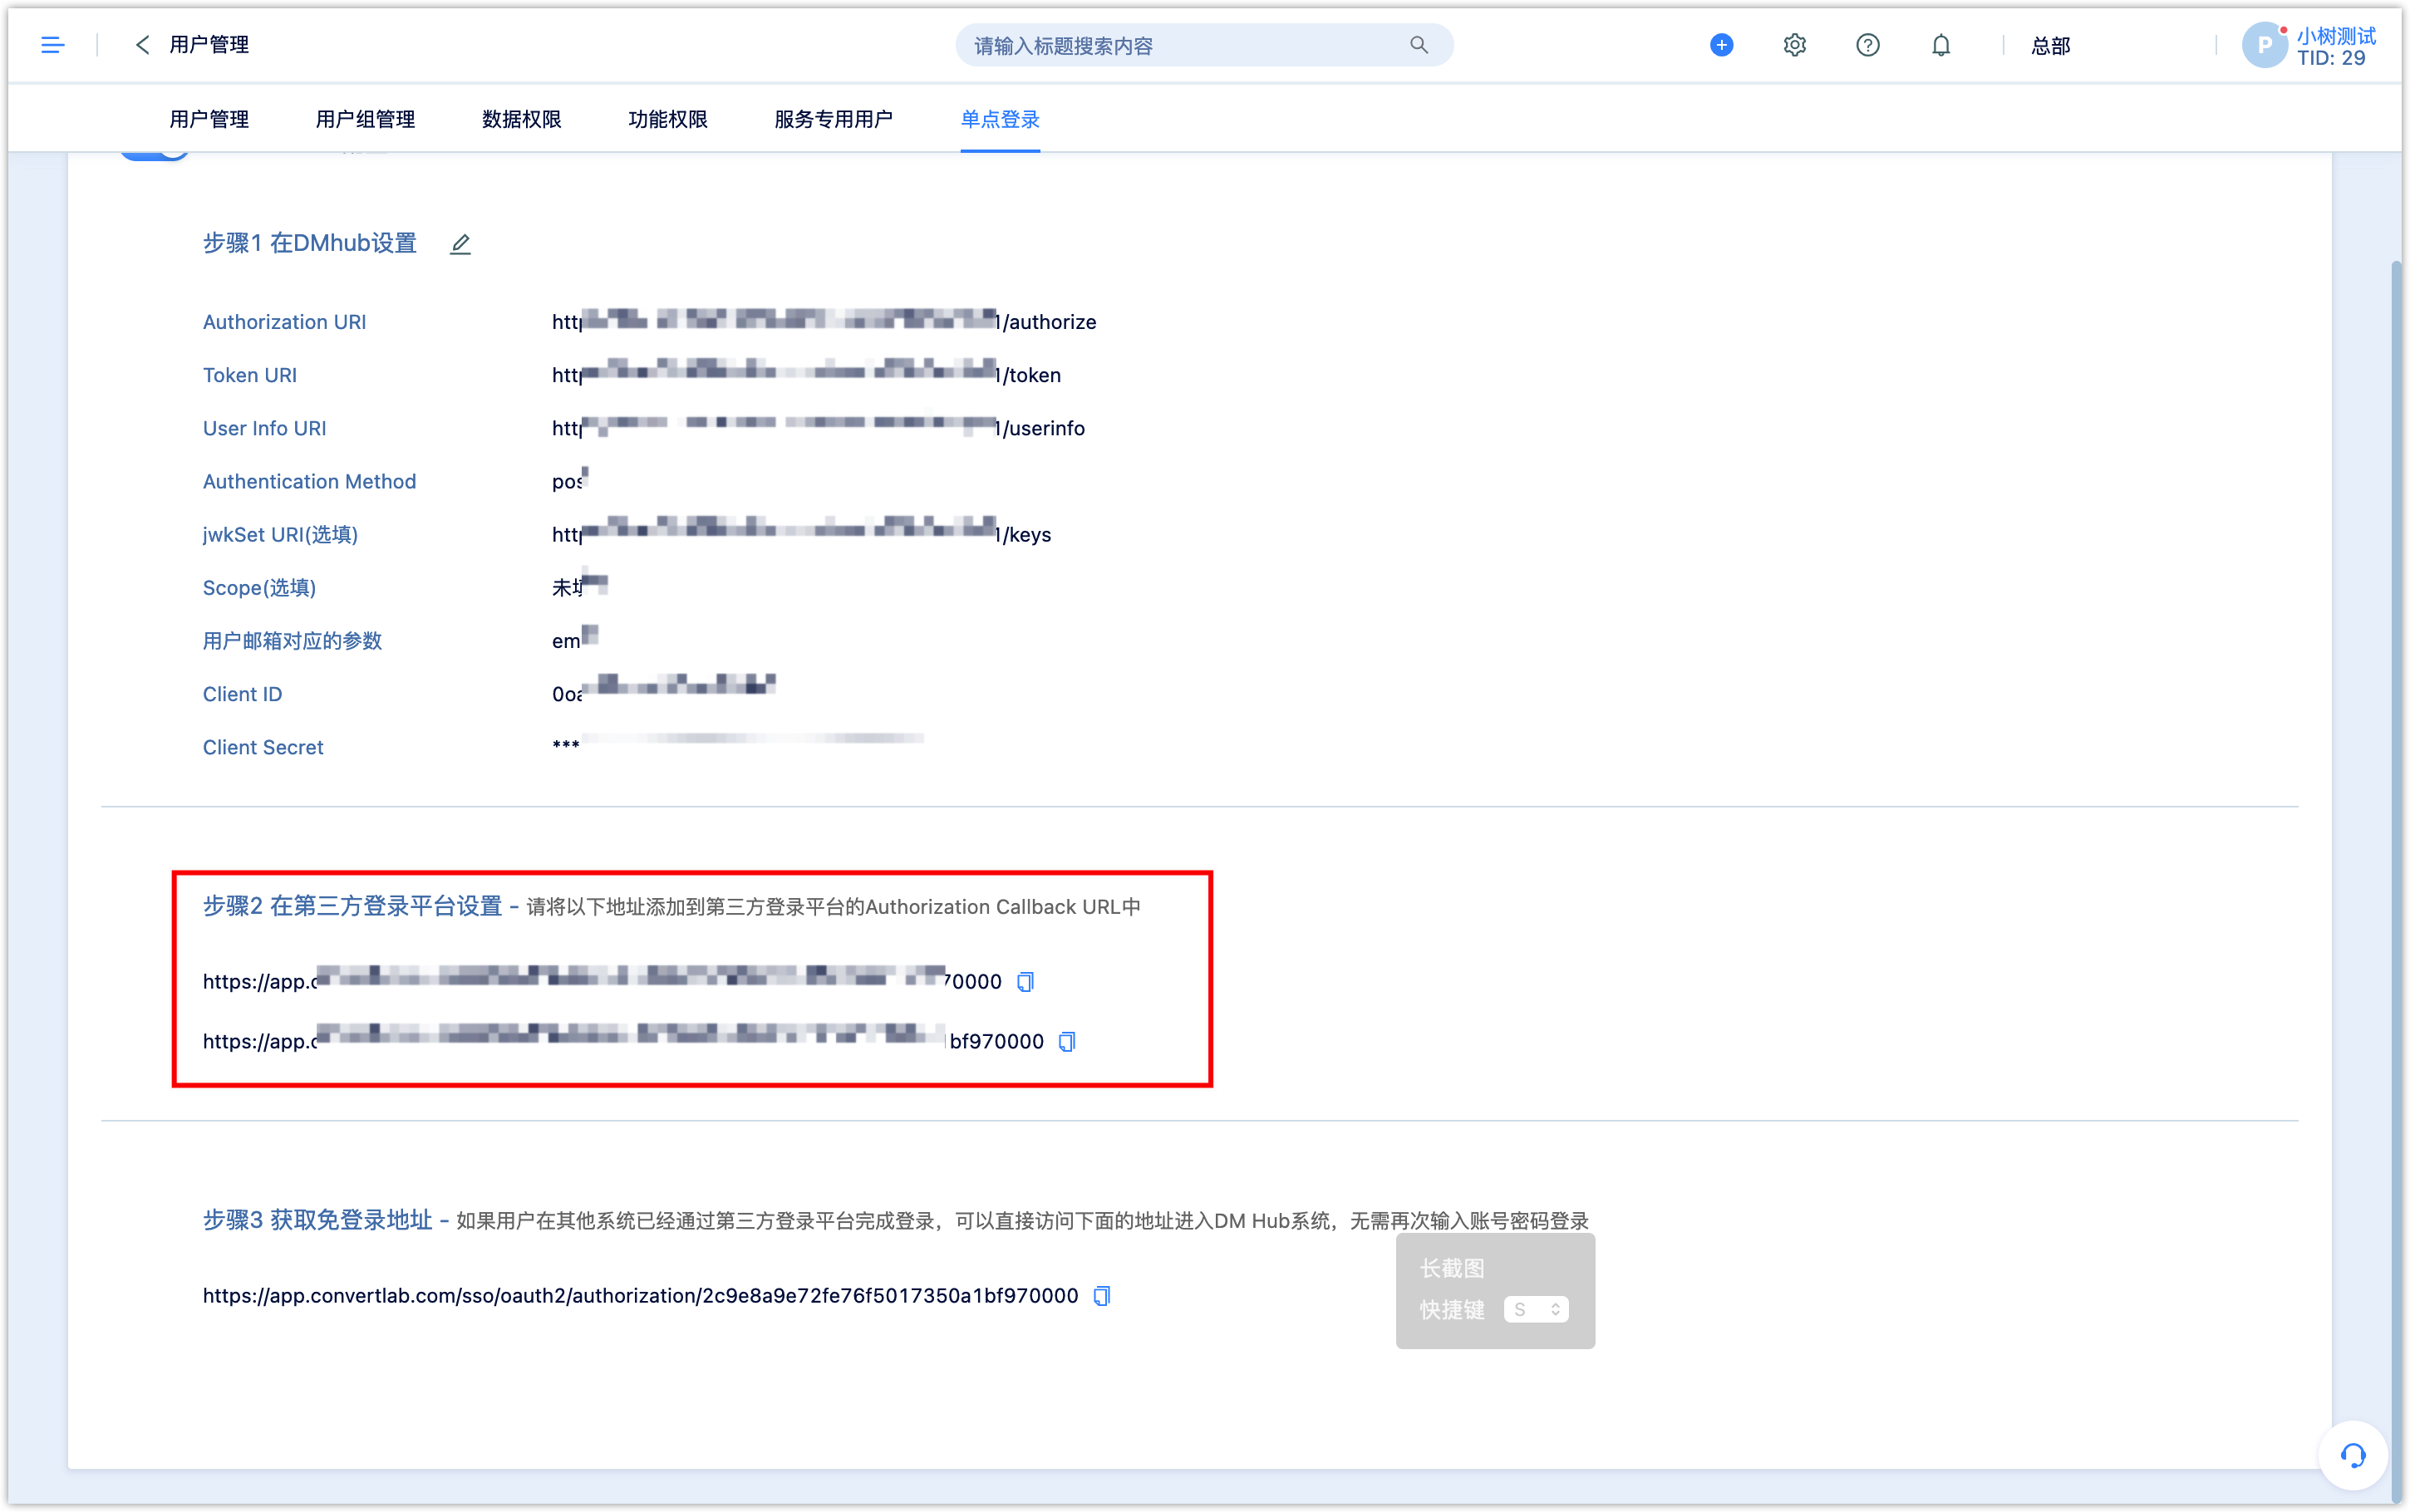
6.2Set Up in the Third-Party Login Platform
Fill in the following information to the Authorization Callback URL of the third-party login palatiform after finishing the above settings. Copy the following information from DM Hub.
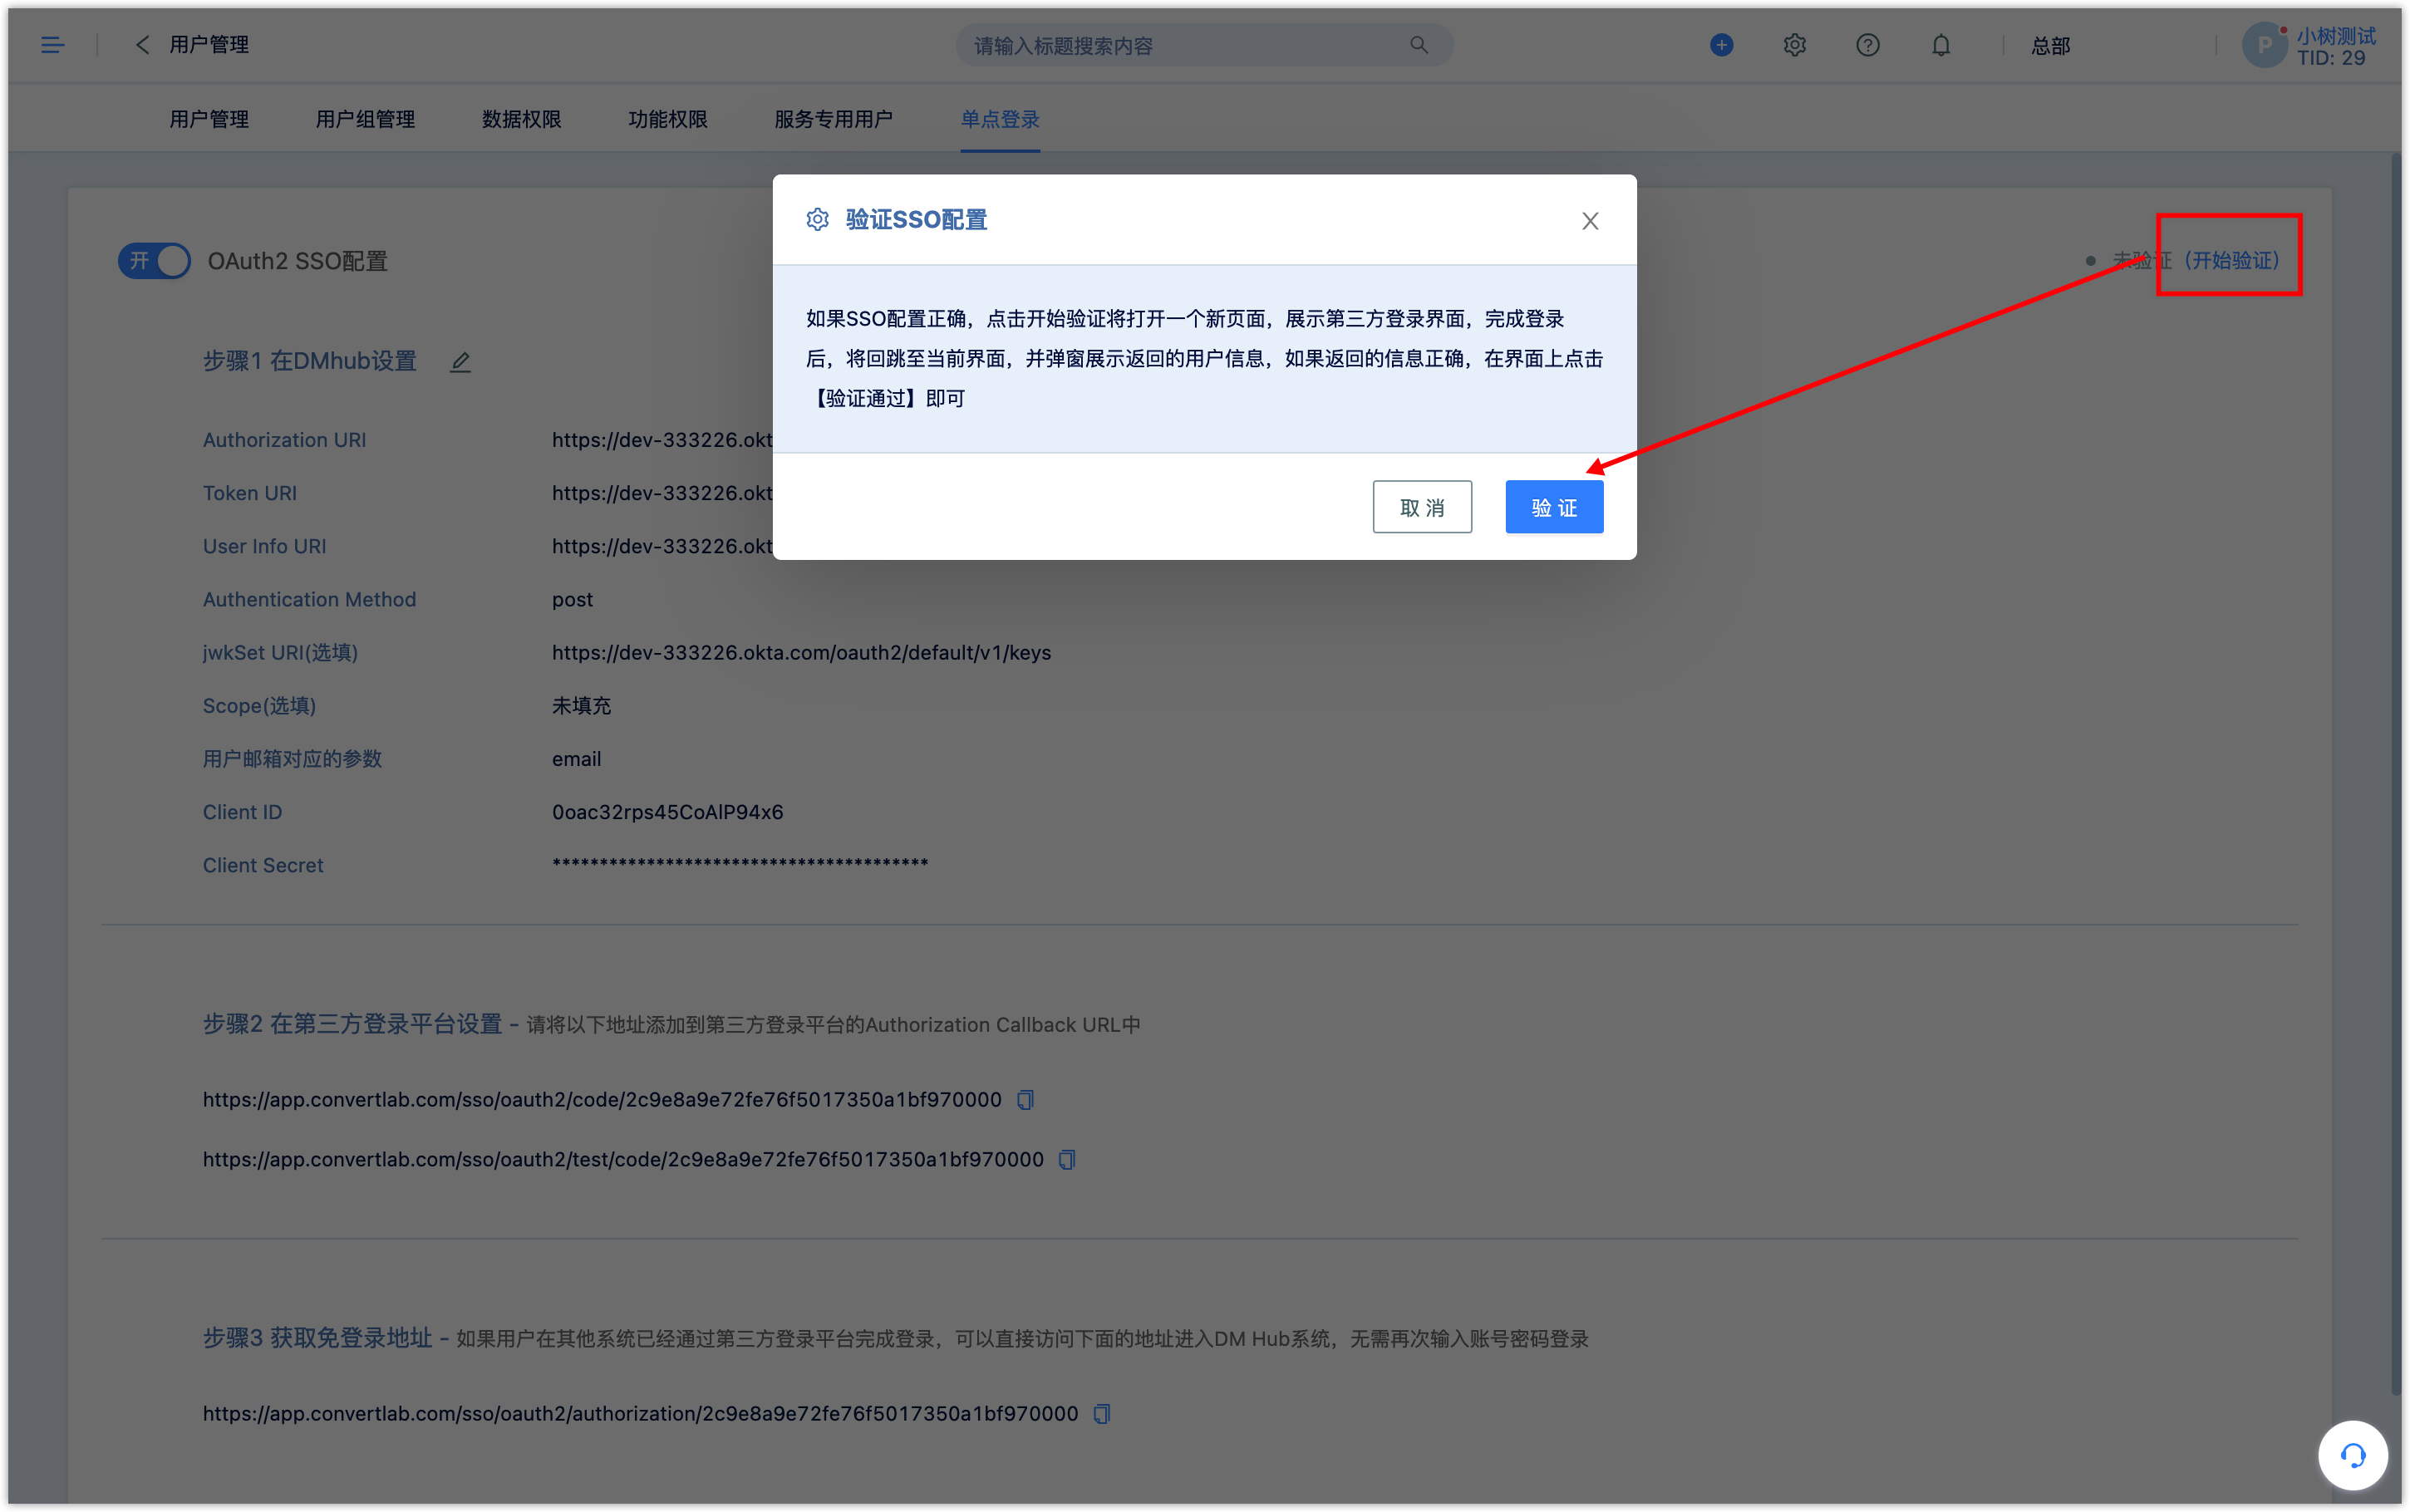
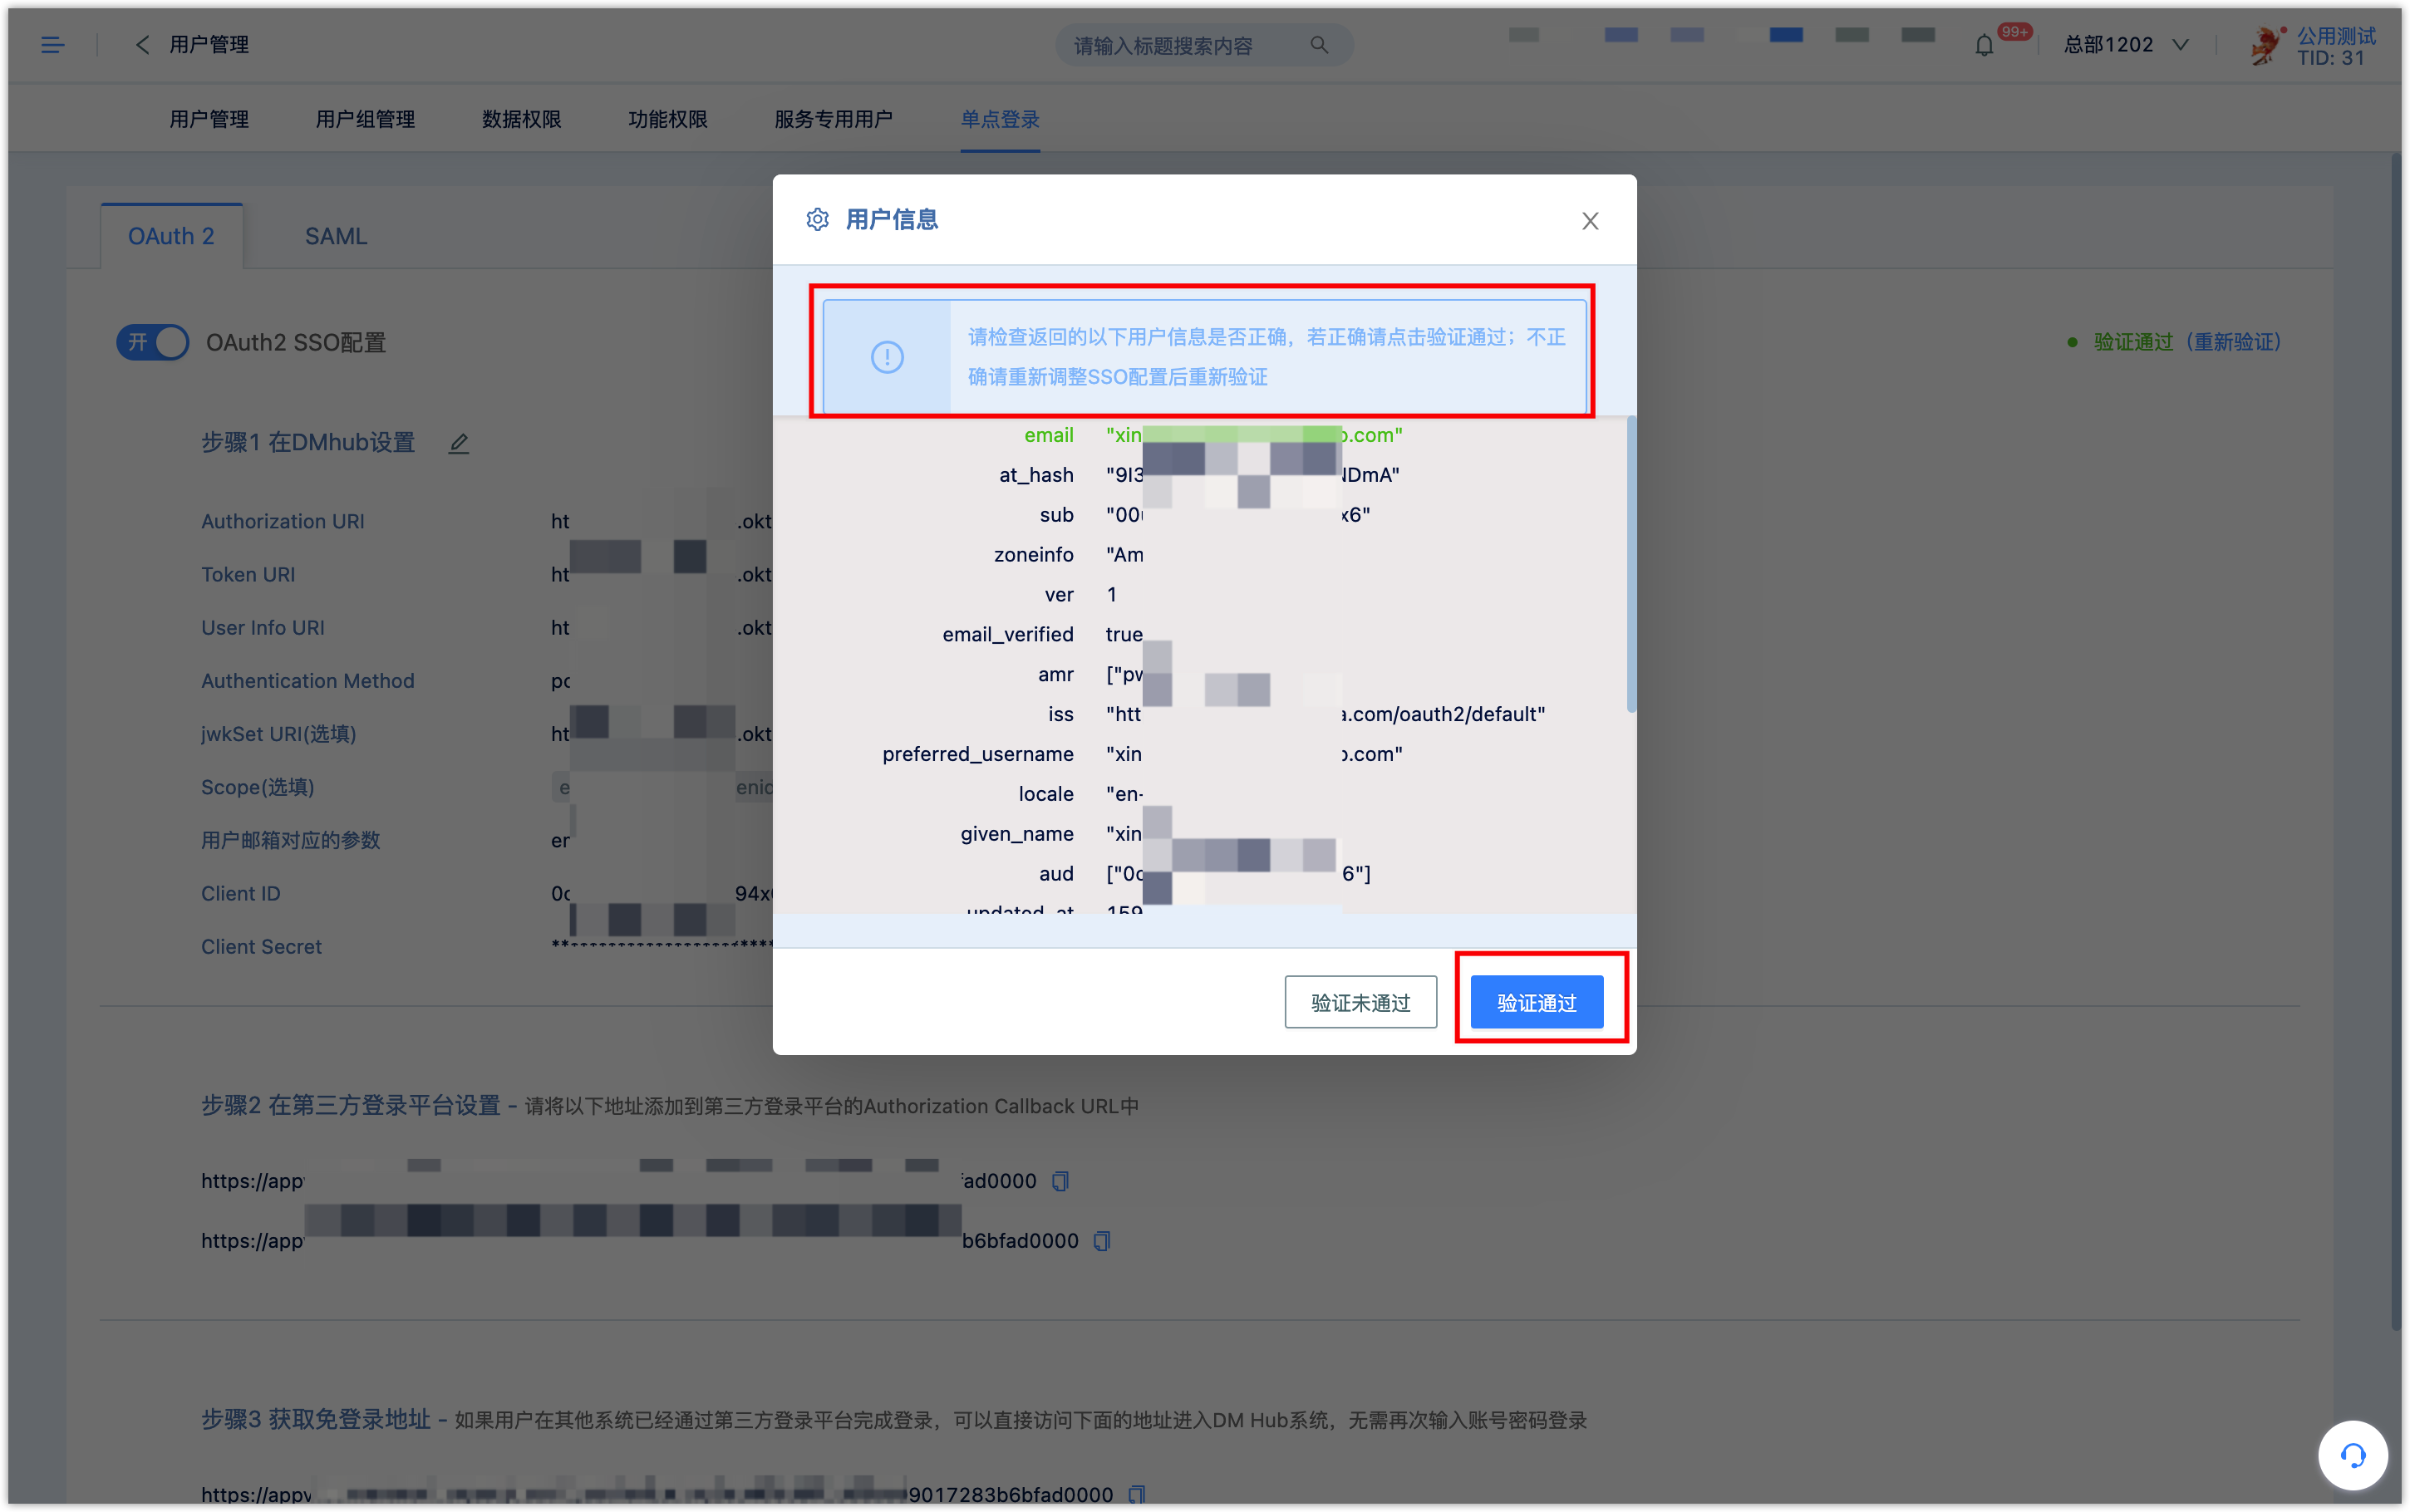
After completing the above settings, click the button [Start Verification] at the upper right corner to verify that the configuration is correct. According to the operation prompt of the pop-up window, jump to the third-party login platform and log in to the account. It will jump back to the current interface and the pop-up window will show the returned information, if the information is correct, click [Verify Passed] on the interface.
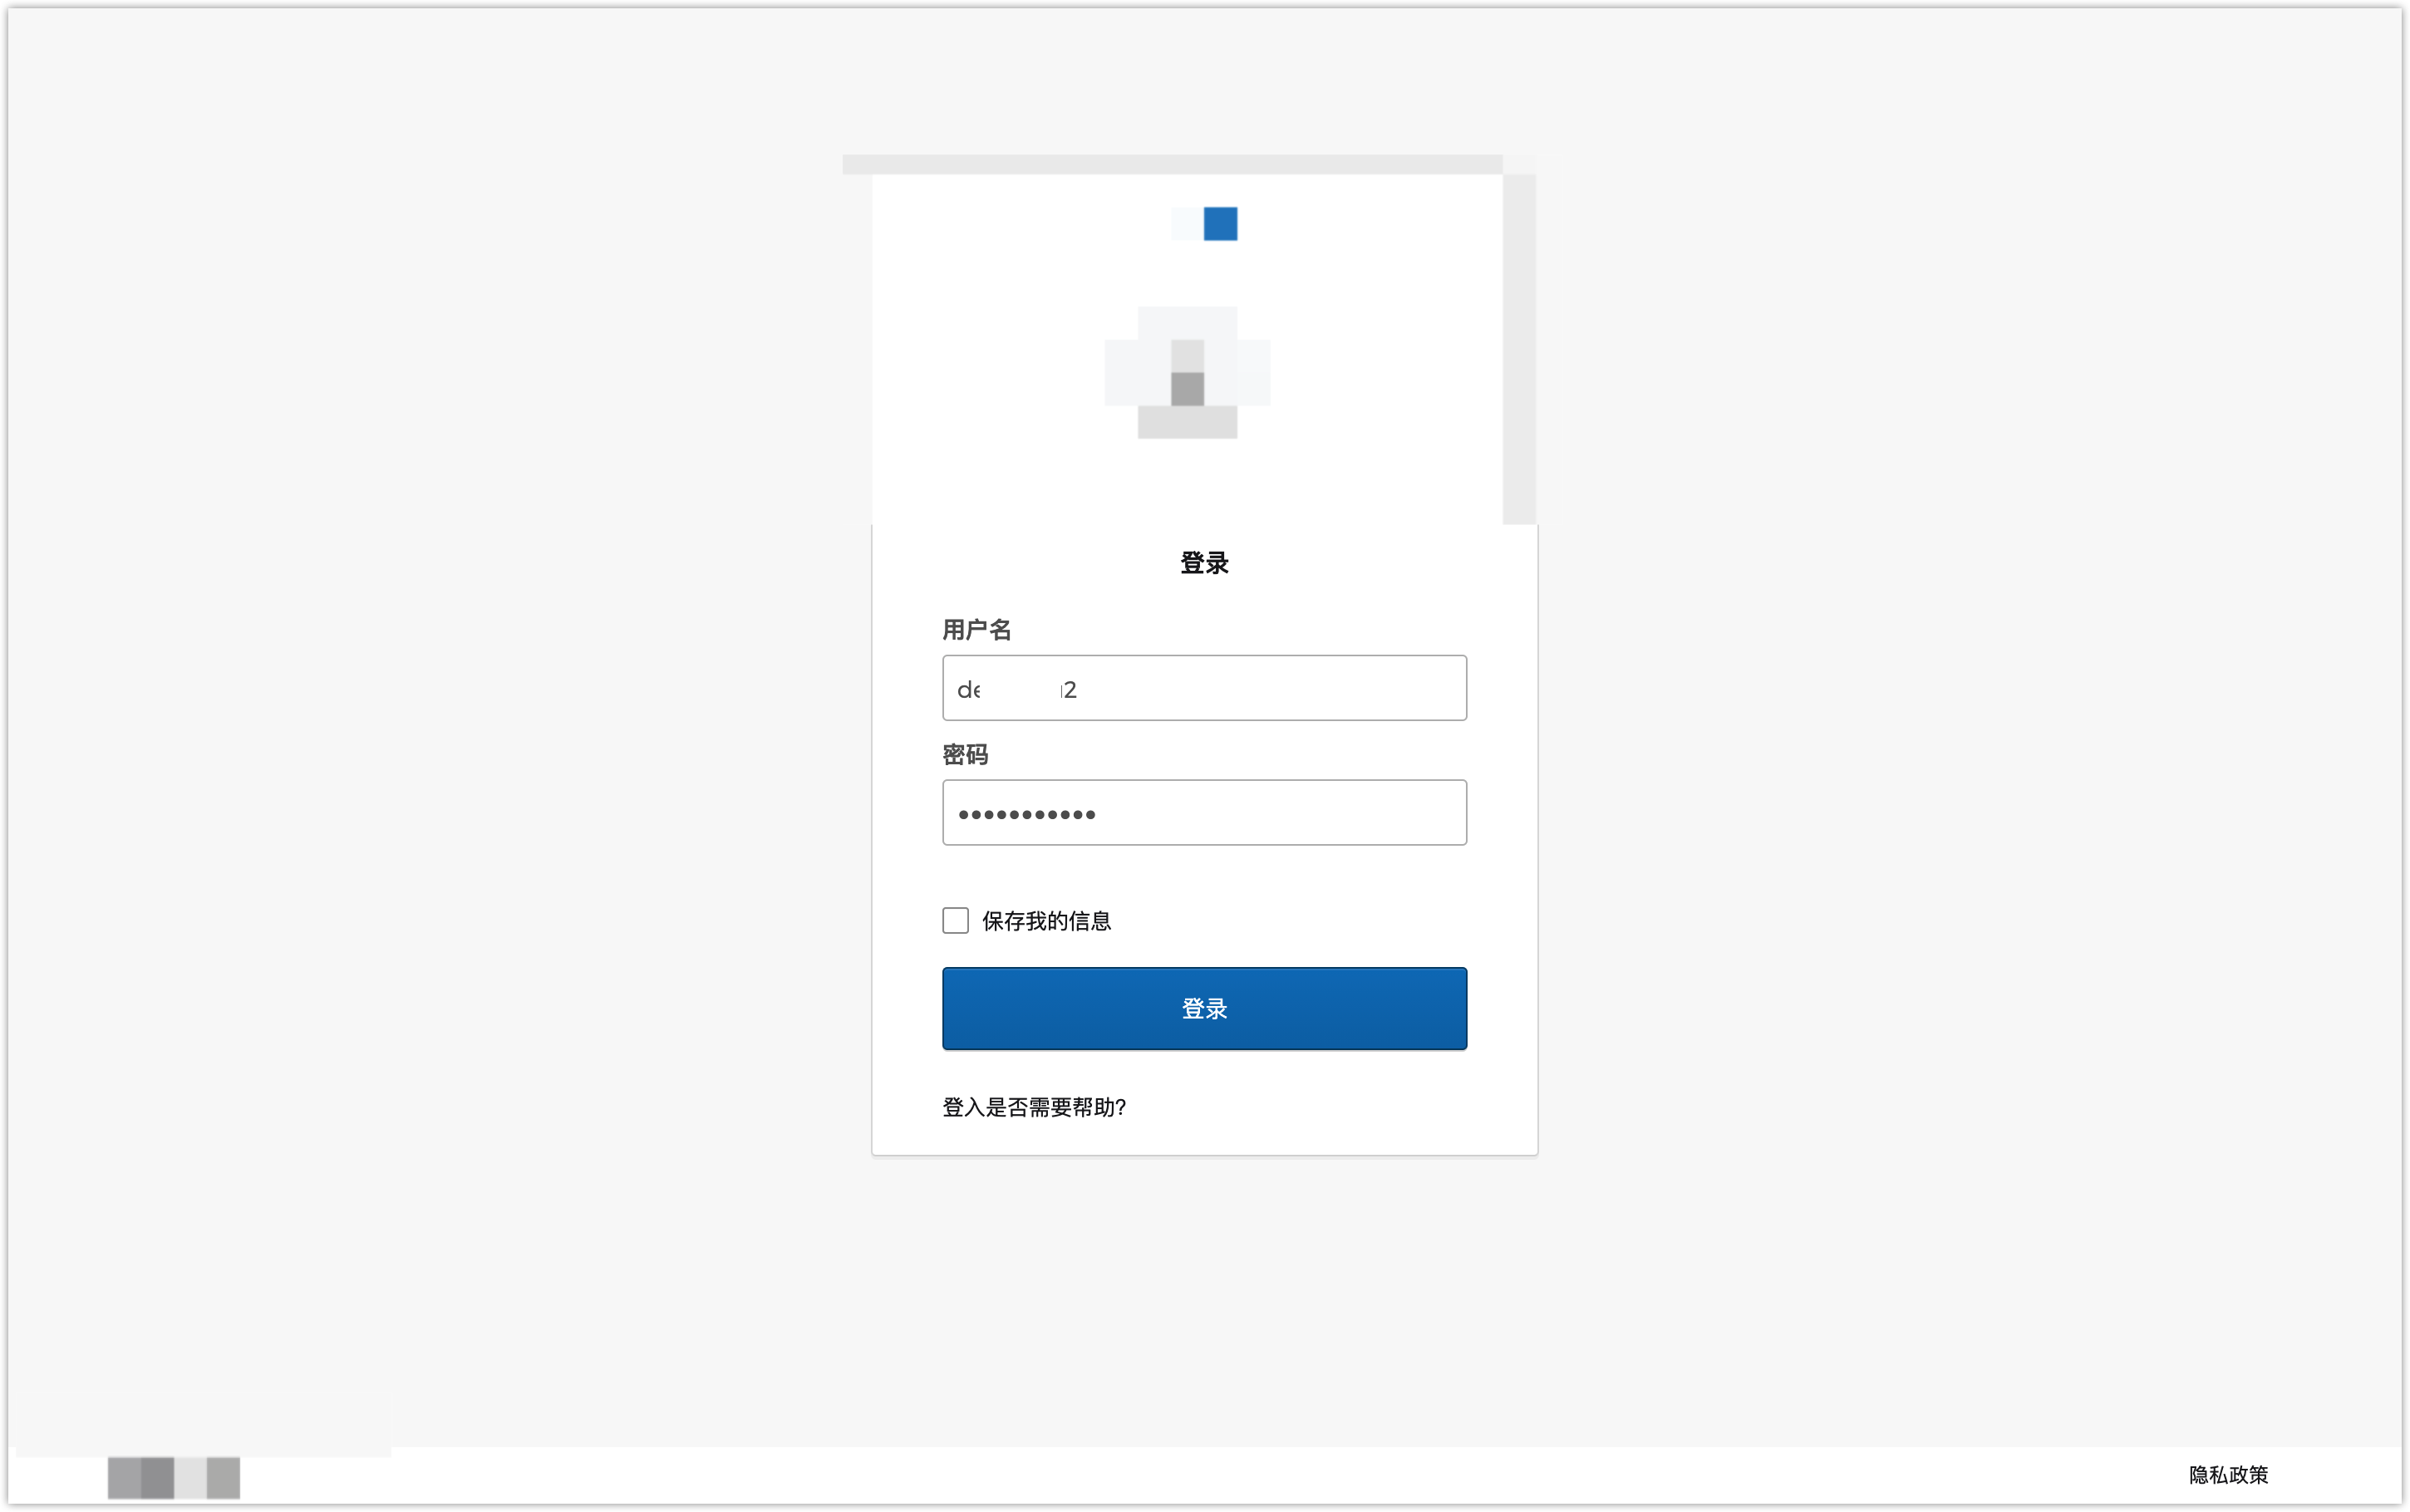
Enter the third-party login platform, input the account password to log in.
After logging in, user will be redirected to the DM Hub page. As shown in the figure below, the user’s mailbox field is successfully matched, and the relevant information has been obtained correctly. Please click [Verify Passed] to indicate that the relevant settings have been successfully completed.
6.3Adding SSO Users to Tenant Through API
After completing configuration, SSO users need to be added to tenant through Open API, then SSO users can log in to DM Hub Tenant.
Open API Reference:pathname:///../api-docs/v2/restapi/user
6.4Log in to DM Hub Through SSO
Click [SSO login] in DM Hub log in page to login through SSO.