Website
1.Overview
The website module in the system can record website traffic, track the source of traffic, and capture website visitor information. Compared with a single website traffic statistics and tracking, DM Hub can integrate the traces left by leads in various channels to provide marketers with complete customer portraits for more precise marketing and content communication.
The following describes how to use DM Hub to integrate company website. According to different data obtained, the website tracking can be divided into three methods: connecting to the website (accessing PV/UV data), collecting customer information (collecting form data), and tracking page click behavior.
2.Connecting to Website
DM Hub has its own webpage data collection SDK. With simple configuration, user can start collecting accurate user behaviors on company webpage. After connecting the website to DM Hub, user can check the number of visitors, visit count, average browsing time, average page views, etc. of the website in the system. Follow the steps below to set. up
2.1Add Domain
First, please set the domain for tracking. In order to ensure the accuracy of tracking, only the website domain set here will be tracked. Please set it accurately as needed. The setting method is shown in the figure below:
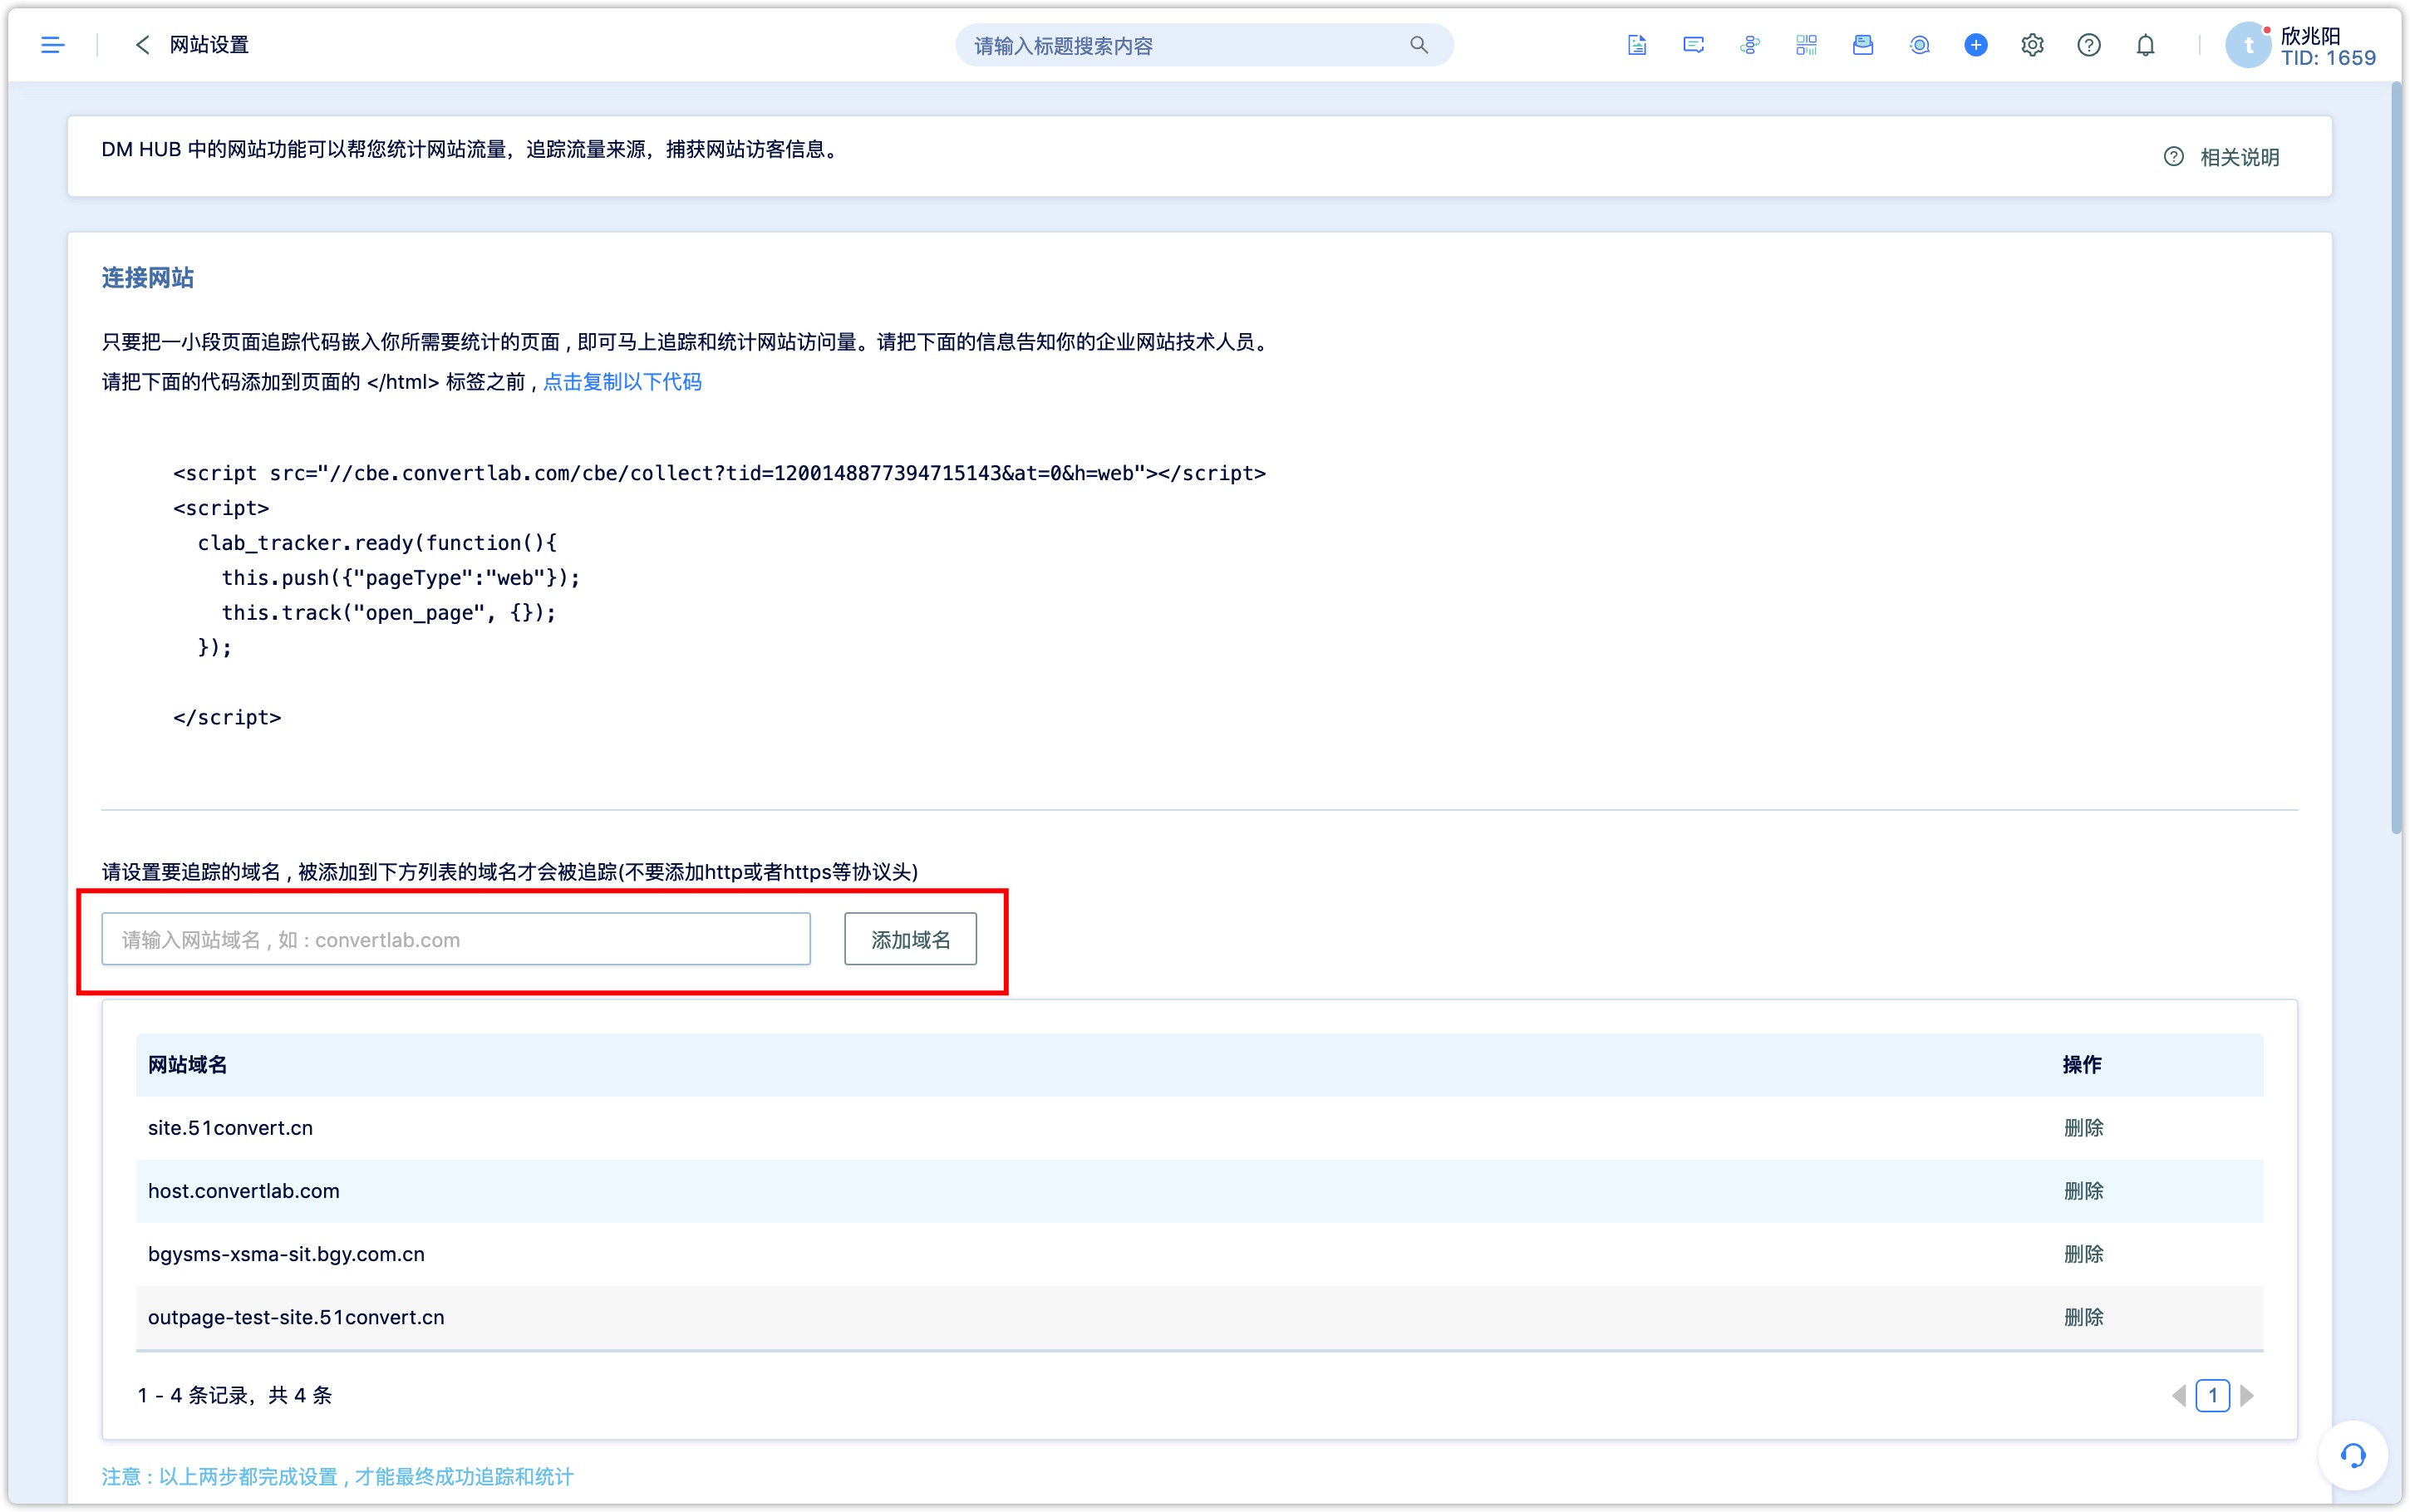
2.2Copy Code
Copy the sample code in the system:
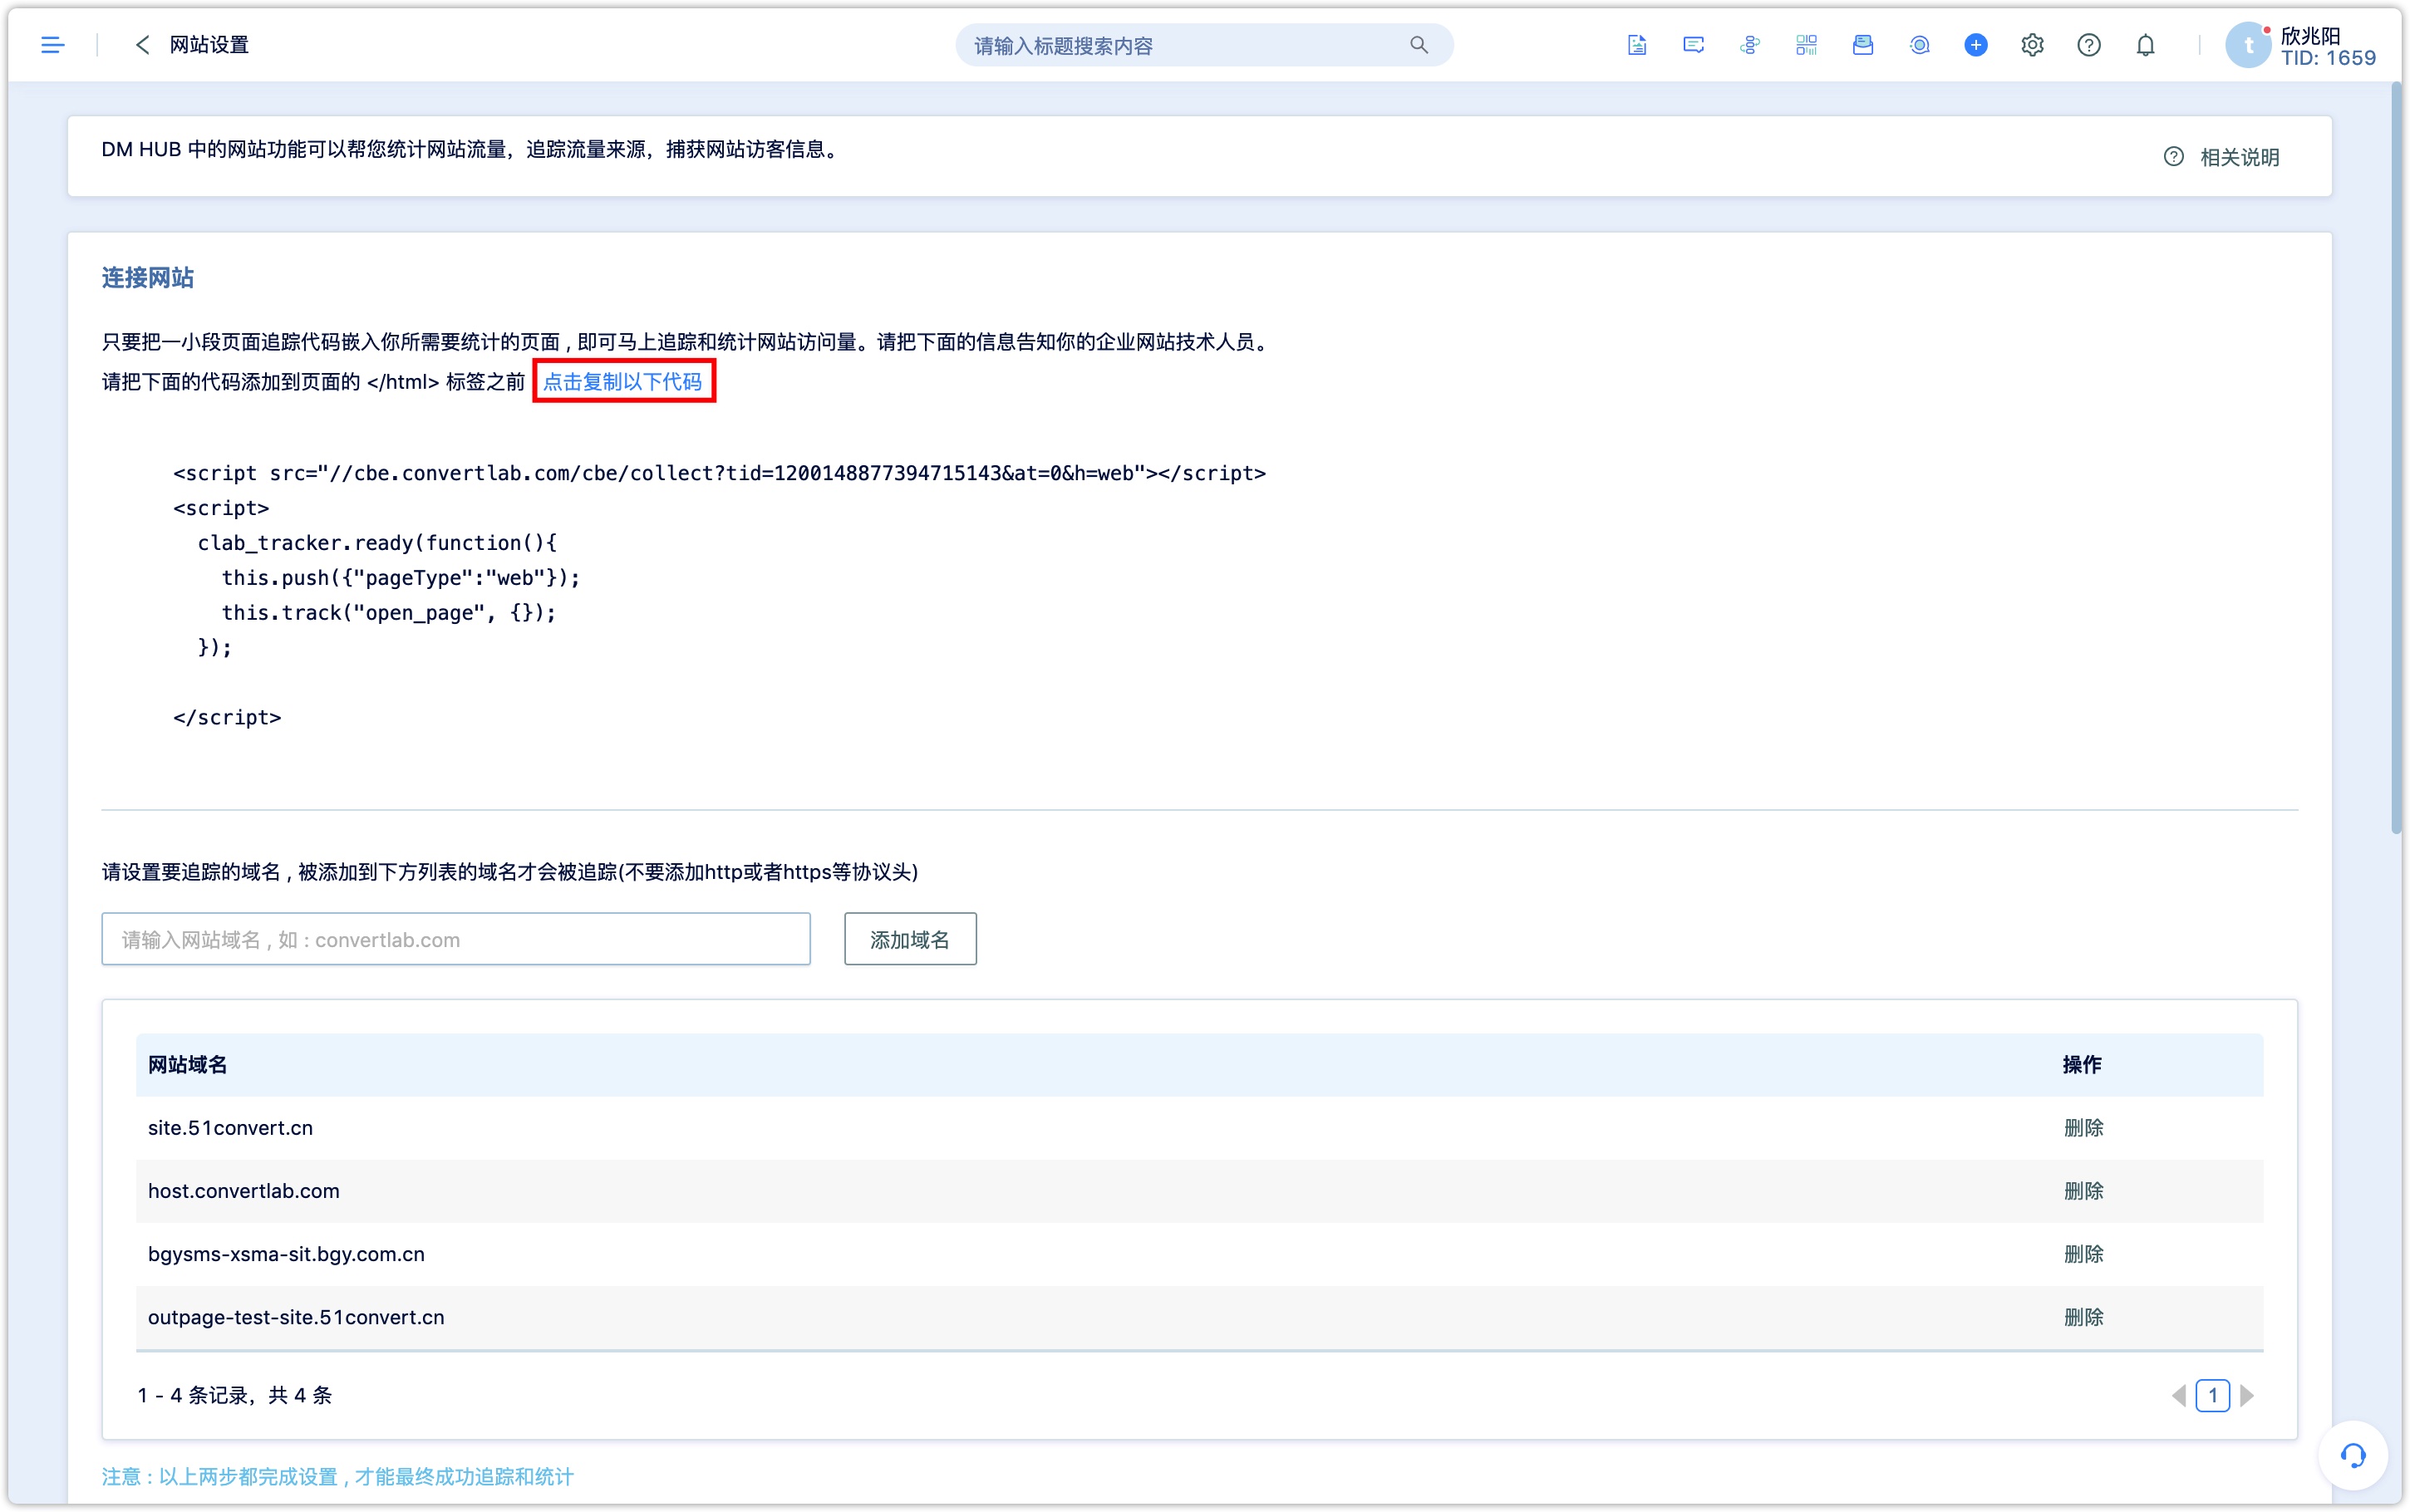
The {YOUR_TID} is the unique ID of the current tenant, please do not change it at will. Embed this code in the web page that needs to be tracked to start tracking user's page visit events. The following will introduce the tracking code interface in detail.
2.3JS SDK Interface Description
The interface defined in the JS SDK allows user to collect data more flexibly.
2.3.1 What is clab_tracker
The clab_tracker object clab_tracker is a global object defined in the JS SDK, and the data collection interfaces are application methods of this object. The JS SDK only needs to be introduced once for each webpage and single-page websites. If it is introduced multiple times on a page, it will cause the repeated definition of clab_tracker, and the latter definition will overwrite all the previous settings, which will eventually cause unpredictable results.
The clab_tracker.ready method will call back when the JS SDK is initialized. It is recommended to put all the tracking code in ready to ensure that the SDK is already available when the tracking is triggered.
2.3.2 clab_tracker.track method
The clab_tracker.track method is used to send the data that needs to be collected to the DM Hub, which can be understood as recording user behavior.
This method supports two parameter passing methods.
Method 1: As shown in the sample code below
if (clab_tracker) {
  clab_tracker.track(event, targetName, targetId, properties, callback);
}
Track method parameter description:
| Parameter | Description |
|---|---|
| event | event id, such as open_page (access page), see DM Hub event model |
| targetName | The name of the event target, such as the name of the page in the page access event |
| targetId | the unique identifier of the event target, such as the link ID in the click link event, which is used to distinguish the target object during data analysis |
| properties | Optional, a js object, which can contain properties in the event model |
| callback | Optional, if there is a callback, this method will be called after the track sending action is completed |
The sample code is as follows:
 clab_tracker.ready(function(){
    this.track("click_link", "报名链接", "link_id_xxx" {"identityType": "wechat", "identityValue": "openidxxx", "source": "百度搜索"});
  });
Method 2: Put all attributes in one object
clab_tracker.ready(function(){
    this.track("click_link", {"targetName": "报名链接", "targetId": "link_id_xxx", "identityType": "wechat", "identityValue": "openidxxx", "source": "百度搜索"});
  });
2.4clab_tracker.push method
If there are many tracking codes set on a page, and there are some common parameters between them, when these participants are set separately at each tracking point, it will cause inconvenience to code maintenance. For that, clab_tracker introduces the push method to set the global parameters of the page. The parameters set by the push method will be automatically passed in subsequent track method calls on this page (to be precise, the same clab_tracker object).
For example, the following code:
clab_tracker.ready(function(){
    this.push({"identityType": "wechat", "identityValue": "openidxxx"});
  });
The values of identityType and identityValue are set as global parameters here, so there is no need to specify them in subsequent track method calls, and they will be automatically passed.
If the global parameters set in the push method are reset in the track method, the definition in the track will override the corresponding parameter settings in the global. The parts of the global parameters that are not covered remain valid.
2.5 Passing Identity Parameters
For data collection on the web, cookies are used by default to identify users. Due to the instability of cookies, they cannot be used as a strong identity to identify users. In order to more accurately identify the user, if the user's identity information can be obtained on the page, such as WeChat openid, the user's login account, etc., it can be passed as an identity.
The data collection interface of JS SDK supports up to three sets of user identities to be imported and matched in order, whichever is matched first. The parameters passed are as follows:
{
    "identityType": "身份类型1",
    "identityValue": "身份值1",
    "identityType2": "身份类型2",
    "identityValue2": "身份值2",
    "identityType3": "身份类型3",
    "identityValue3": "身份值3"
  }
Please note that the first identity type is "identityType", not "identityType1".
If the website page is placed in the WeChat environment and the OpenID of the fan can be obtained, then the following line can be added after this.track("open_page",{});
this.push({userId:"oBcVGs-hrUAclXik7BmDuO_yCP4",channelType:"wechat"});
The userId is the OpenID. If you still need to set [Content Tag] for this page, you can continue to add push content, as follows:
this.push({userId:"oBcVGs-hrUAclXik7BmDuO_yCP4",channelType:"wechat",tag: "青年"});
2.6URL Parameter Model
If a parameter recognizable by the JS SDK is added to the URL, the SDK will automatically grab it when collecting data and save it in the corresponding event attribute.
For example, for the following URL with parameters:
https://www.convertlab.com?cl_sr=百度
When data collection is performed on the page:
clab_tracker.track("open_page", {});
It is equivalent to adding data collection with the "source" parameter:
clab_tracker.track("open_page", {"source": "百度"});
The corresponding relationship between URL parameters and event attributes is shown in the following table:
| URL Parameters | Corresponding Event Attributes | Description |
|---|---|---|
| cl_sr | source Source | |
| cl_ctnm | contentName | Source Content |
| cl_cp | campaign | Marketing Campaign |
| cl_rid | referrer | Referrer ID |
| cl_rfp | referPlan | Promotion uuid |
| cl_md | source1 | source-media |
| cl_pl | source2 | source-ad position |
| cl_cr | source3 | source-creative |
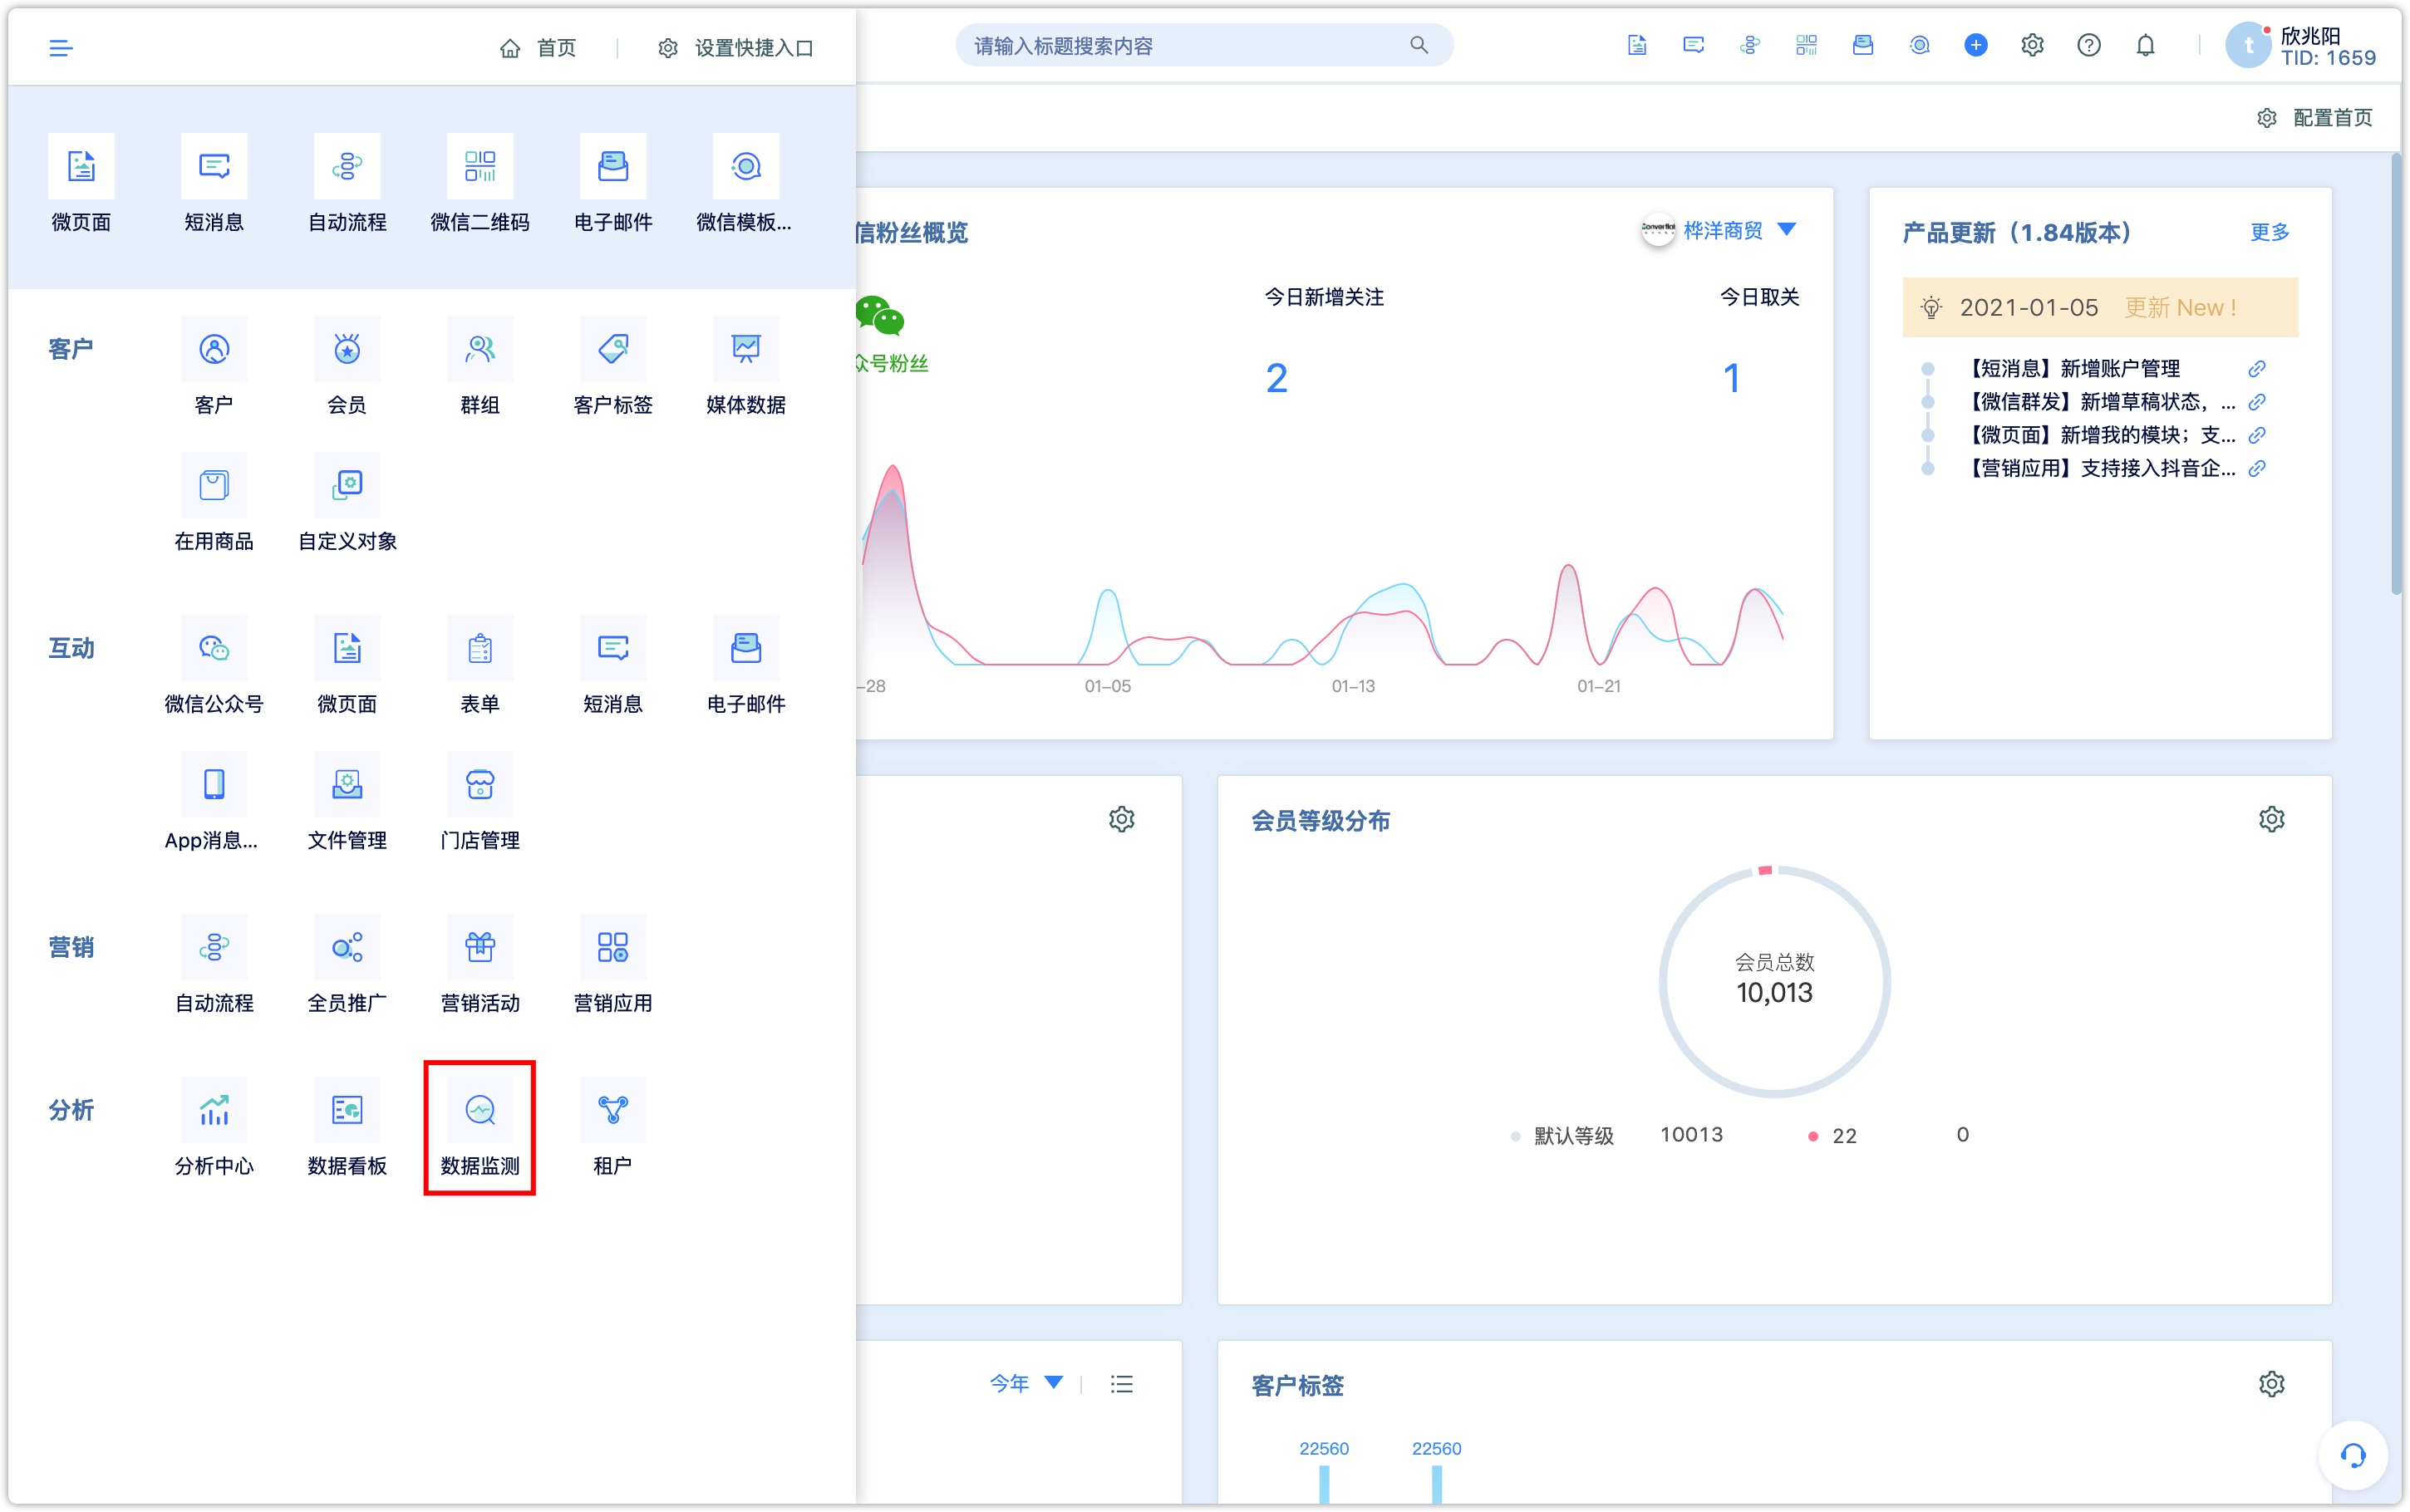
3.Website Data Monitoring
After website is tacked in the above methods, user can check the website data in [Data Monitoring]-[Website Monitoring].
3.1Overview of website visits
Website traffic data counts basic website traffic indicators such as PV, UV, bounce rate, exit rate, etc., to help users understand the quality of website traffic and the traffic data from different sources more clearly. DM Hub’s website traffic statistics are divided into website visit overviews (that is, the traffic data of the entire website) and website pages (that is, the traffic data of each page alone). The relevant statistical indicators are explained as follows:
| Indicator | Chinese Name | English Name | Indicator Description |
|---|---|---|---|
| Session Information | 访问人数 | Unique Visitors | Unique Visitors |
| Session Information | 访问量 | Visits | The number of sessions in a period of time |
| Session Information | 跳出率 | Bounce Rate | A user ends the session after only one access event, which is called bounce rate. Bounce rate = number of sessions bounced/visit volume. |
| Session Information | 页面浏览量 | Session Page Views | The sum of all page views of the session |
| Session Information | 平均页面浏览量 | Avg Session Page Views | Average Session Page Views = Sum of Session Views/Visit |
| Session Information | 平均停留时间 | Avg Session Duration | Avg Session Duration = Sum of Session Stay Time/Visitivity |
| Page Information | 页面浏览量 | Page Views | Number of Page Views |
| Page Information | 推出率 | Page Exit Rate | The page exit rate is the rate of exit pages. The higher exit rate indicates that many users left the site on this page and ended their visit. |
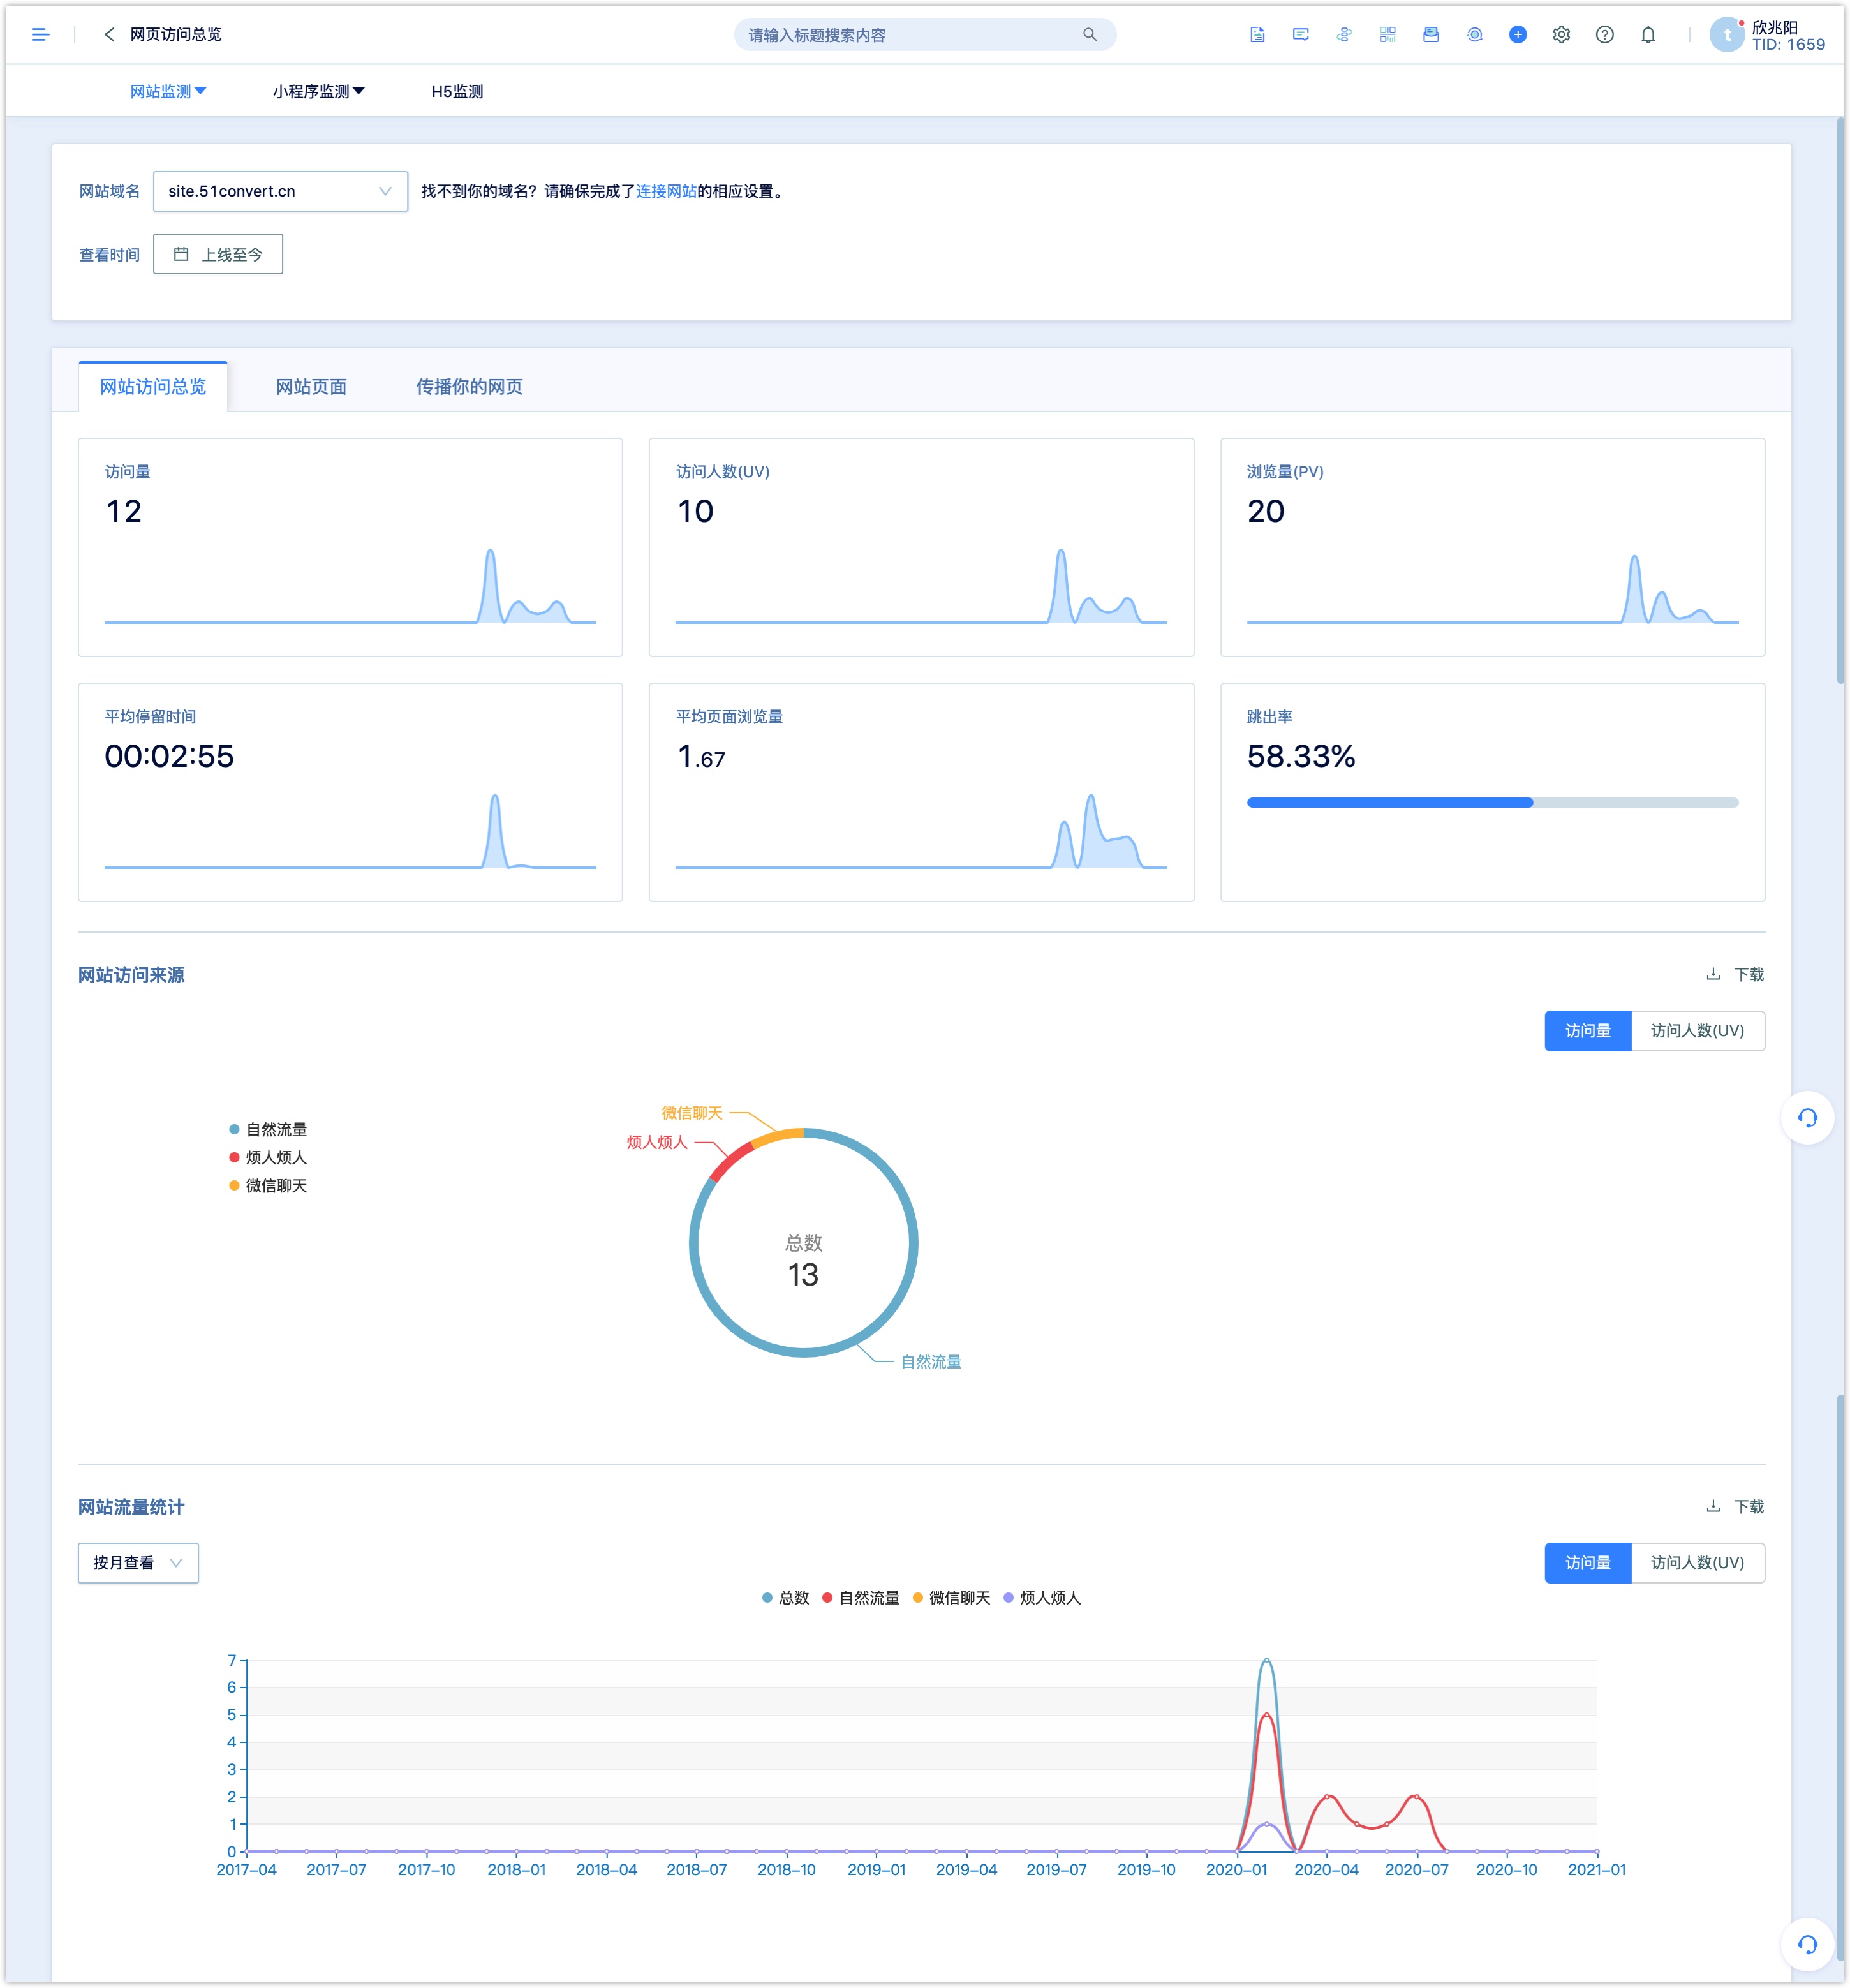
Website visit overview:Statistics of 6 traffic indicators include: visits, pageviews (PV), number of visitors (UV), average stay time, average page visits, bounce rate. These 6 indicators are all session indicators. (Refer to the table above for the meaning of specific indicators) In each indicator statistics, there are comparative data for the selected time range on a month-on-month basis.
Website source analysis:Shows the proportion of traffic from different sources, which can be viewed according to the number of visitors and the number of visits. This module displays the TOP20 source of the traffic. For more source traffic, click download to review.
Website traffic curve by time:This module can view the traffic data of year, month, day and hour according to the time period selected by the user. At the same time, it supports viewing the traffic curve according to the number of visits or the number of visitors. The chart can display the data curve of TOP5 sources and total traffic at the same time. Click the name of the source below to compare the traffic data curve of the chart. More sources of traffic can be downloaded and viewed.
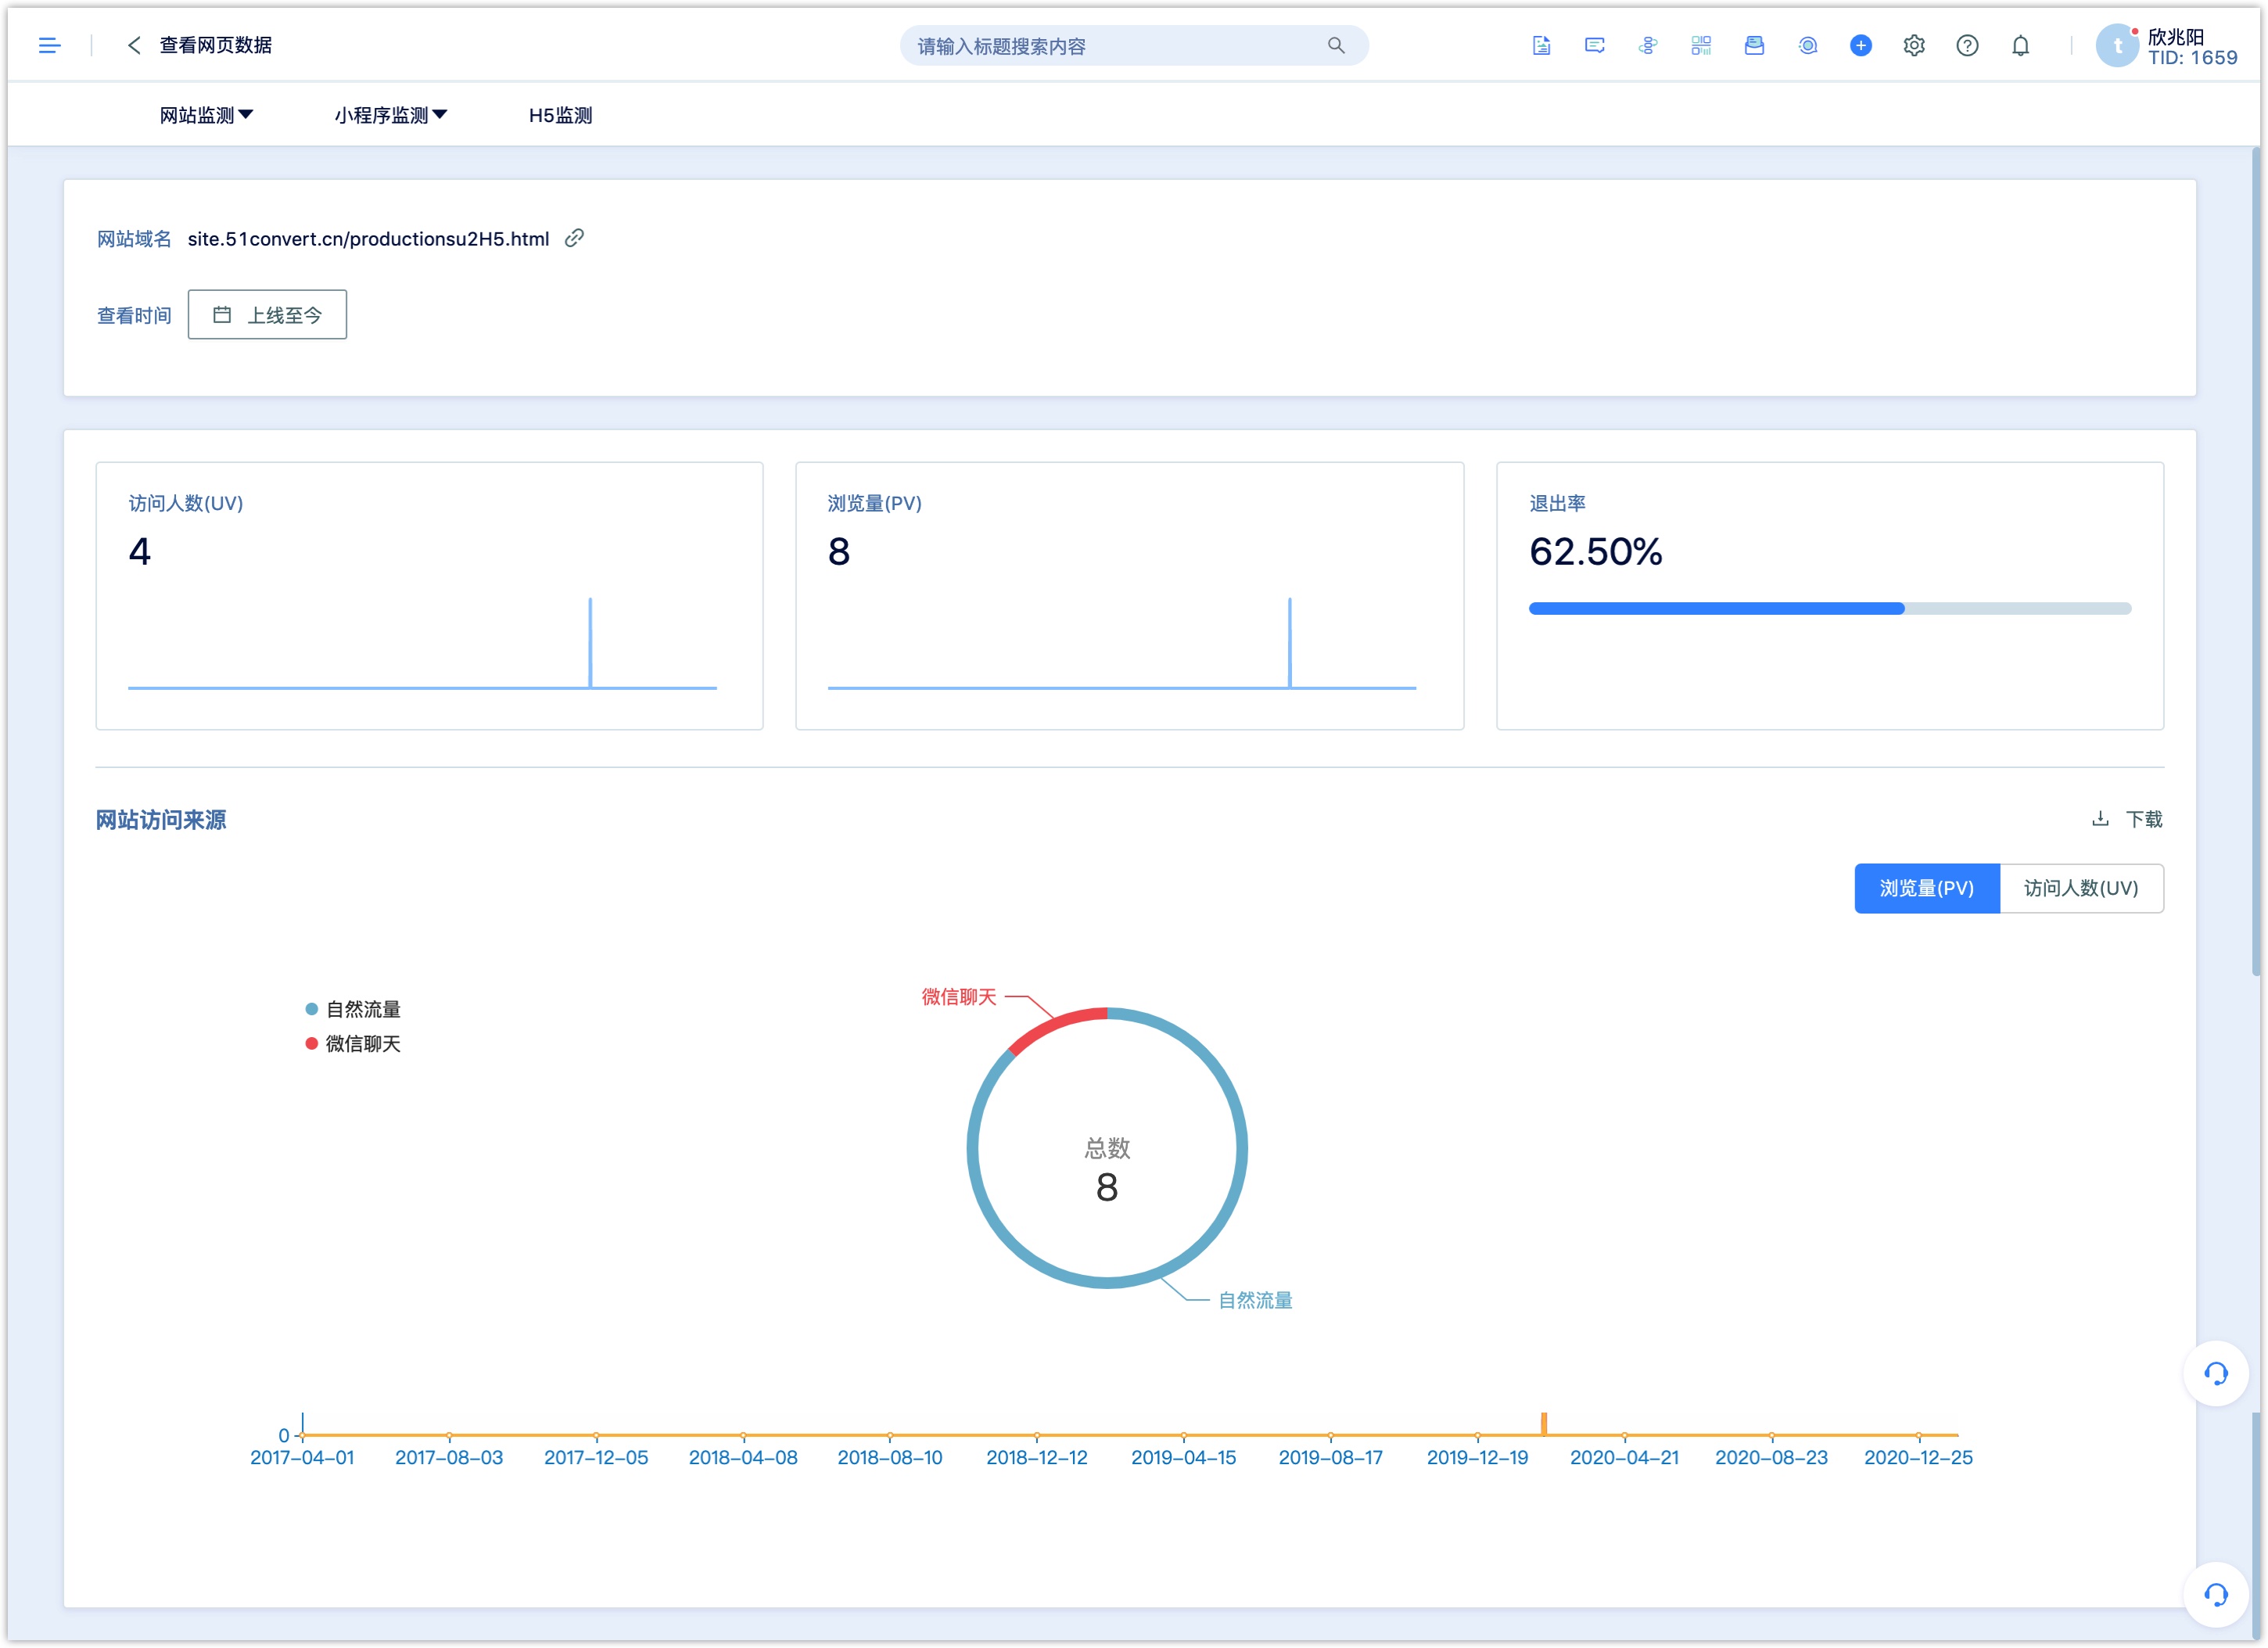
3.2Website page
The website page displays the traffic data of different pages on the website, and the page can be selected for a certain period of time to view the data. You can search for related webpages according to the webpage name and URL.
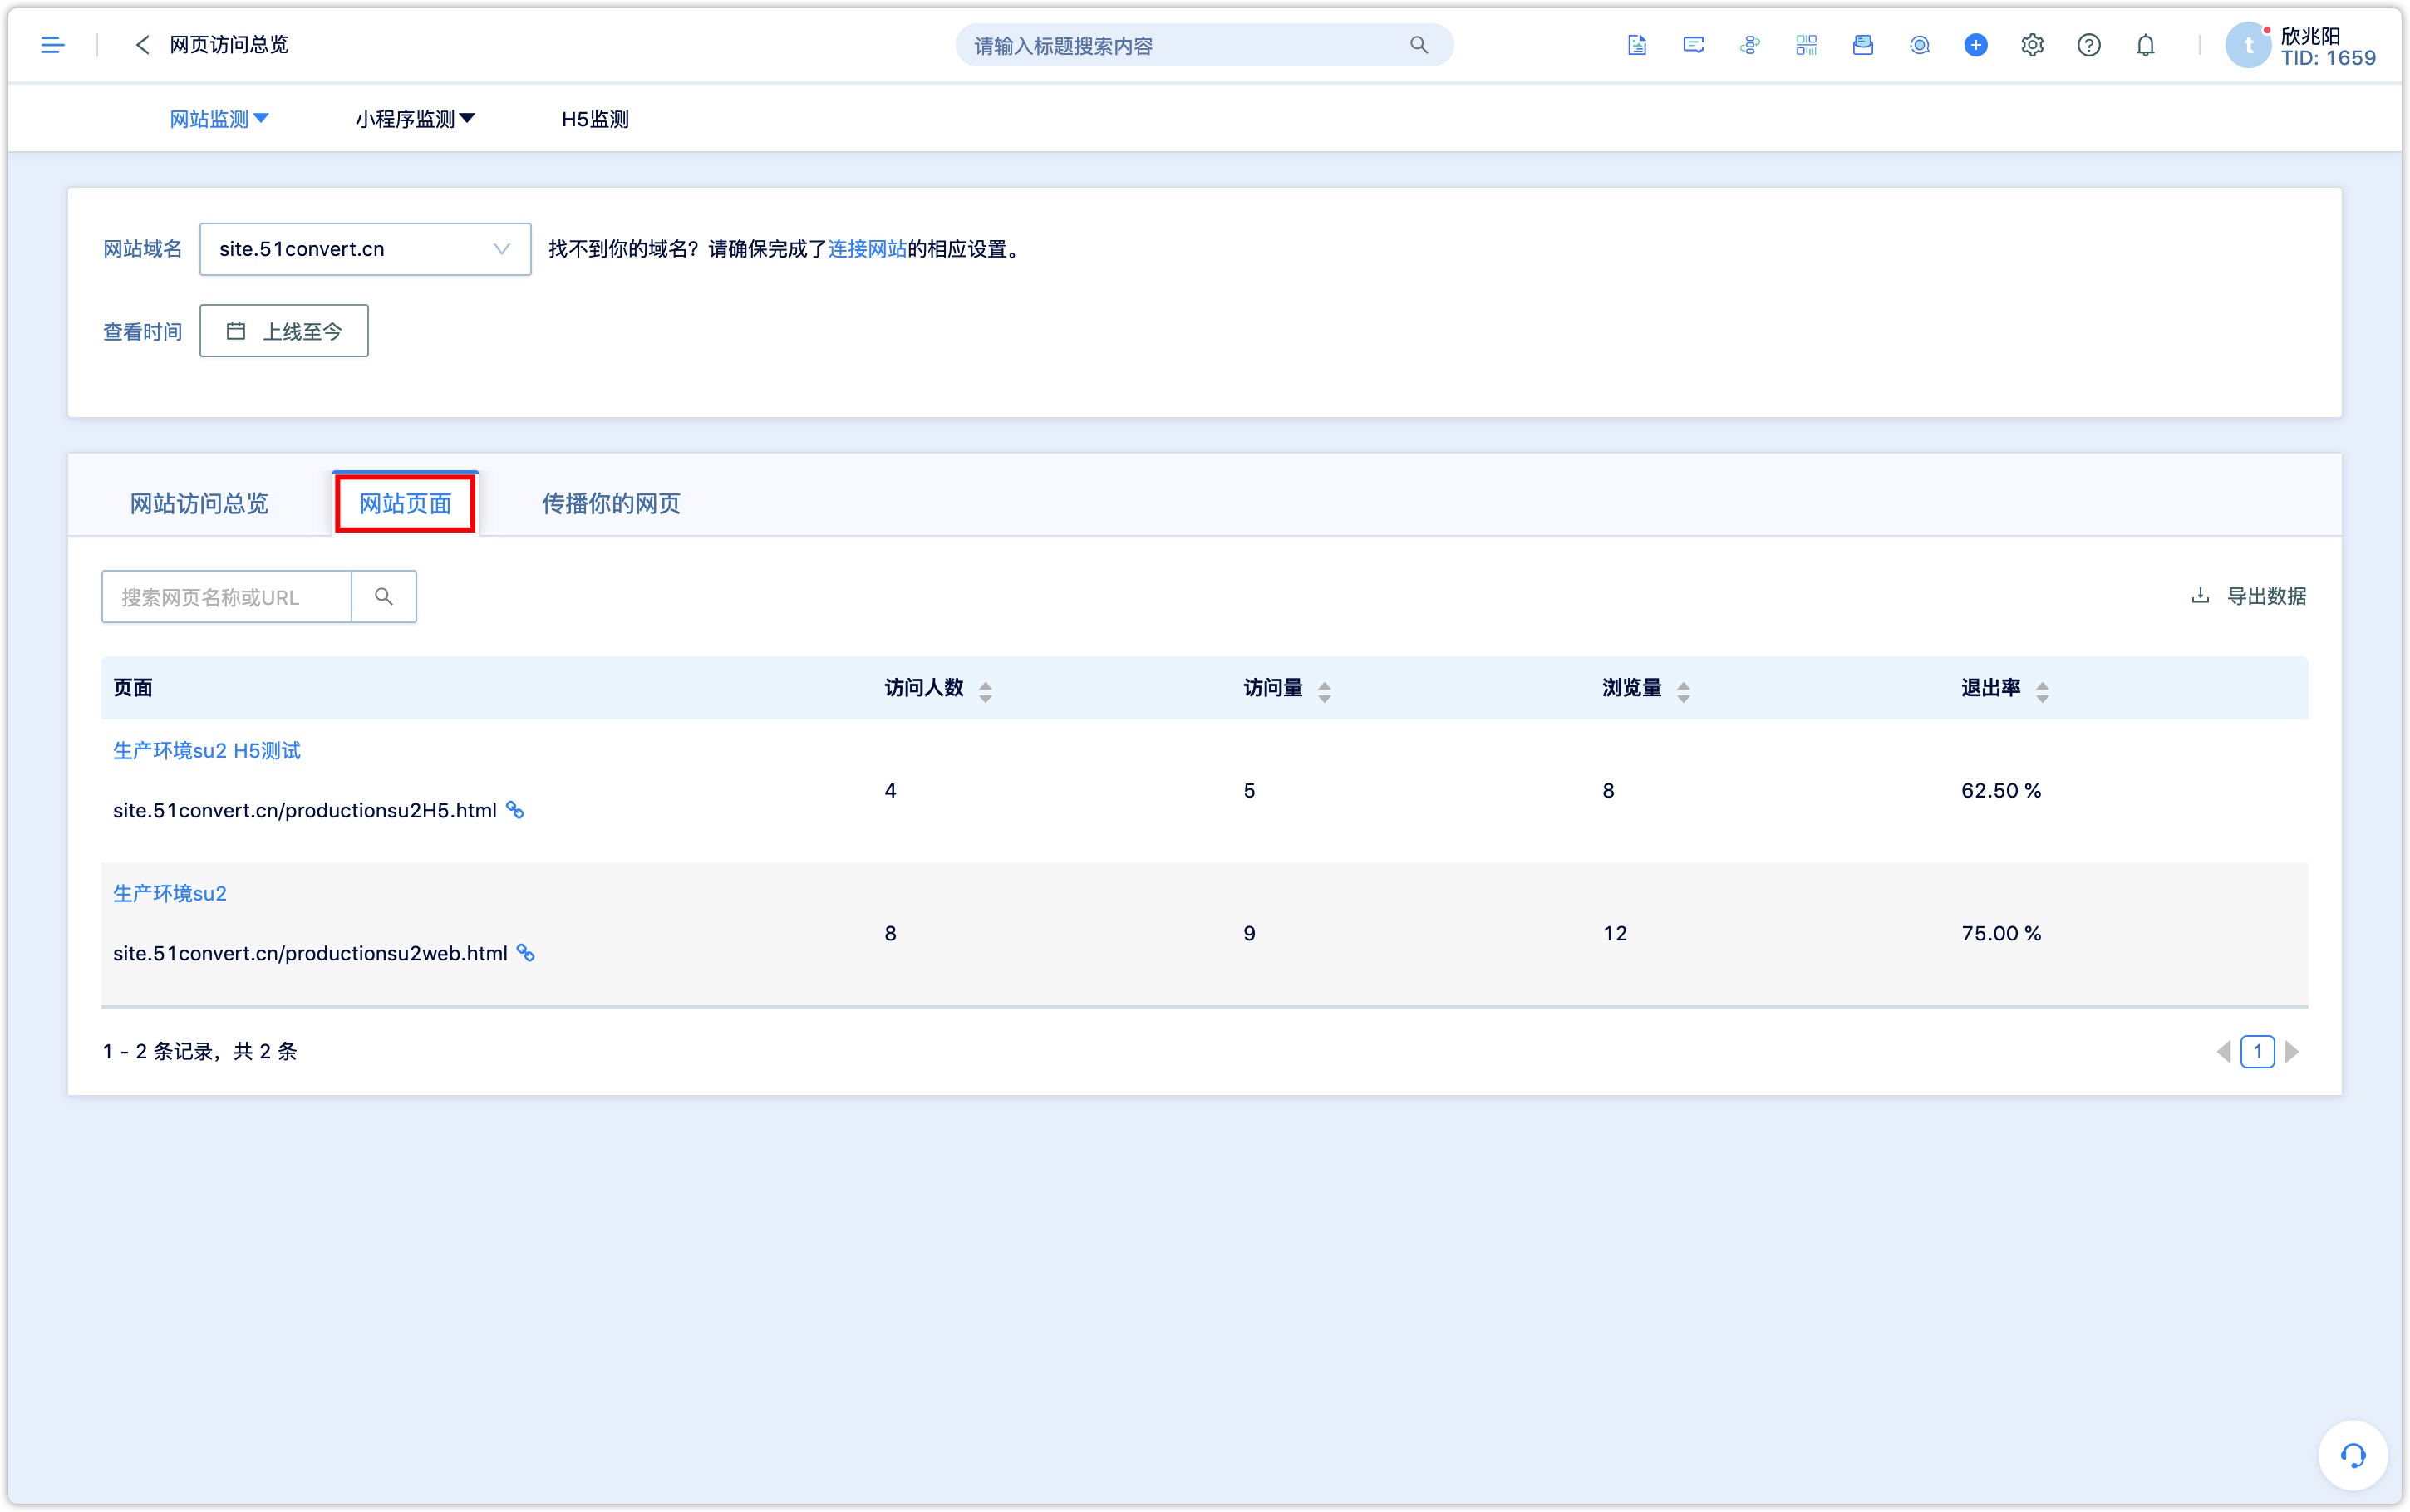
Click on a specific page to jump to the page statistics details page. Page statistics include number of visitors, page views, and exit rate. All three indicators are page-level indicators. There is also a statistics module for the proportion of website sources and a module for website traffic statistics by time, which facilitates a more detailed understanding of the traffic performance.
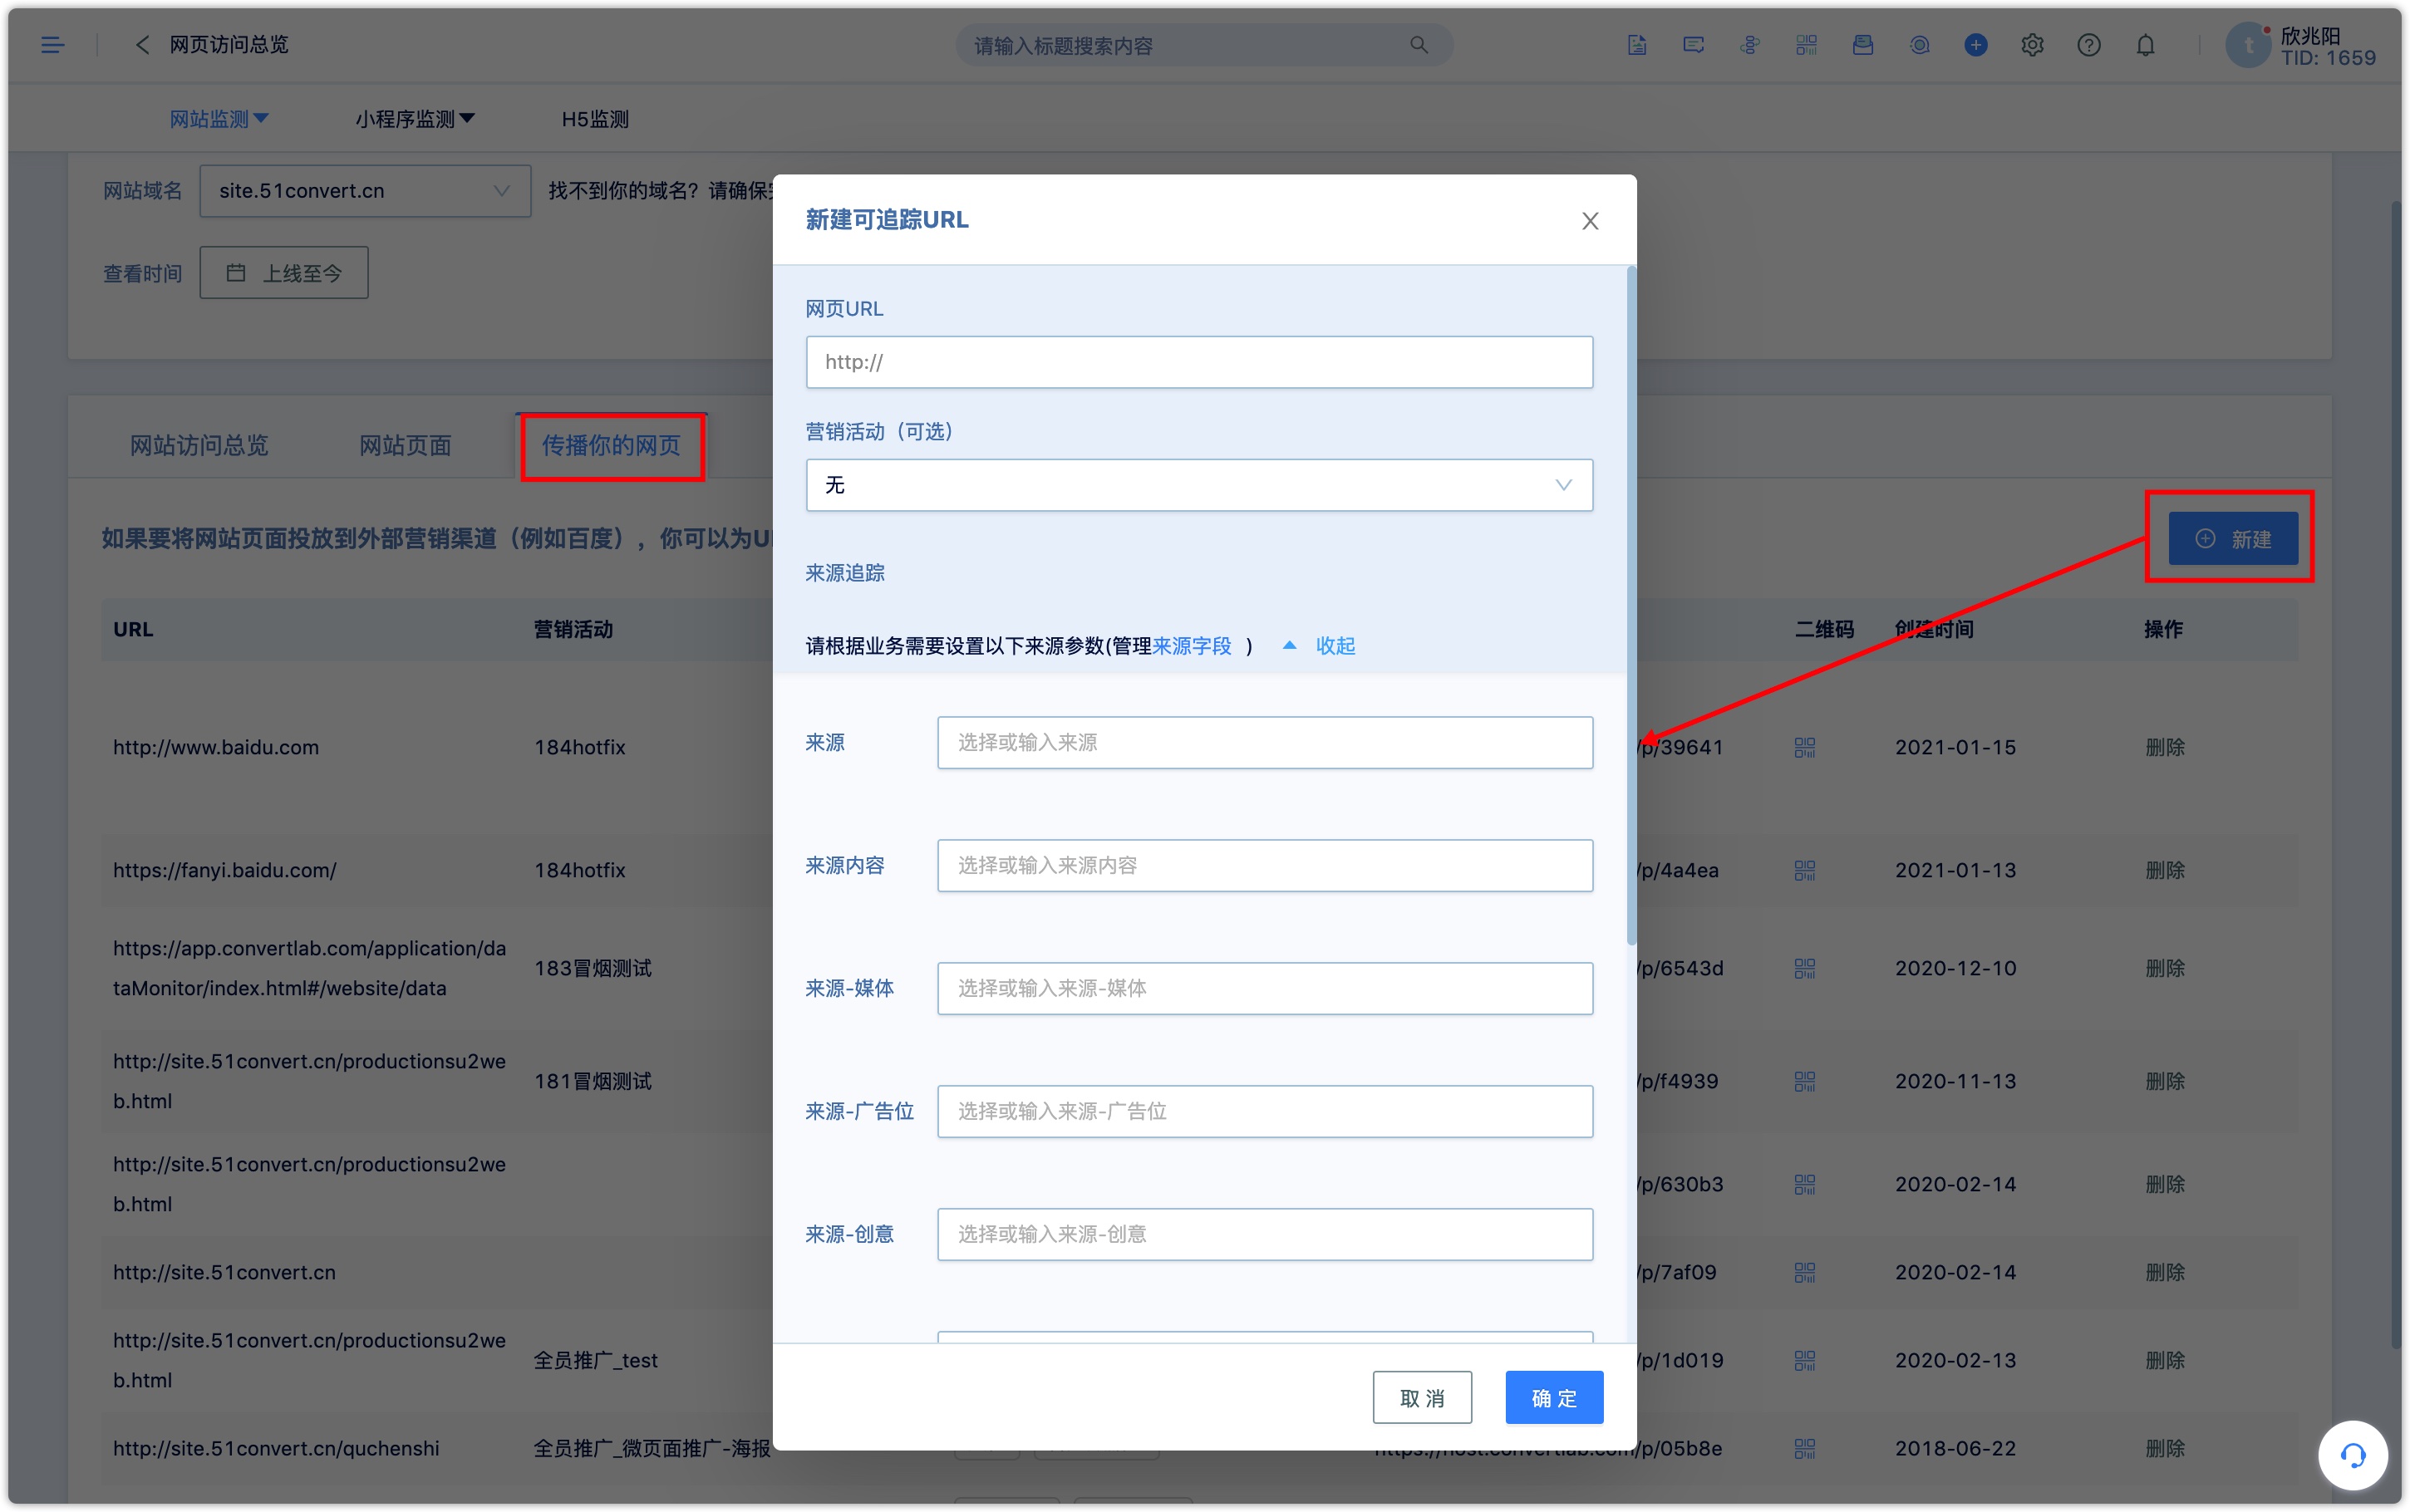
3.3Spread your page
Add parameters for webpage links, place trackable URLs and QR codes into marketing channels, and the system will count the source of traffic to the website, so as to clearly count the delivery effects of each channel, so as to better complete customer portraits. data.
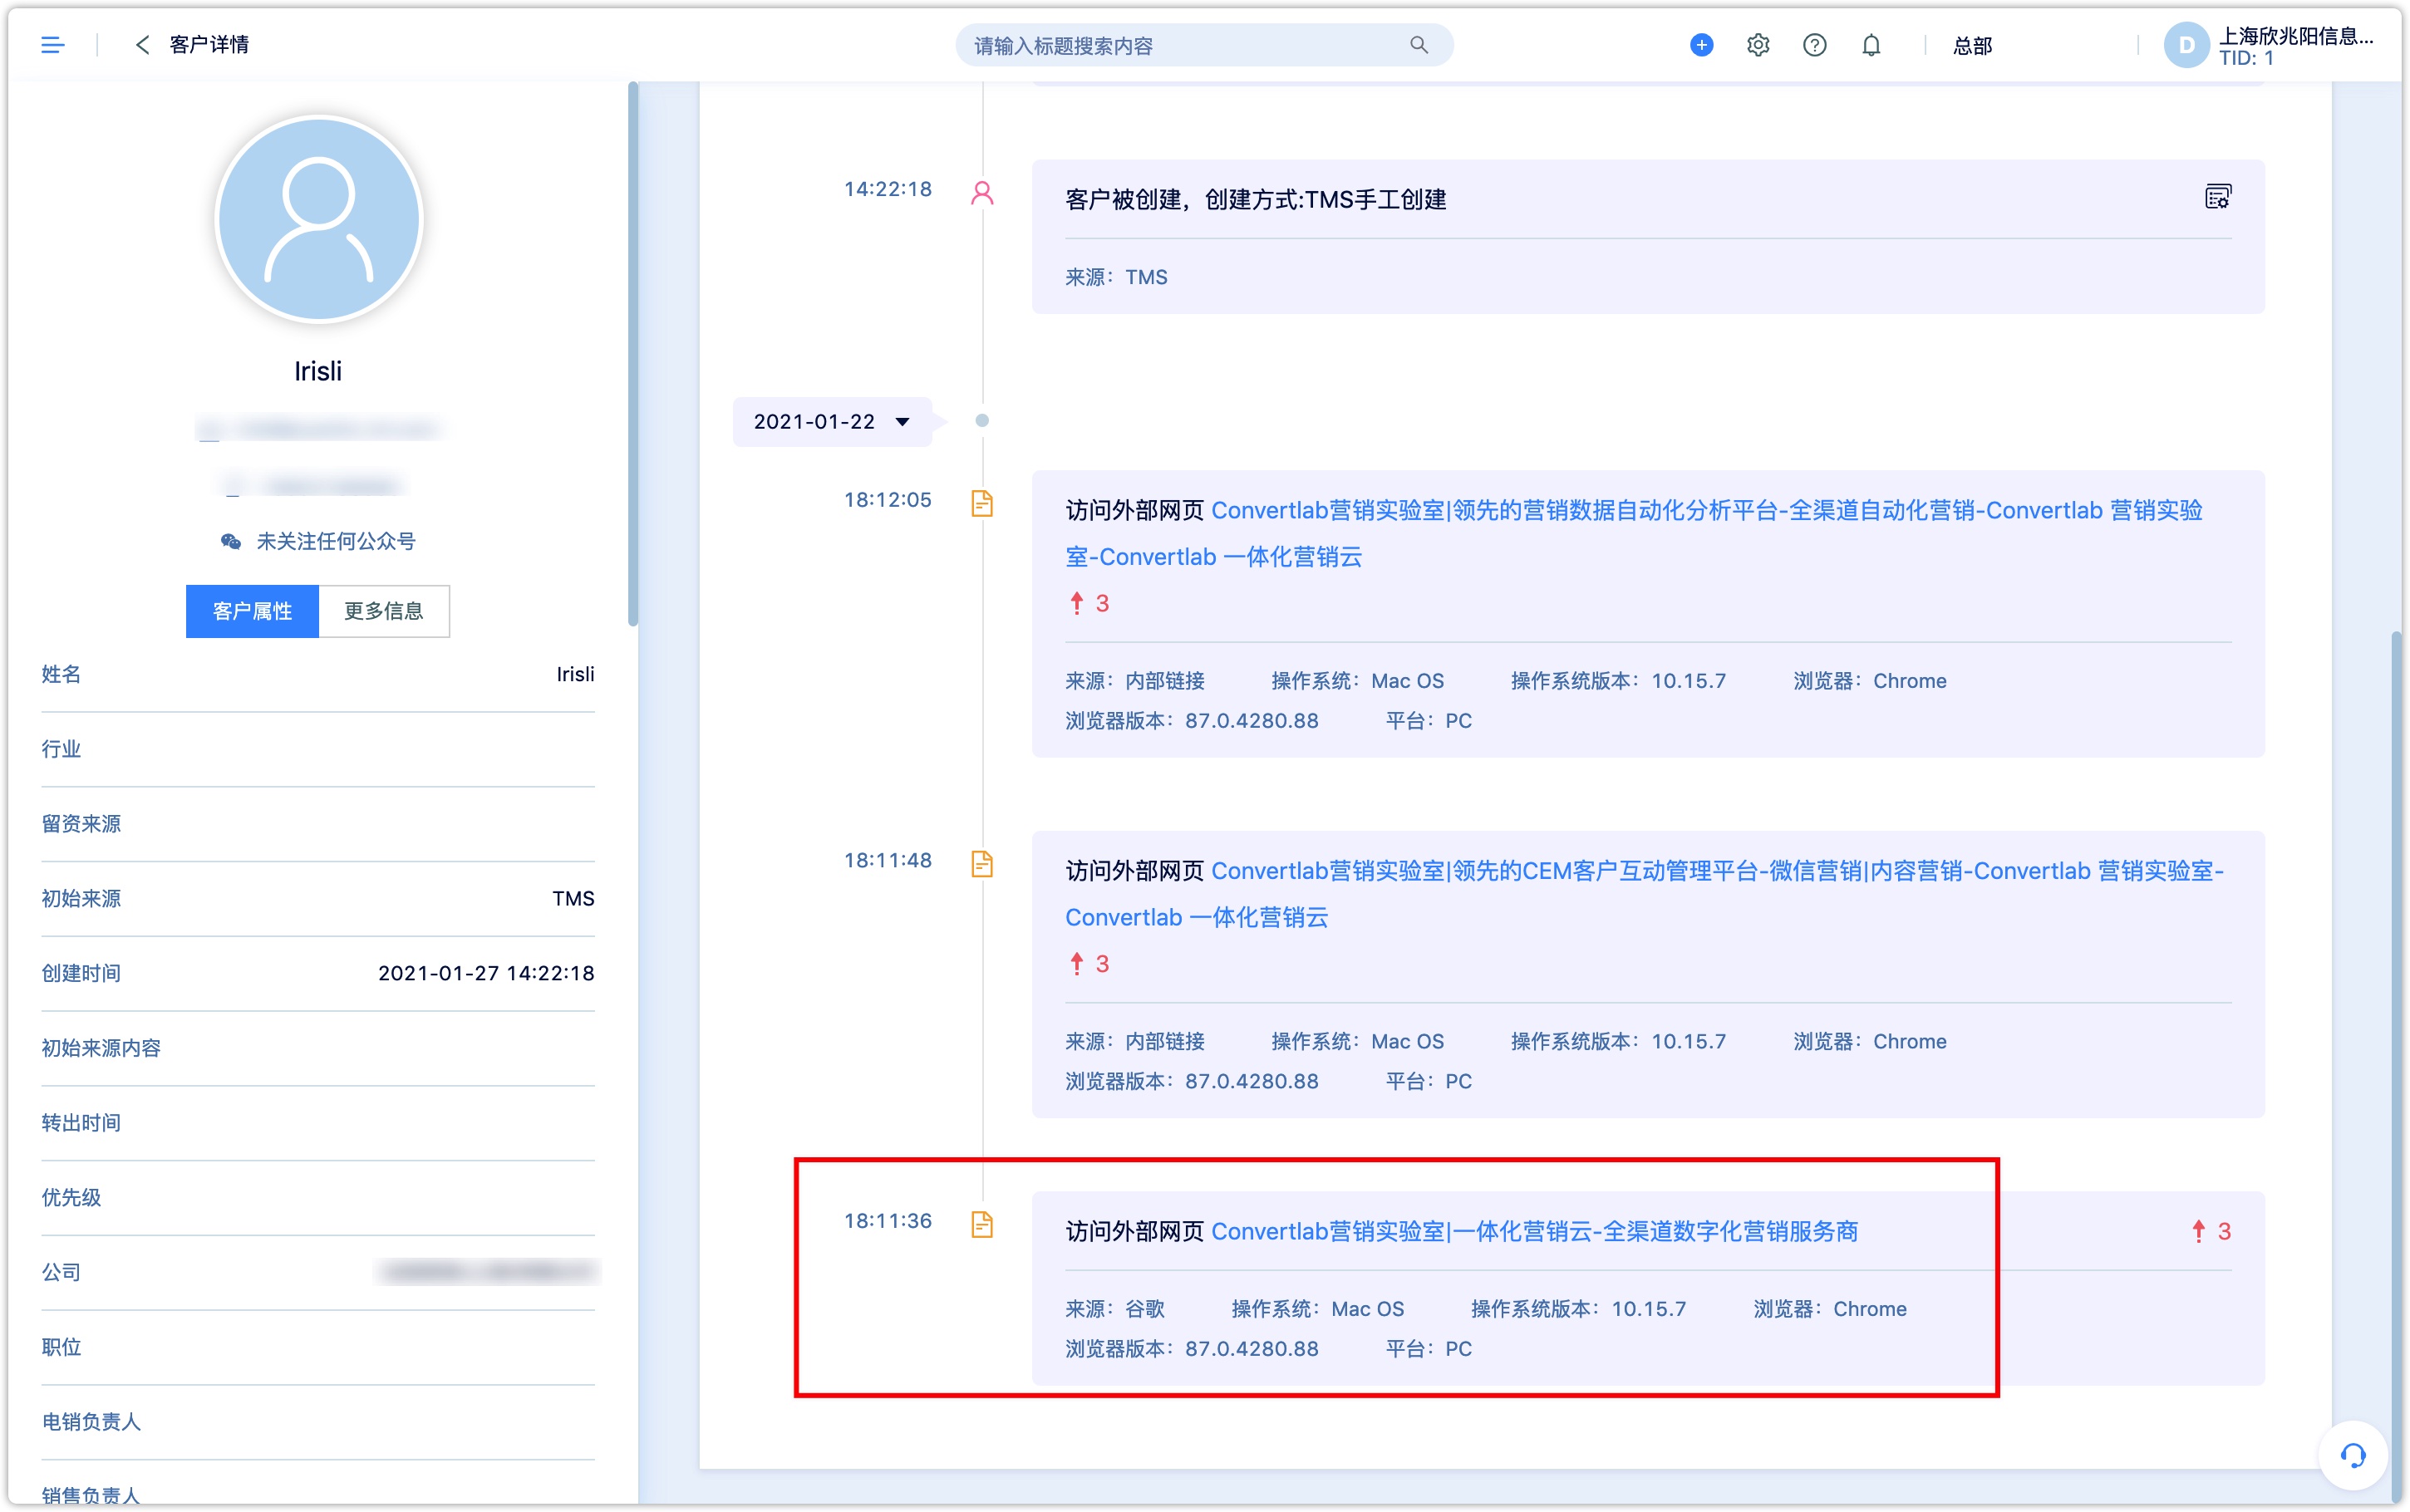
3.4Default event collection
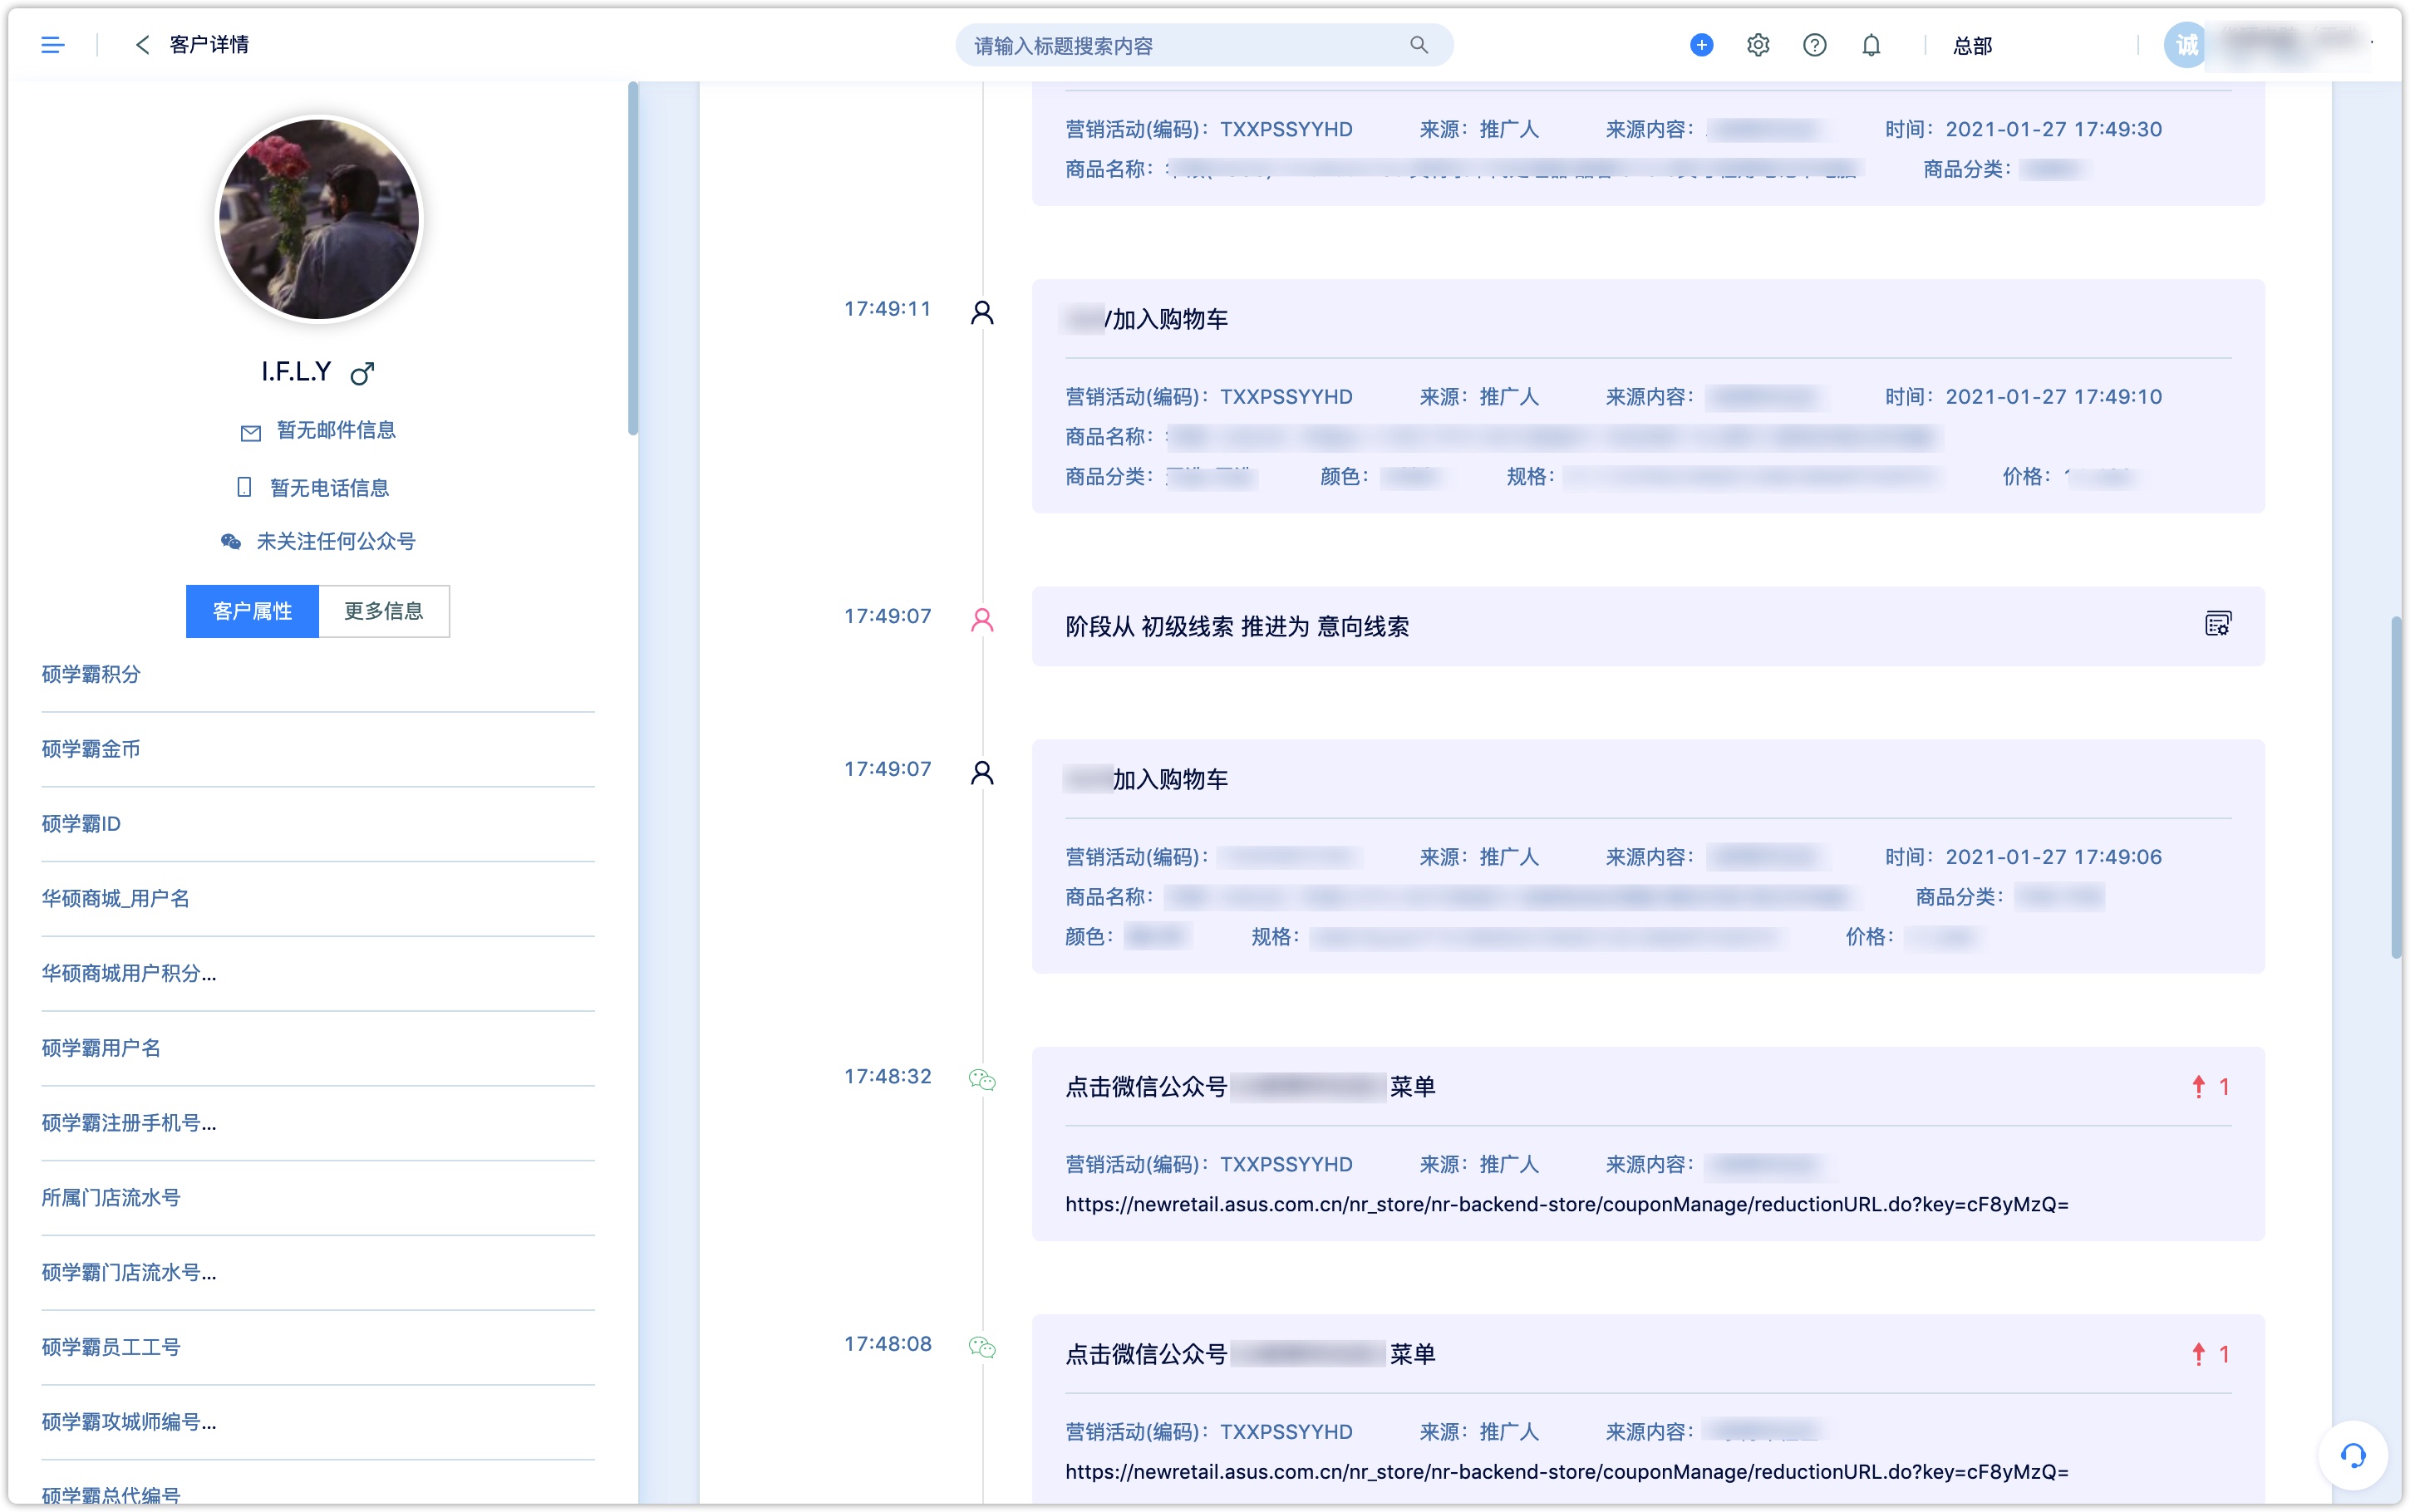
When customers visit the website, they will automatically record their access events. If they access the page through a trackable URL or QR code, their behavior will carry the corresponding source, source content and other parameters. The timeline is shown below. These data can be used by users to filter and identify people, as well as data analysis.
4.Visitor Information Collection
4.1Form Integration
Placing a form on the website can effectively collect basic information of visitors. The form can be type of registration, feedback, message voting, etc.
4.1.1Adding a domain to whitelist
First, please set the tracking domain. In order to ensure the accuracy of tracking, only the website domain set here will be tracked. Please set it accurately as needed. The setting method is shown in the figure below:
4.1.2New Form
In the [Interactive]-[Form] function module, first create a form according to actual needs. For the specific steps of creating a form, please refer to the document form introduction
Note: Hidden fields also need to be created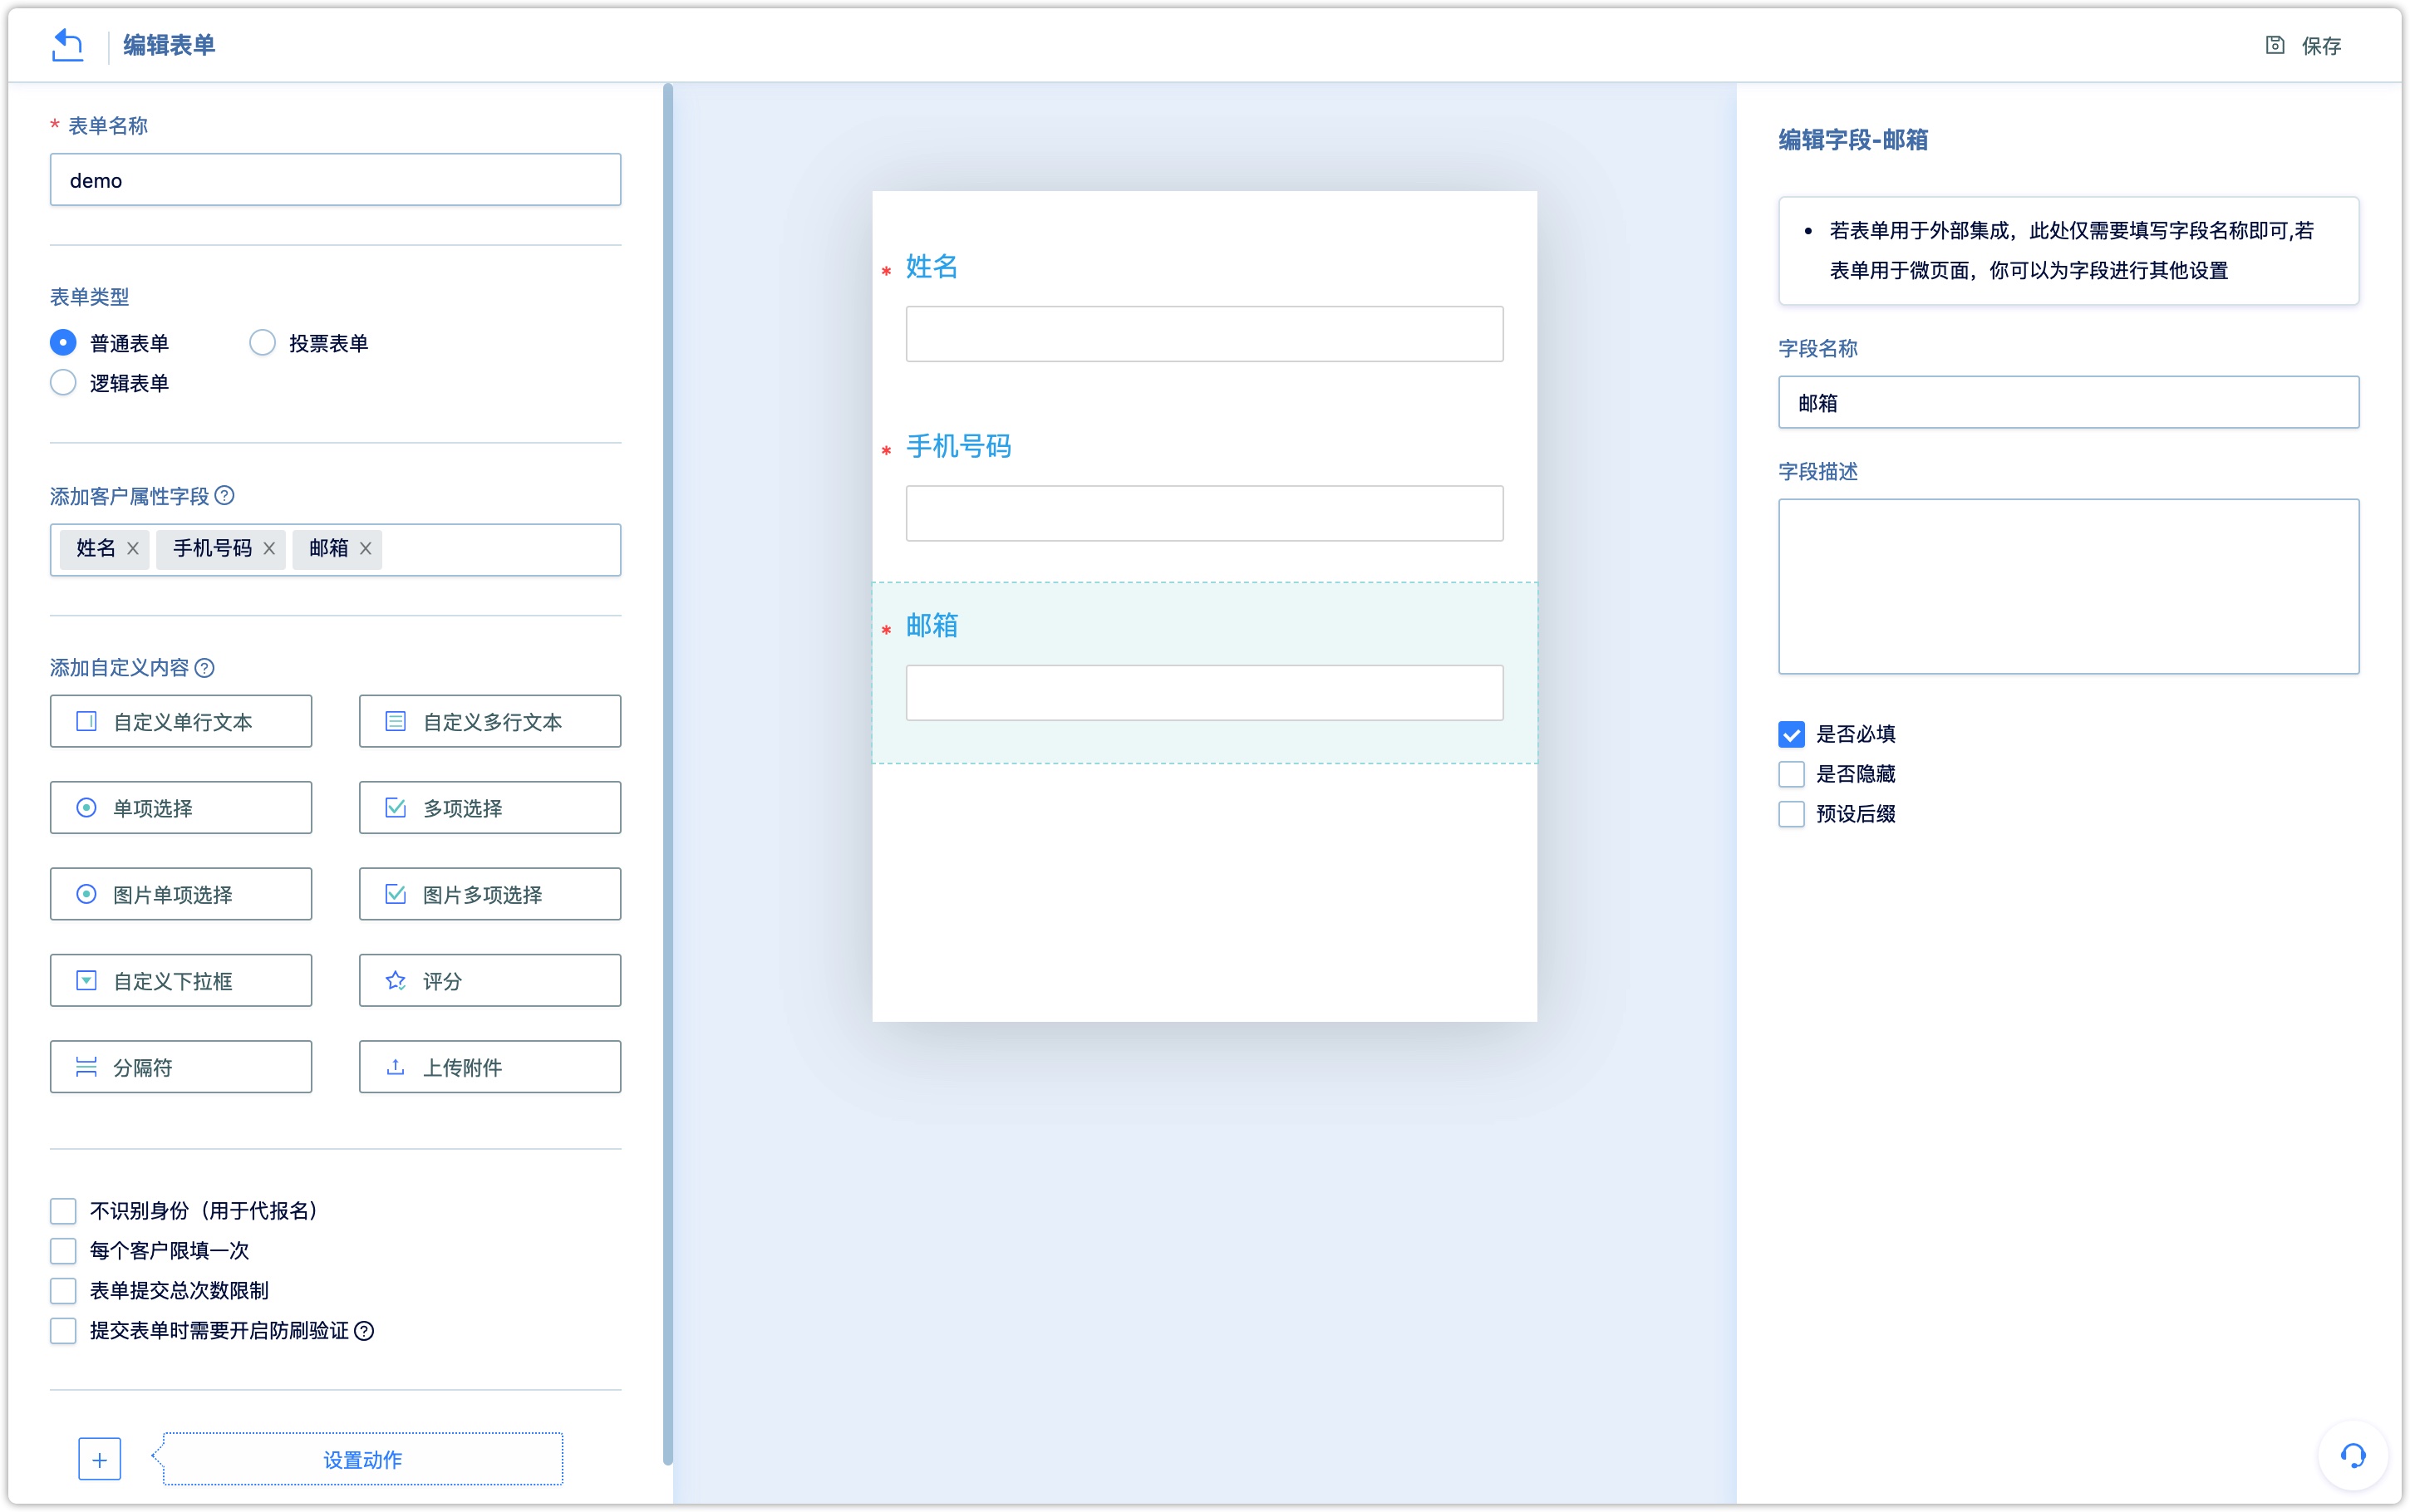
4.1.3Form Integration
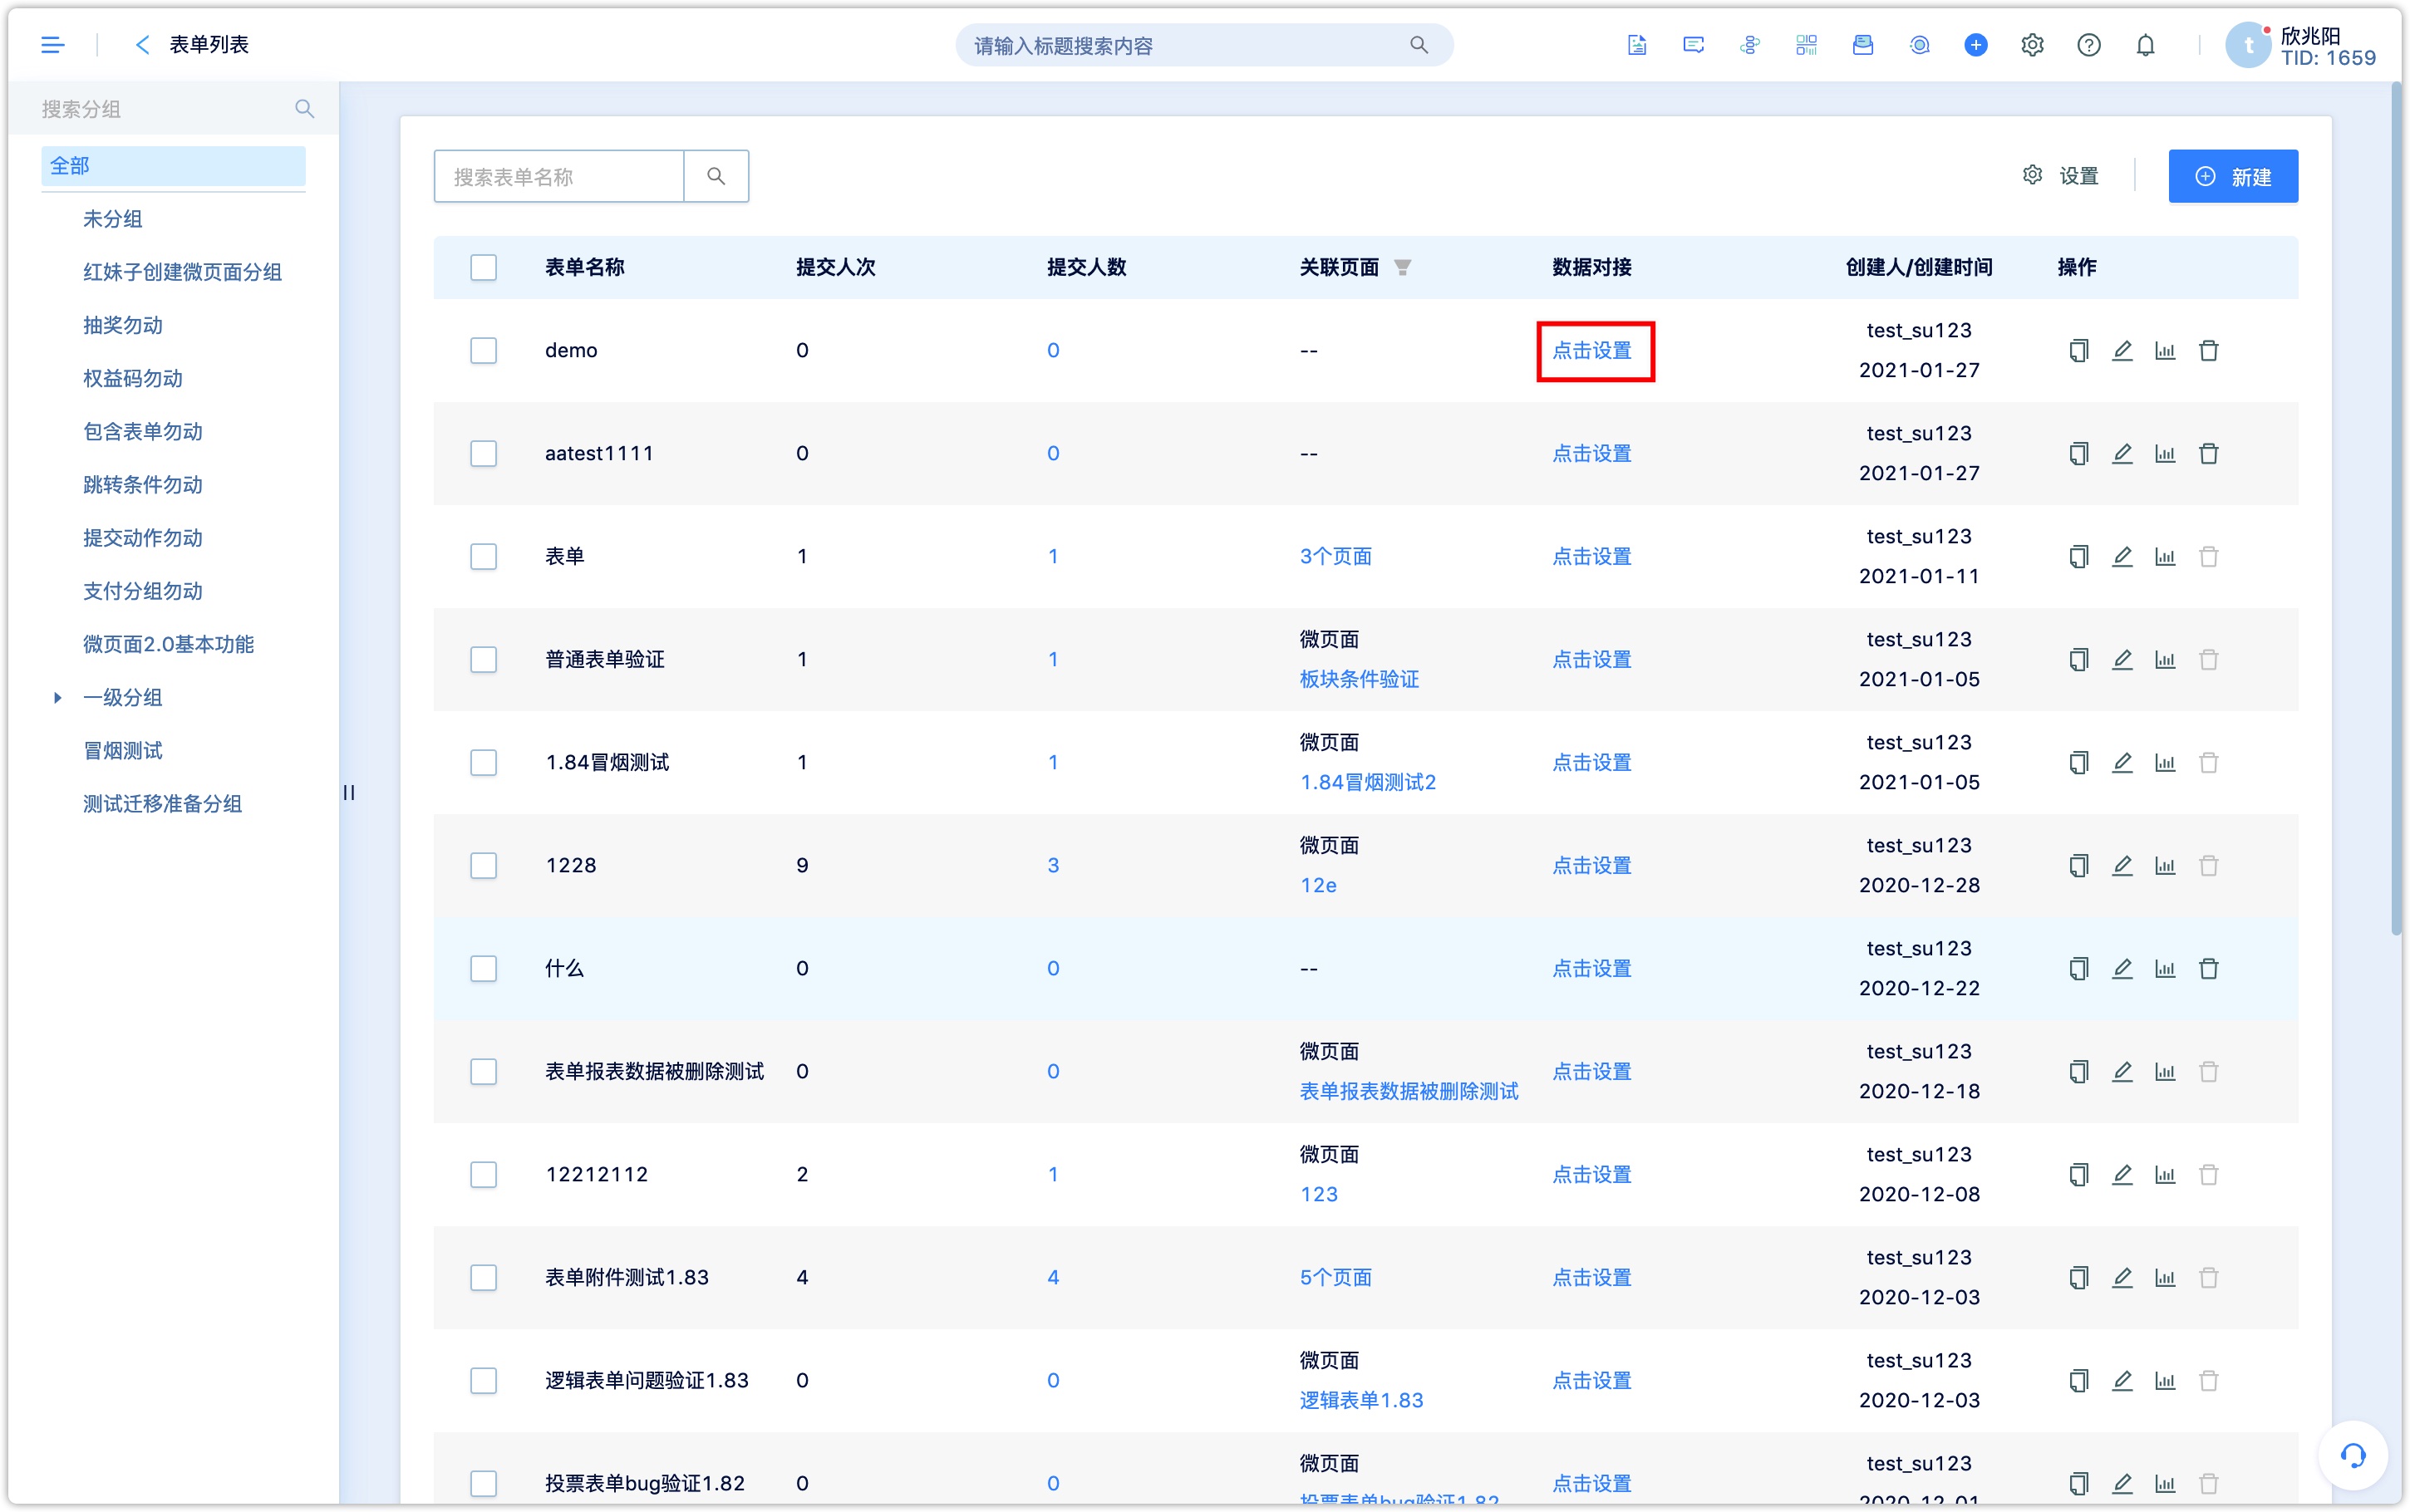
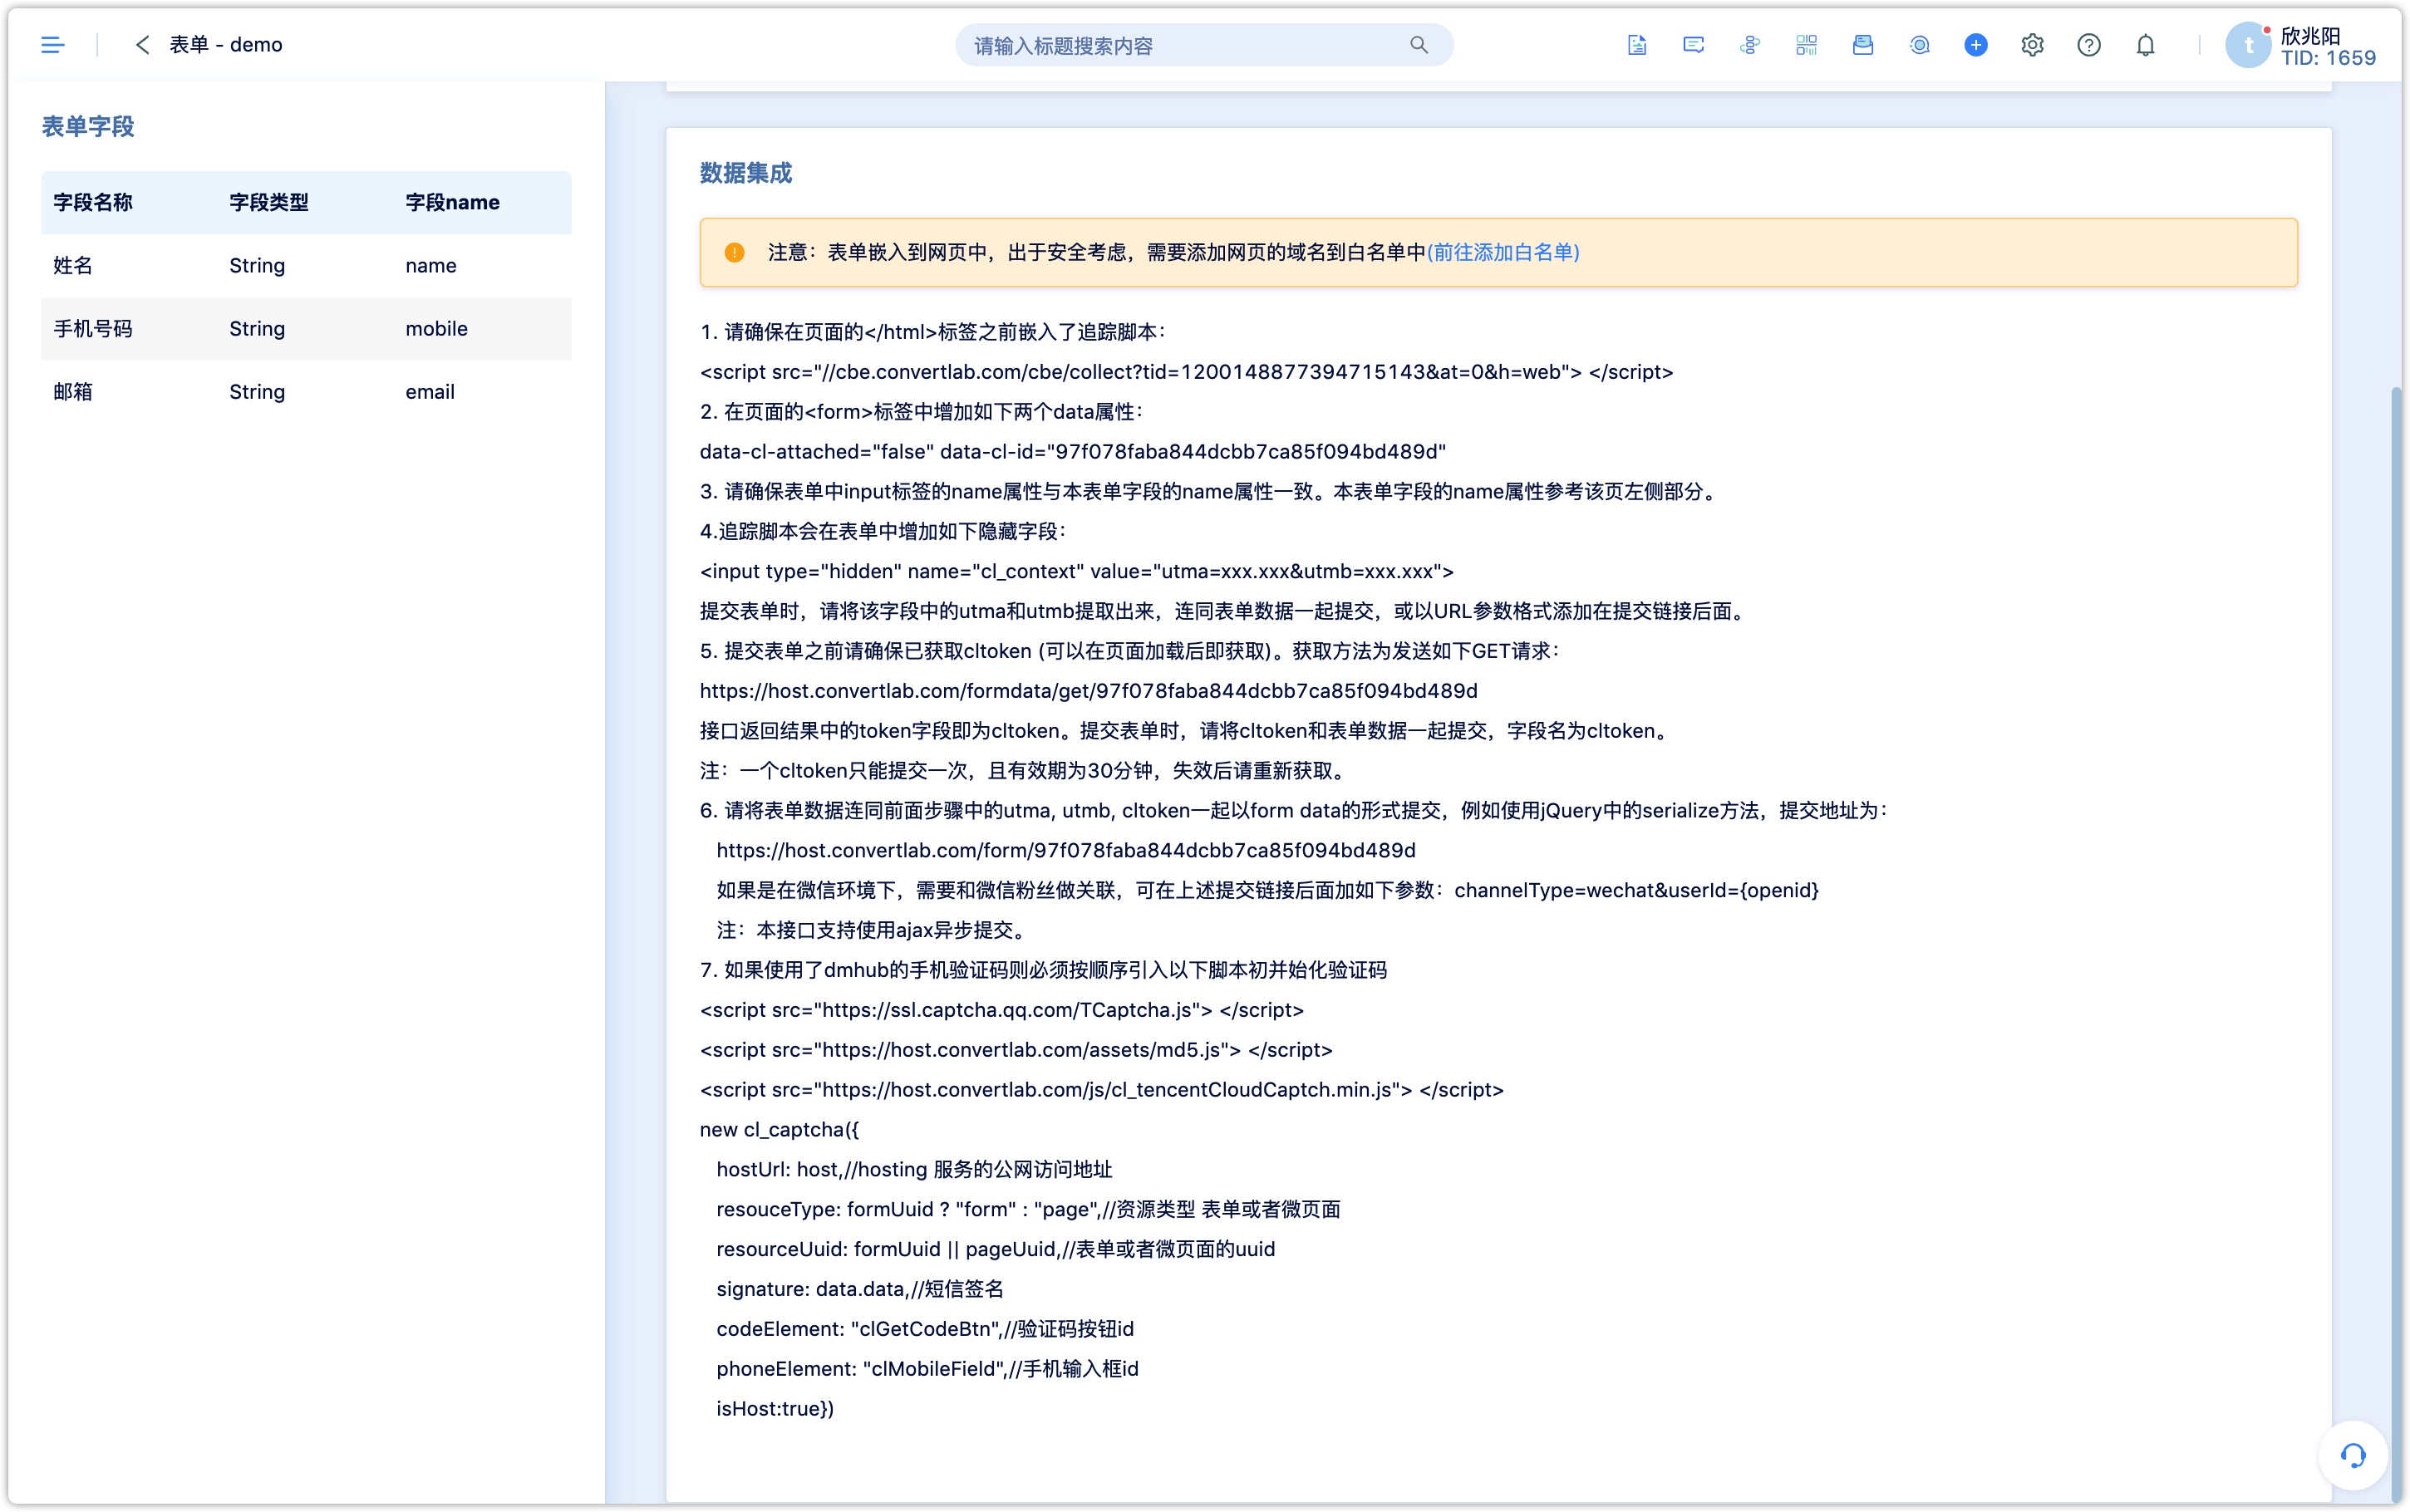
Follow the data integration steps.
Develop the form by yourself and create an embedded form with the same fields in DM Hub to receive data. Please ensure that the name attribute of the custom form field is correspond with the embedded form. (that is, the DM Hub customer attribute ID is the same).
Add the following two data attributes to the form tag of the custom form: data-cl-attached="false" data-cl-id="{form UUID}", where {form UUID} fills in the details created in the DM Hub The uuid of the form.
Embed the tracking script as required. For the embedding method, refer to Setting up the tracking website. The tracking script will add the following fields to the form:
<input type="hidden" name="cl_context" value="utma=xxx.xxx&utmb=xxx.xxx">
Send a GET request to get the cltoken. The token is used when submitting the form and can only be used once. If you want to submit it again, you need to get the cltoken again. The obtaining method is as follows: GET: http://host.convertlab.com/formdata/get/{form UUID}, where {form UUID} fills in the uuid of the specific form. The obtained data contains the data named token, which is the cltoken to be used when submitting the form subsequently.
When submitting the form, data will be in in the form of form data. Please note that the field name must match the created embedded form. At the same time, an additional field cltoken needs to be added to the form data, which is the value of the token obtained in the previous request. Please also submit the utma and utmb in the hidden field cl_context. The address for submitting the form: POST: http://host.convertlab.com/page/{form UUID}?channelType={channelType}&userId={userId}, where {form UUID} fill in the uuid of the specific form, {channelType} and {userId} is added as appropriate according to the actual situation, {channelType} represents the current channel, such as wechat, {userId} represents the user's ID in the current channel, such as the current user's openId.
Sample code:
<form id="clForm" method="post" data-cl-attached="false" action="http://host.convertlab.com/page/{表单UUID}?channelType={channelType}&userId={userId}">
  <!-- 此处示例 3 个表单字段,实际开发中请确保每个字段的 name 属性和 DM Hub 中创建的嵌入式表单中对应字段的 name 相同 -->
  <!-- DM Hub 预置客户属性,DM Hub 预置,不可修改 -->
  姓名:<input type="text" name="name" /><br/>
  <!-- DM Hub 预置客户属性,DM Hub 预置,不可修改 -->
  手机号码:<input type="text" name="mobile" /><br/>
  <!-- DM Hub 自定义客户属性,根据业务需求自行创建 -->
  自定义属性:<input type="text" name="attr1" /><br/>

  <input type="hidden" id="cltoken" name="cltoken" value="" />
  <input type="hidden" id="utmb" name="utmb" value="" />
  <input type="hidden" id="utma" name="utma" value="" />
  <input type="button" value="提交" onclick="f1()" />
</form>

<script>
  function f1() {
    $.ajaxSettings.async = false;
    $.getJSON("http://host.convertlab.com/formdata/get/{表单UUID}", function(json) {
      $("#cltoken").val(json.token);
    });

    var cookievalue = $("input[name='cl_context']").val();
    if (cookievalue == "" || cookievalue == null) {
      $("#utma").val("");
      $("#utmb").val("");
    } else {
      var cookiearr = cookievalue.split("&");
      var str1 = cookiearr[0];
      var utmas = str1.split("=");
      var utmavalue =utmas[1];
      var str2 = cookiearr[1];
      var utmbs = str2.split("=");
      var utmbvalue =utmbs[1];

      $("#utma").val(utmavalue);
      $("#utmb").val(utmbvalue);
    }

    var fromurl = $("form").attr("action");
    $.ajax({
      cache: true,
      type: "POST",
      url:fromurl,
      data:$('#clForm').serialize(),
      async: false,
      error: function(request) {
        alert("Connection error");
      },
      success: function(data) {
        alert("success");
        window.location="xxxxxx.jsp";
      }
    });
  }
</script>
4.2Bind WeChat Identity
Usually the QR code of the official account is placed on the official website for publicity, but the system cannot directly match the customer’s identity on the website with the WeChat identity, even if the same customer visits the website and then scans the QR code with WeChat. Two customers will be created in the system to record relevant identities and behaviors. Now, the QR Code of the official account with identity recognition can be used to match the identity of the website with the identity of WeChat. By embedding a QR code of the official account with identity recognition on the website, once the visitor scans the code, his/her website visit behavior is successfully bound to the WeChat identity, realizing the unification of the data of the two channels.
First of all, make sure that the tracking code of the system has been embedded in the webpage, and the domain name of the website has also been recorded in the system. The system records the customer's website browsing behavior through cookies. When the customer scans the QR code of the official account with identity recognition, the system will automatically match the browsing record to the fans of the official account to achieve information merging.
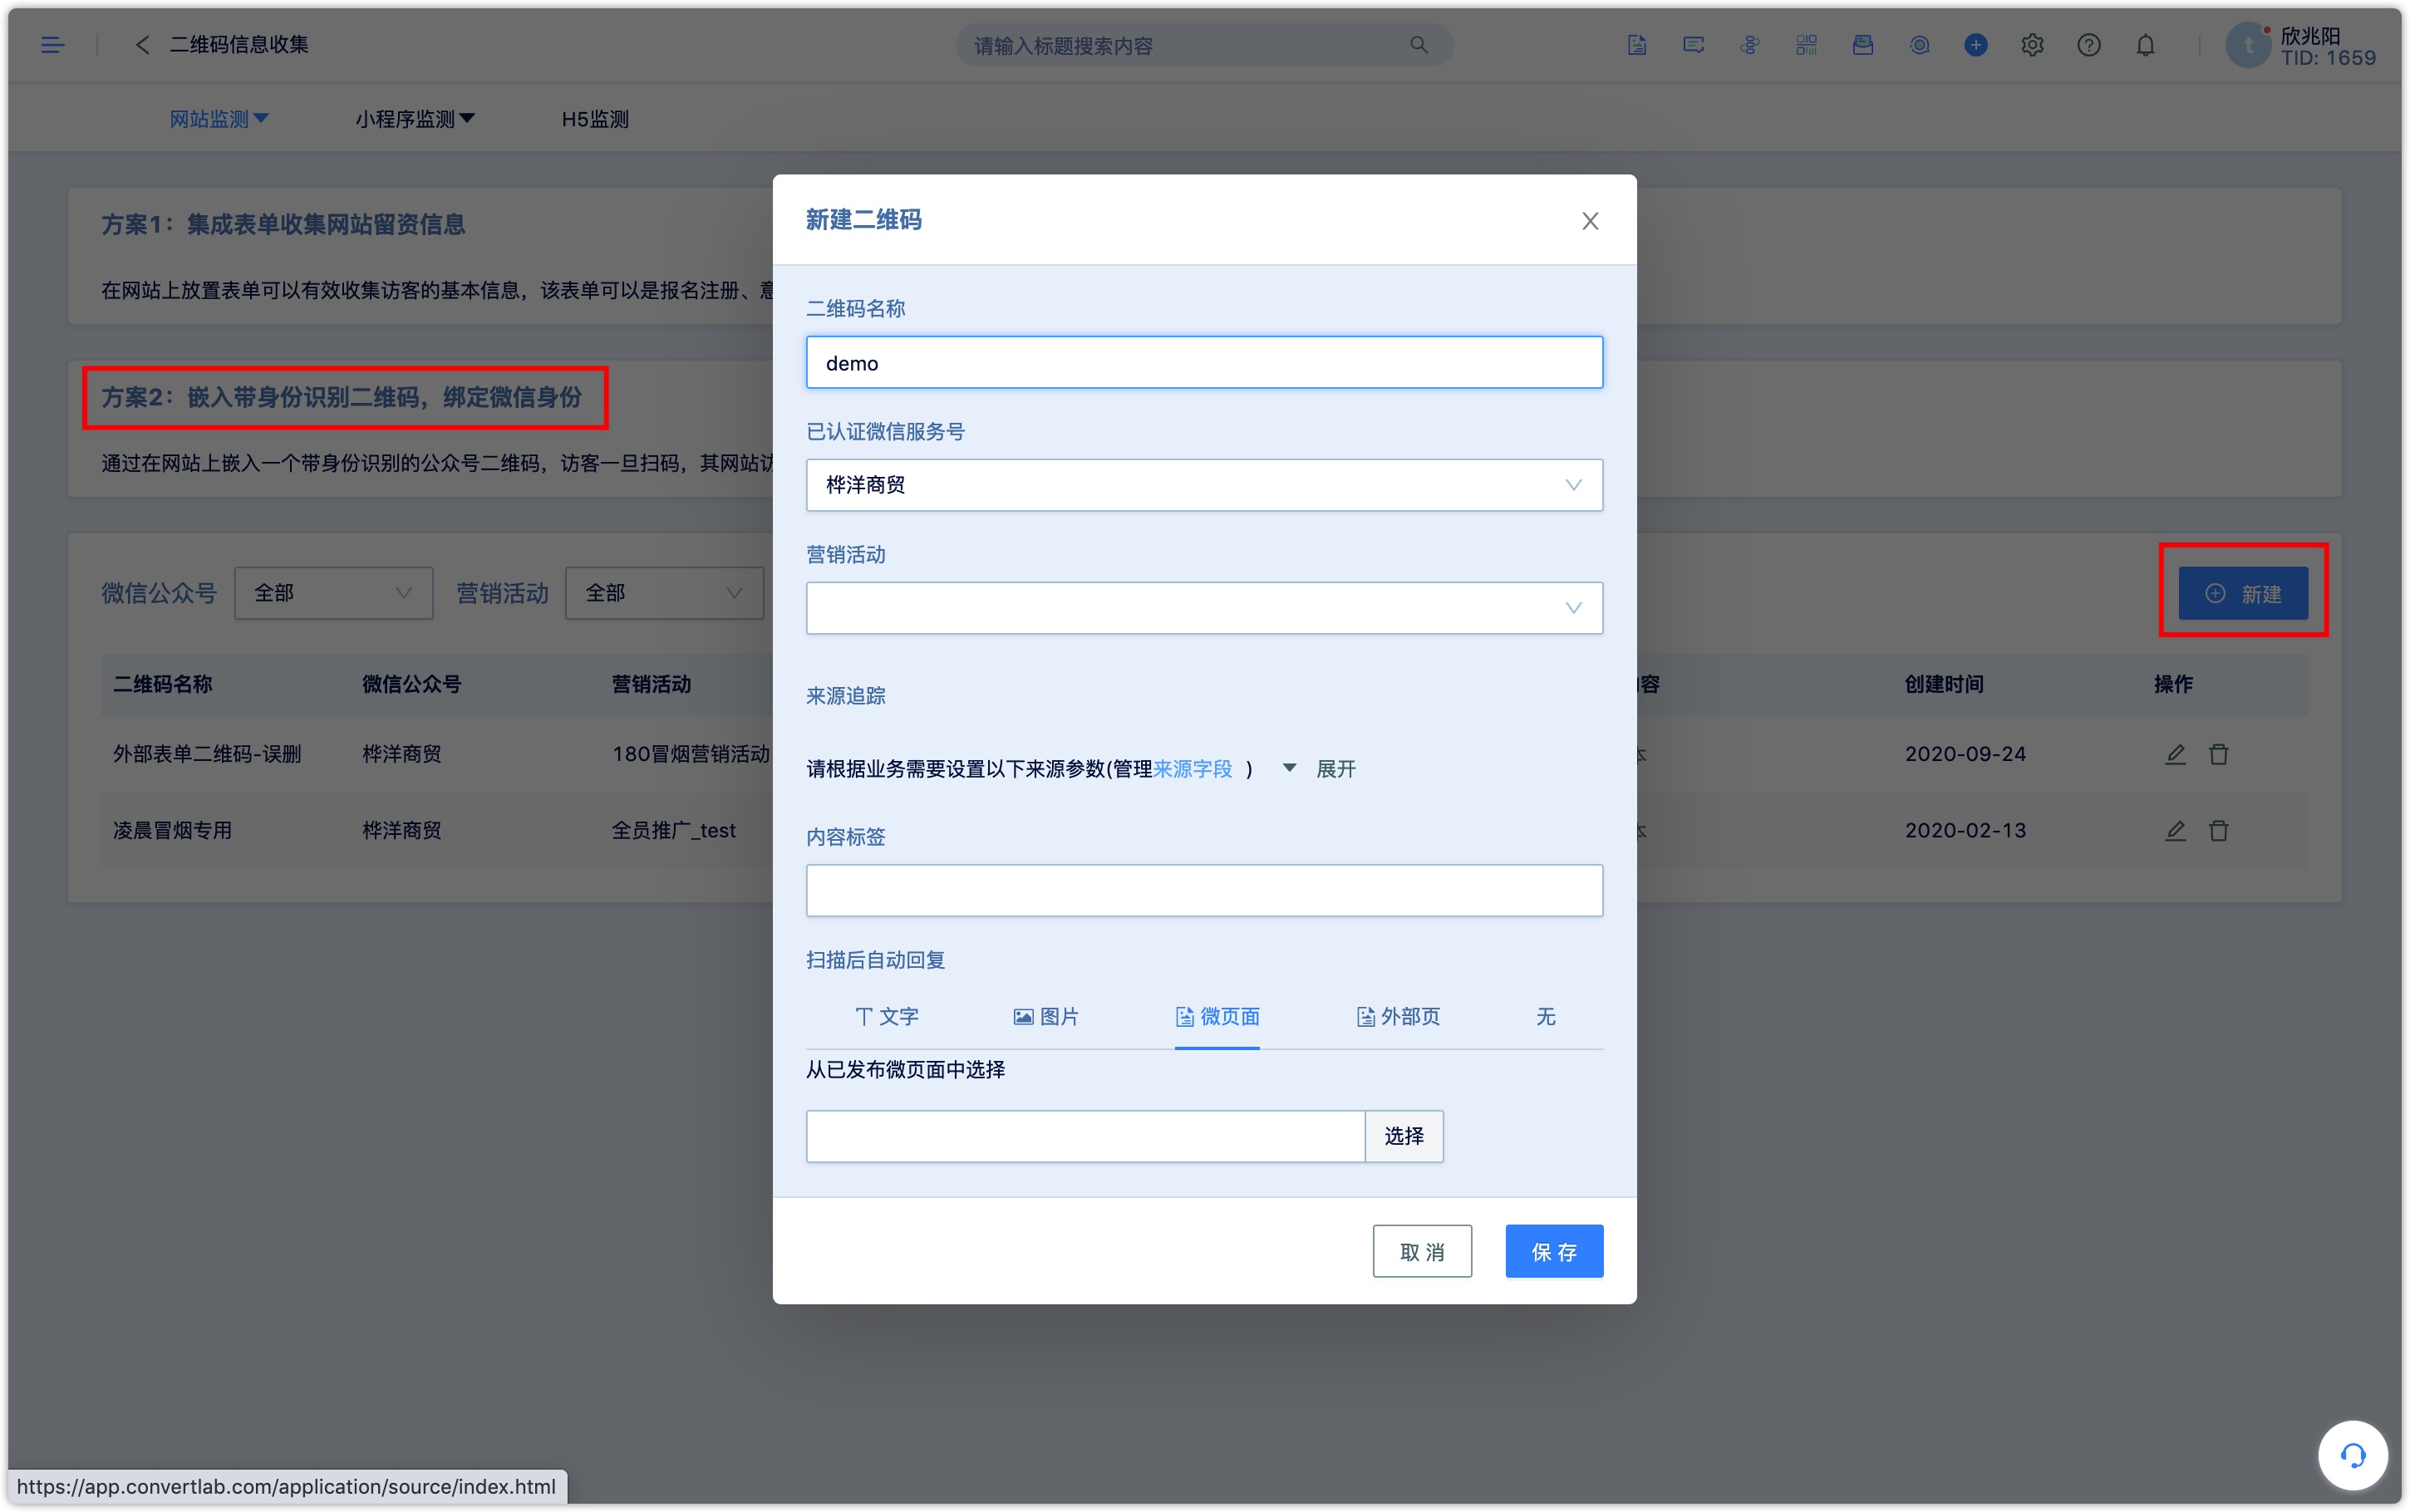
4.2.1Create a QR code with identity recognition
Create a new QR code, fill in the name, associated marketing activities, set source parameters, content labels, and the response content after scanning the QR code. After the settings are completed, click Save.
4.2.2Embedding QR Code
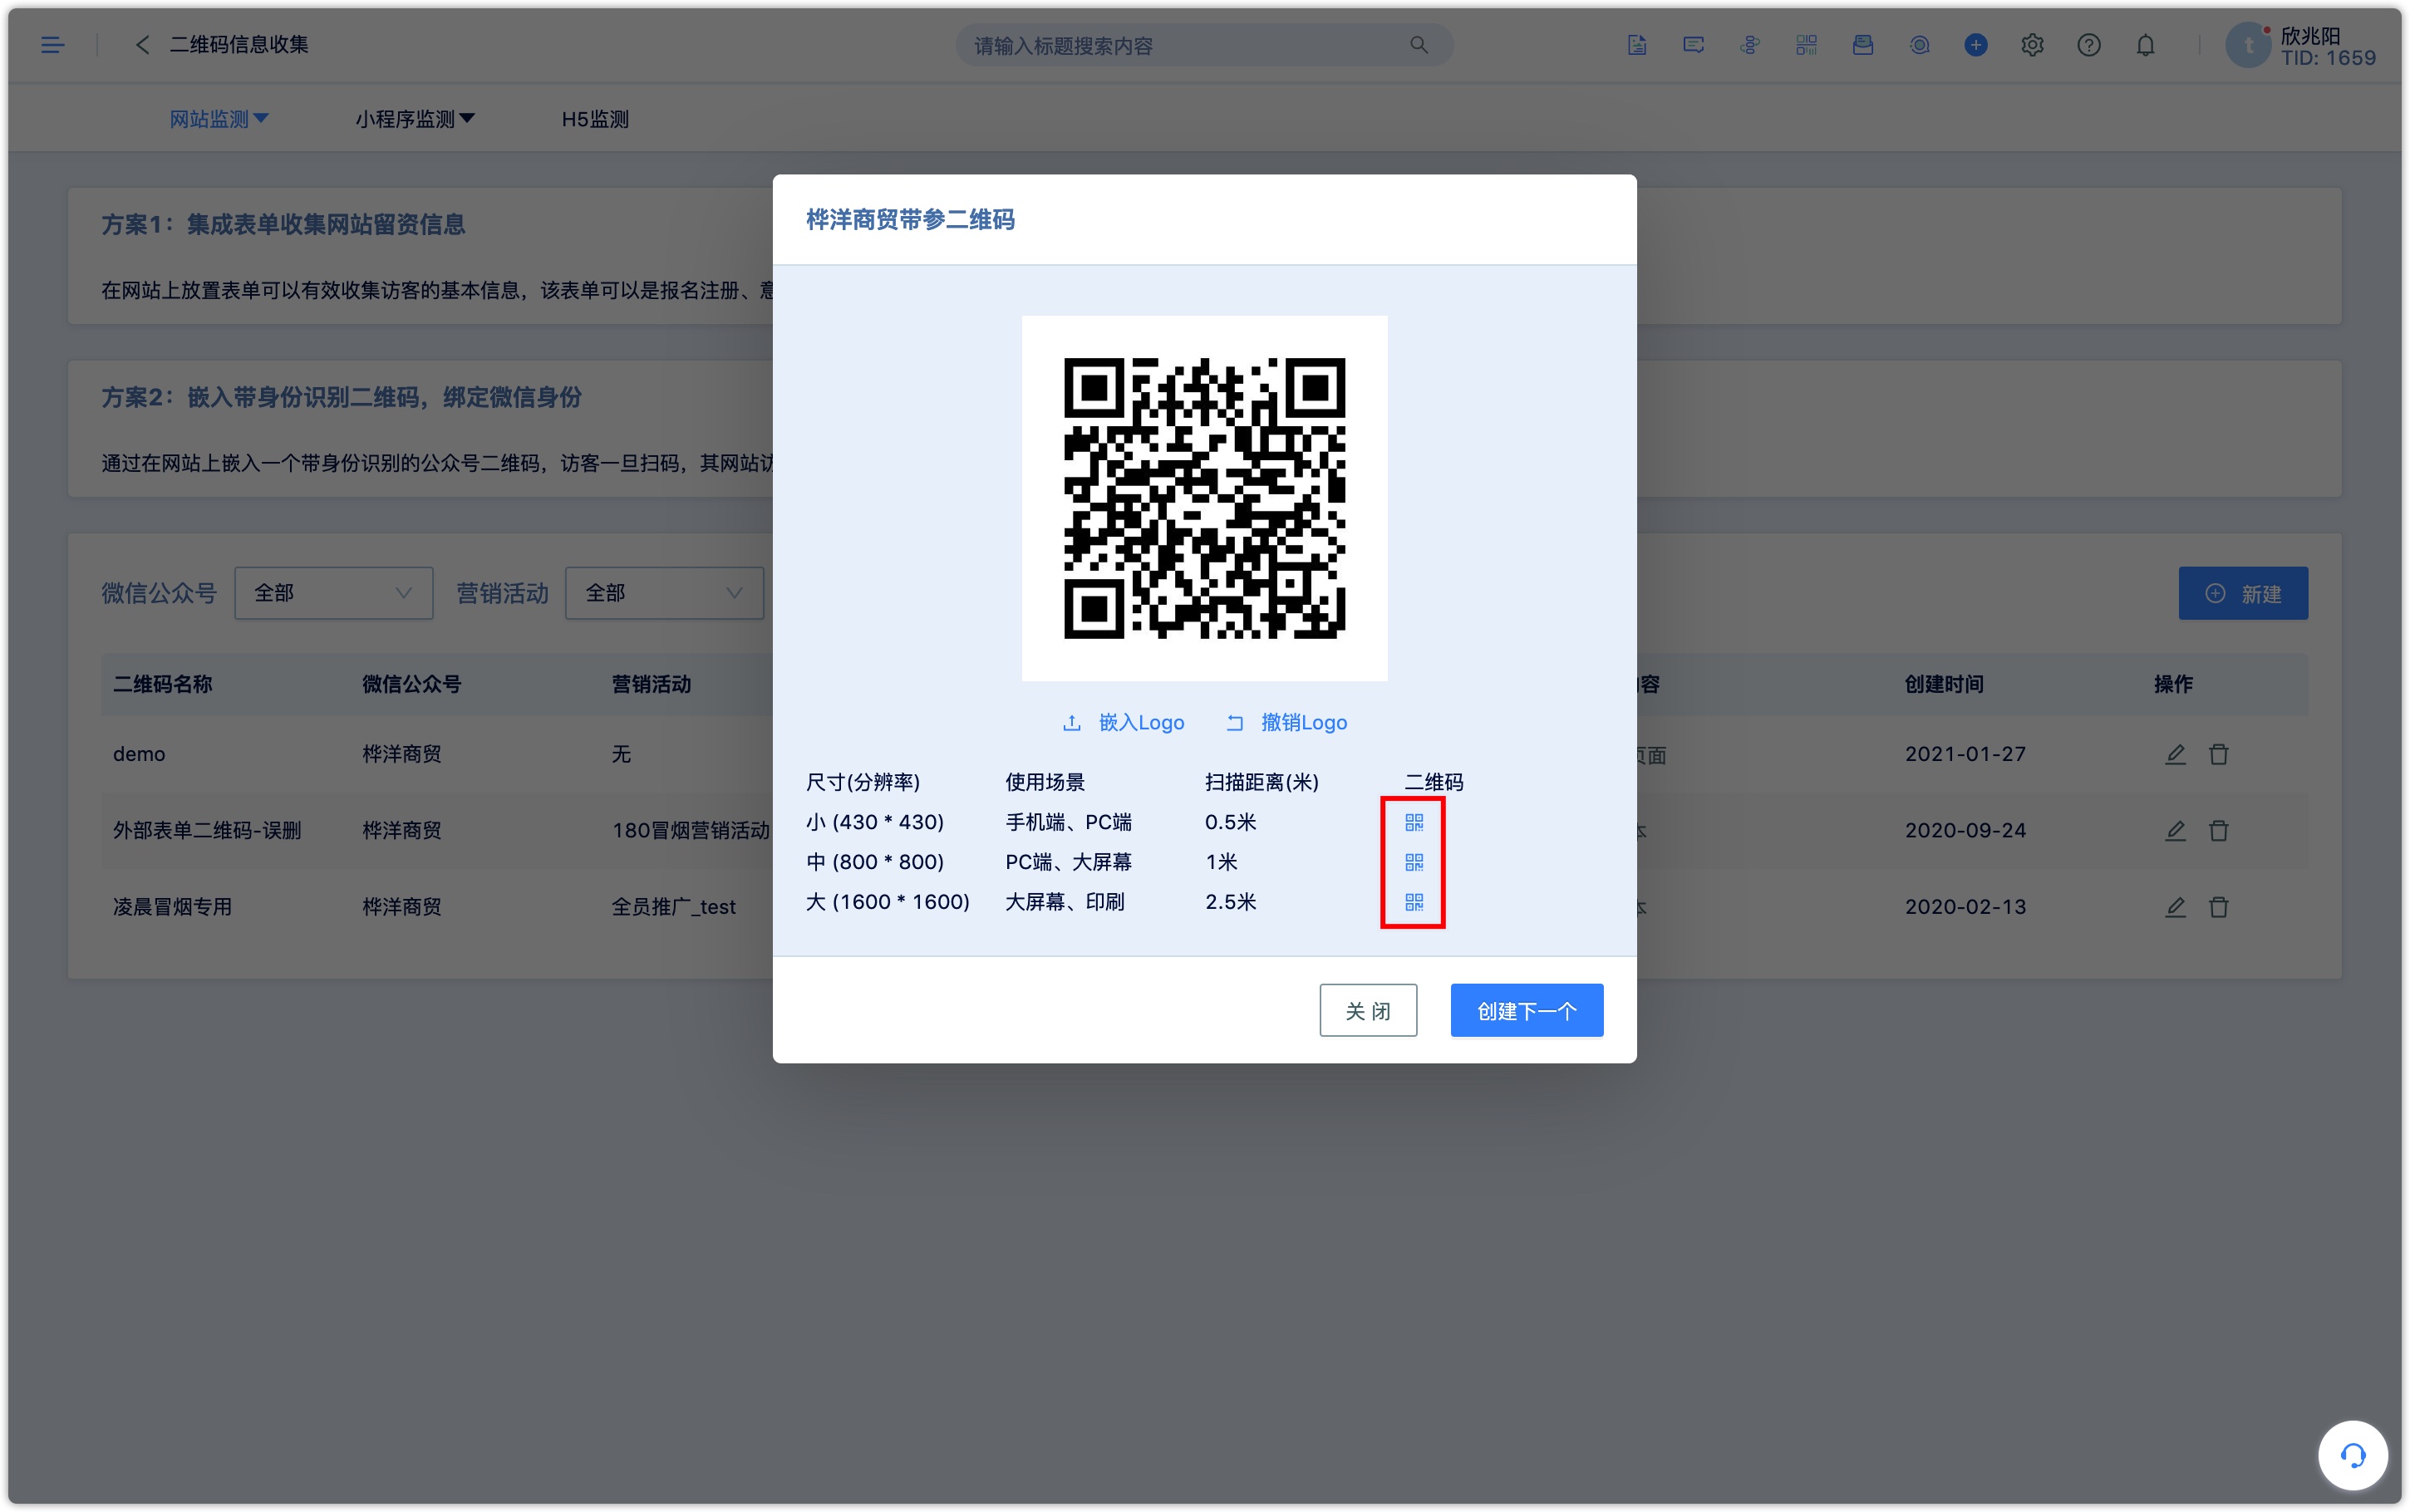
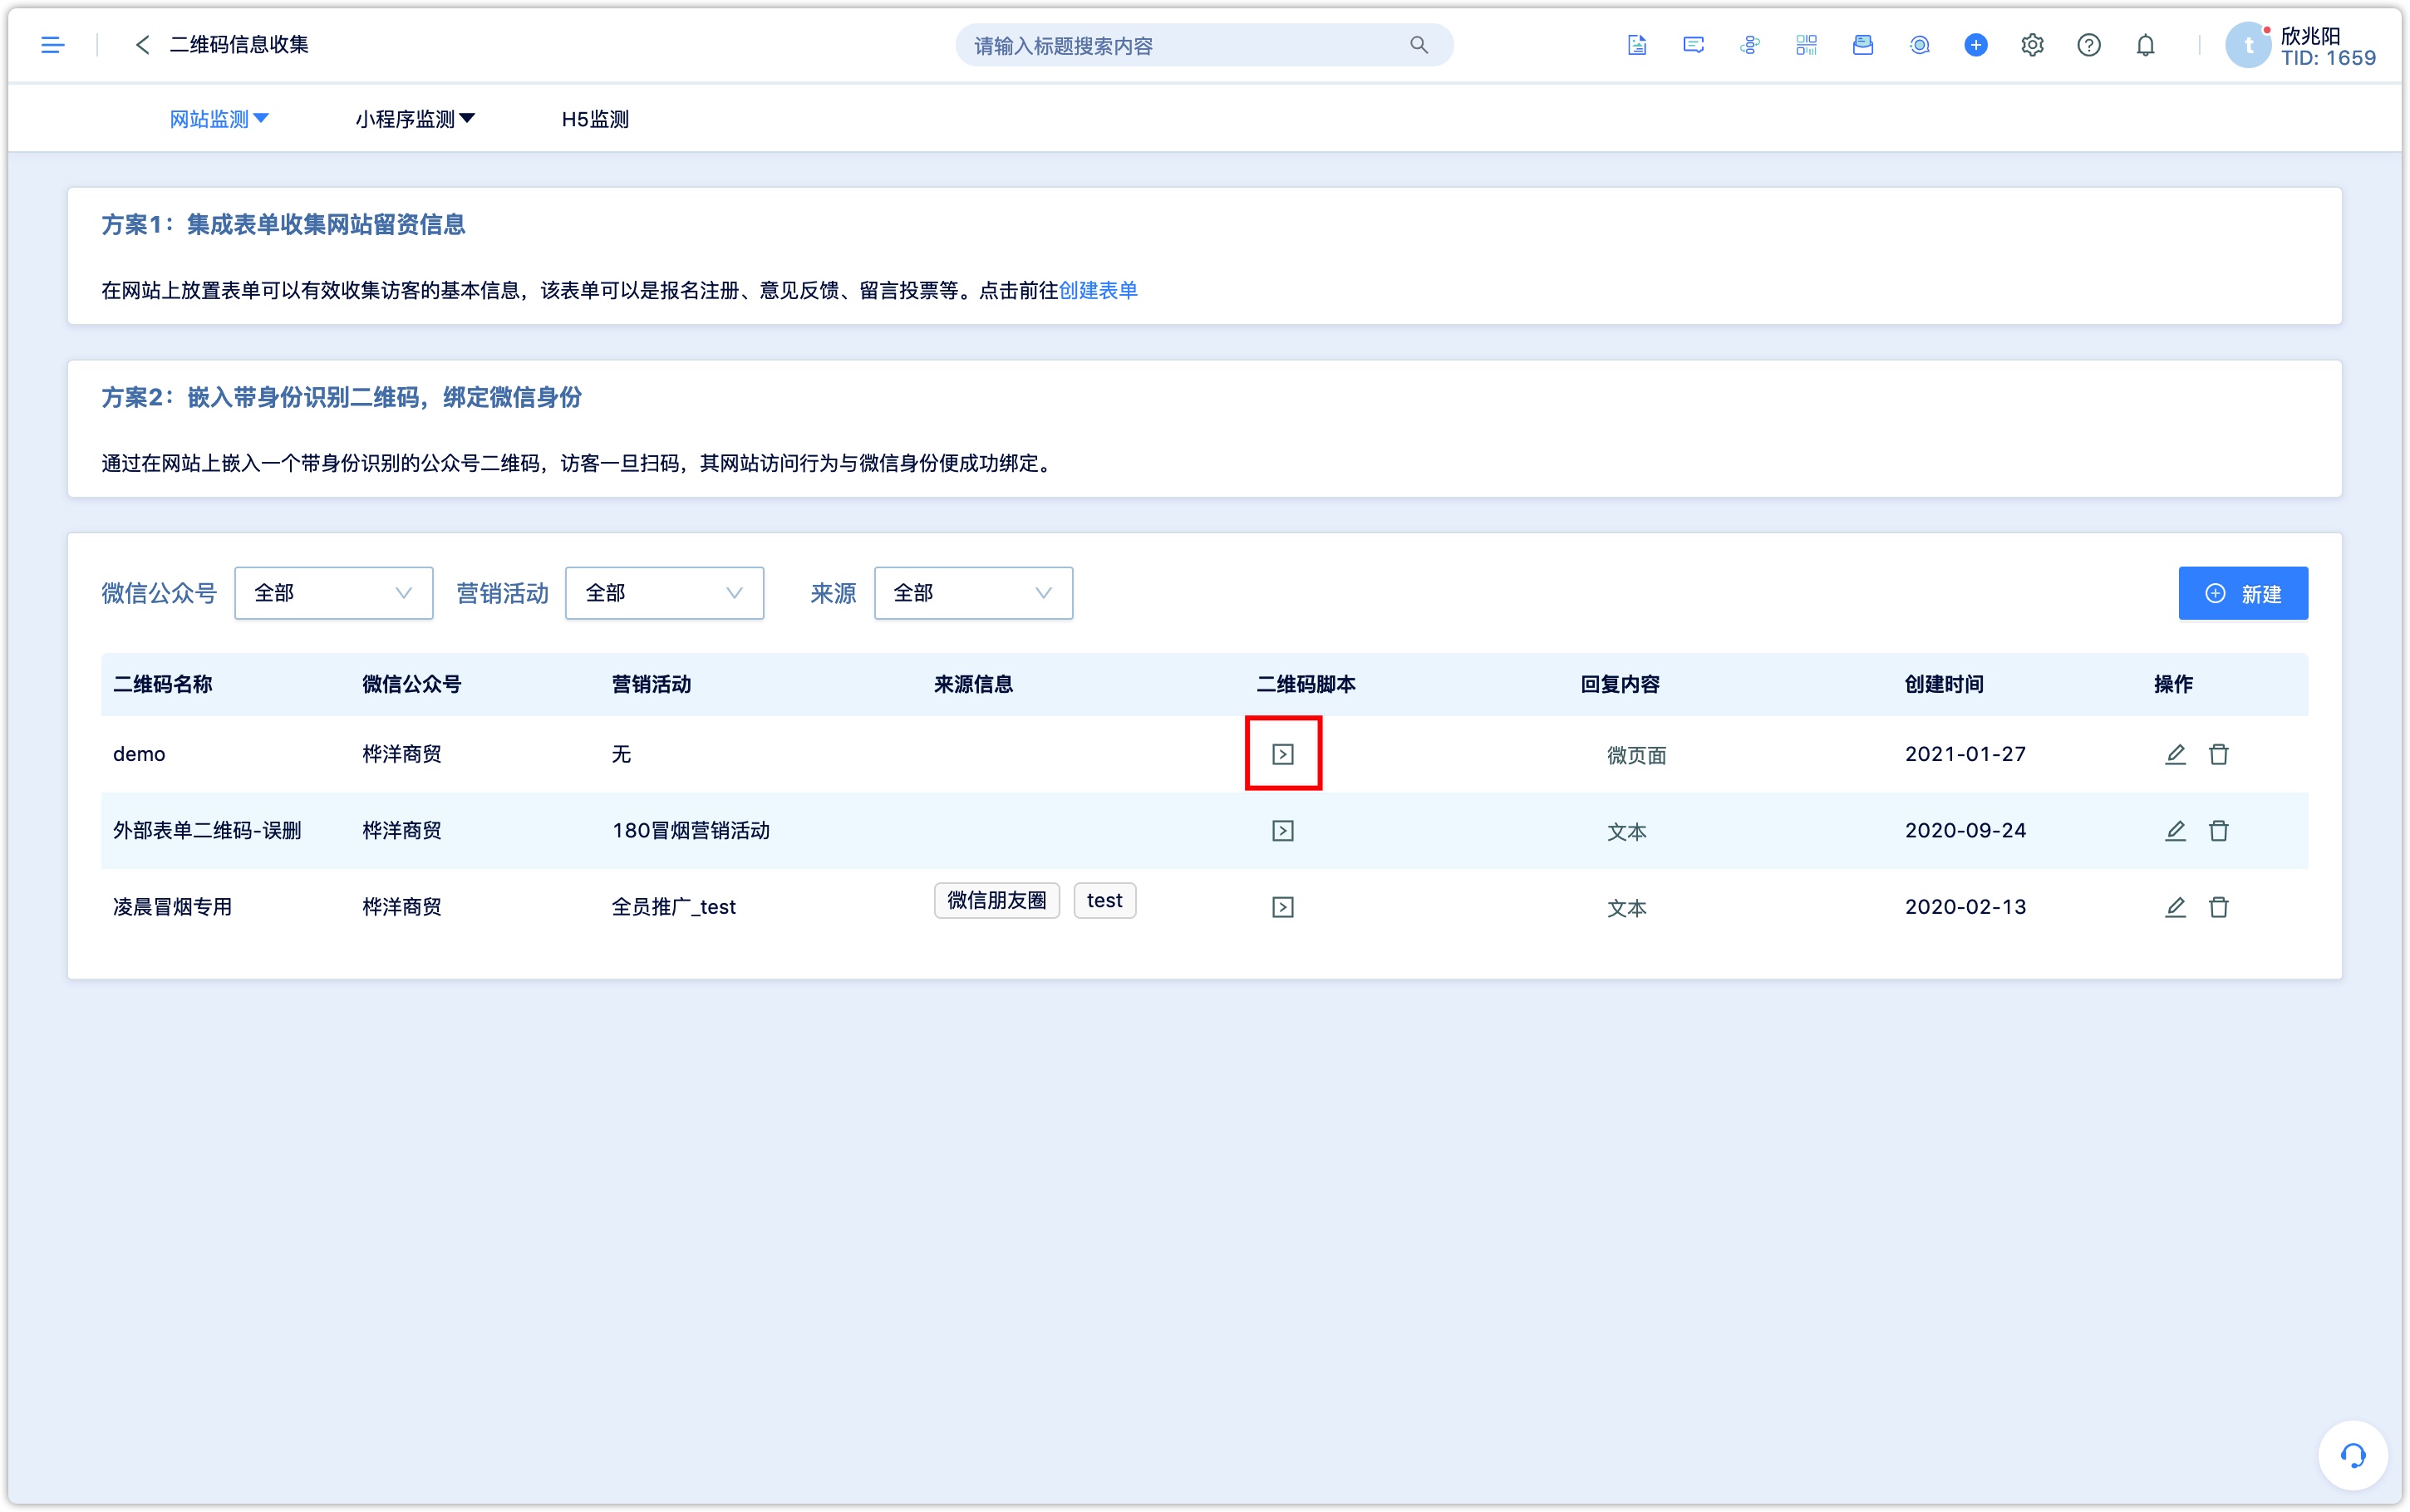
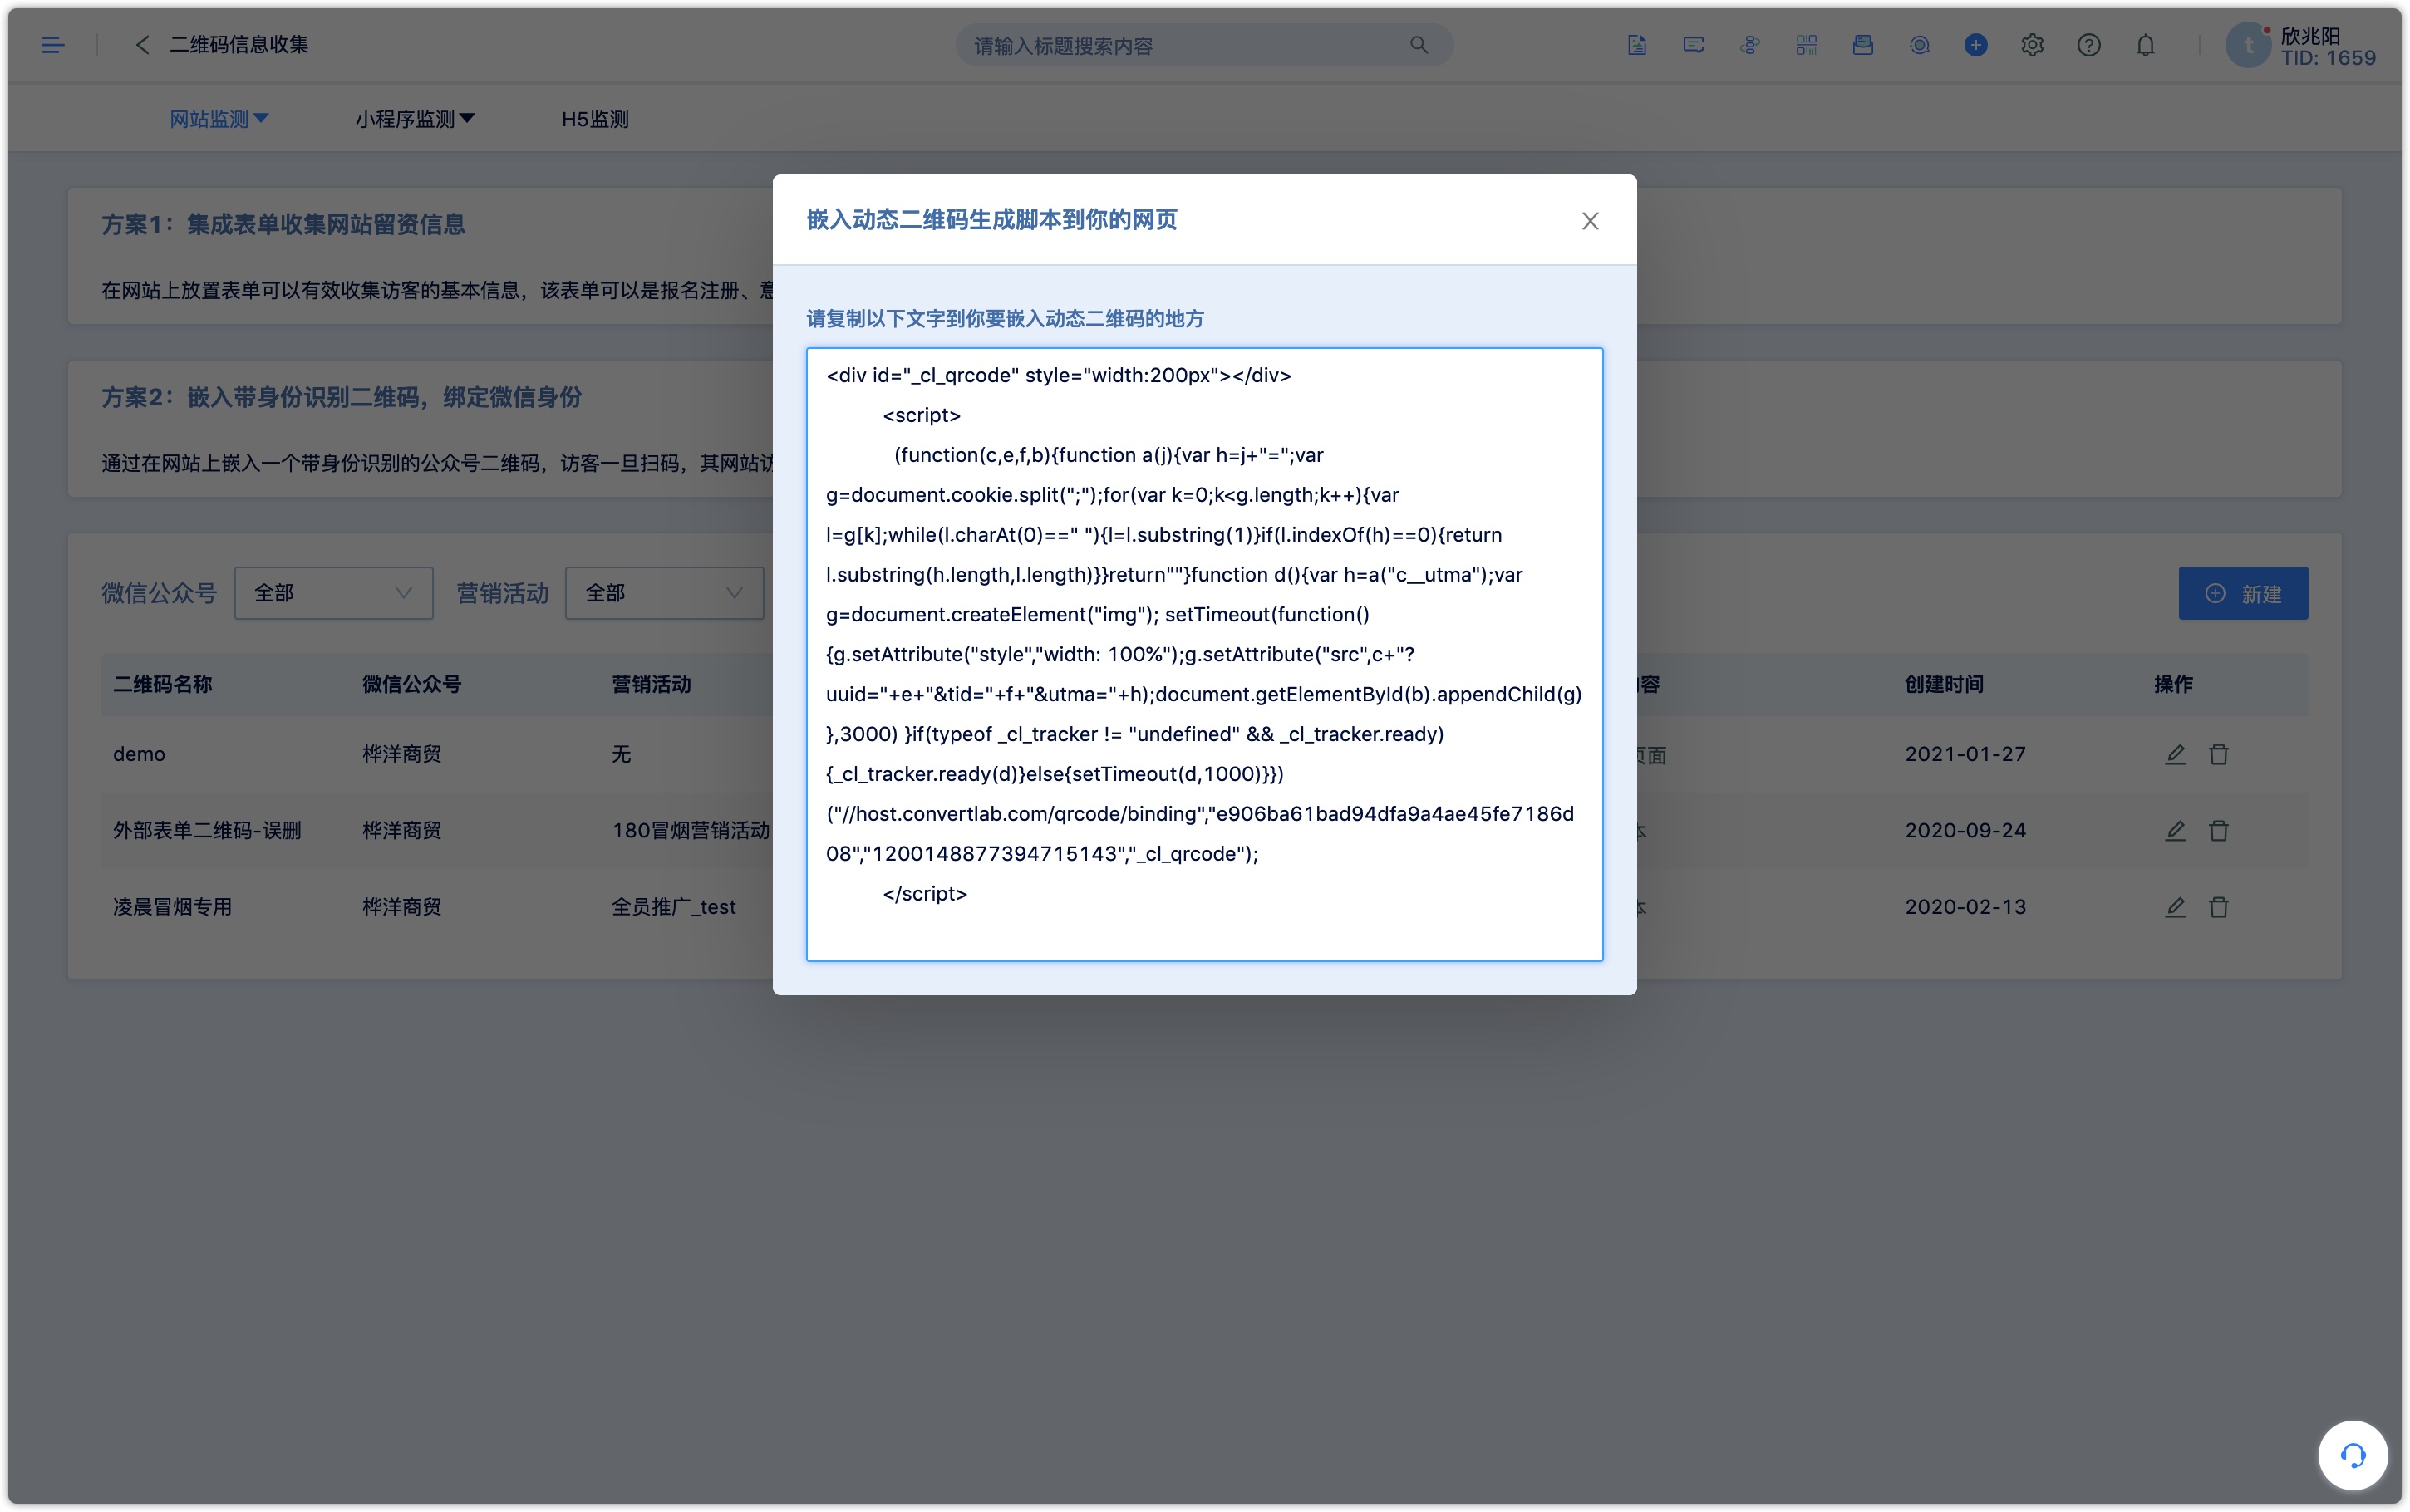
Obtain the QR code script from the list of QR codes with identity recognition, copy its code and embed it in the location where you want to display the QR code.
5.Track page click behavior
Tracking page click behavior is mostly used for strongly interactive pages, and real-time access is achieved by acquiring interactive behaviors, such as liking goods, adding to shopping carts, and so on. To capture these behaviors, you need to create events corresponding to the behaviors in the system, and then embed tracking code in the page. The setting steps are as follows:
5.1Create a new customer event and get the event id
[Setting Center]-[Event]-[Event], where:
Event name:It is recommended to fill in a name that has clear semantics and is closely related to customer behavior, such as: sign up, collect goods, add to shopping cart...
Event ID:This ID corresponds to the event that is actually being tacked in the page and the event name recorded by the DM Hub (please pay attention to the ID case, they should be exactly the same, otherwise the data cannot be passed in)
Scoring criteria:After filling in the corresponding score, as long as the customer triggers the event, the customer activity will increase the corresponding score
• Change Stage:After selecting a stage, the customer will advance to the corresponding stage after triggering the event. (Note: If the customer's stage is higher than this stage, it will not be downgraded to this stage)

Detailed operation please refer to document event description
5.2Carry out event tracking on the page
If you are embedding a point on a button or link on the official website or H5 page, you can add an attribute data-cl-event, the default is click:
<button data-cl-event="c_1461830492453">收藏</button>
If the event is not triggered by a link click, you need to use javascript to manually submit the custom event:
track:function(event,targetName,targetId,properties,callback)
- The properties parameter is optional, if there is a properties parameter, it will replace the properties of the page
- The callback parameter is optional. If there is a callback, call this method after completing the track sending action:
_cl_tracker.track('c_1461830492453','收藏商品','p001',{sku:'SN2016000',price:102.00});
The event tracking of the page access event (that is, a piece of code is embedded in the current page, and an event is recorded when the current page is accessed). This needs to be executed directly after the cbe resource (ie the code embedded in the website settings) is loaded. The sample code is as follows:
<script>
_cl_tracker.track('c_1479895689829','访问商城', ' targetid ');
</script>
5.3Statistics
Custom events will be directly recorded to the customer timeline. Custom events support various application modules such as advanced screening, triggering of auto-flow, and analyze by the analysis center.